

Basic Operations |
Page 17 |
2.Press the System button repeatedly until the character to the left in the display says “br” (for Bend Range).
3.Use the Program Up/Down buttons to the left of the display, to change the value.
The table on page 68 shows you how many semi-tones each value in the display represents.
If the Pitch Stick should be malfunctioning on startup, the display will scroll the message “PITCH BEND ERROR.”. The Nord Lead 2 will then work as usual, but the Pitch Stick will be disabled.
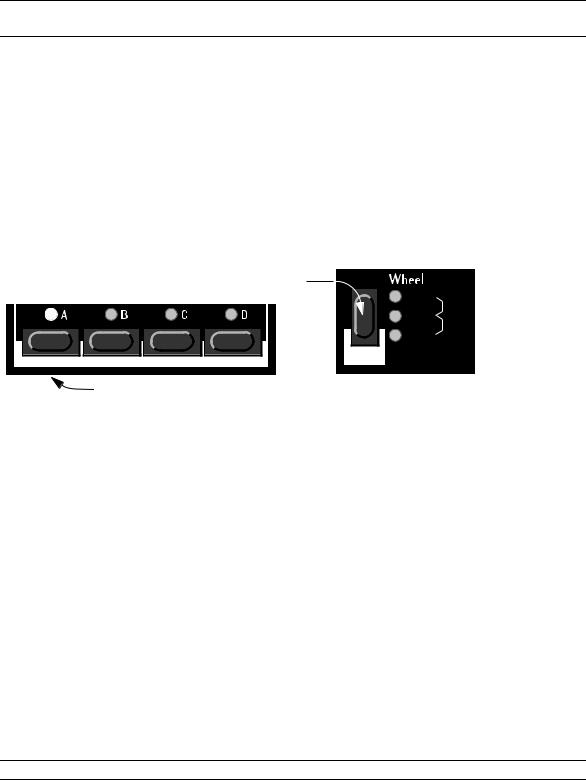
Modulation Wheel
The effect of moving the Modulation wheel can be different for each Program. You can change the function by pressing the button just above the Modulation wheel. It steps between five possibilities. A description of each can be found on page 53.
Master Tune
To tune the Nord Lead 2 to other instruments, proceed as follows:
1. Hold down the Shift button and press the button labelled Tune.
|
|
Hold down the Shift button... |
|
|
|
|
MORPH |
|
|
|
LFO 1 |
|
|
|
OSC 2 |
|
|
|
FM |
|
|
|
FILTER |
TUNE |
OUT MODE |
LOCAL |
SHIFT |
PROG. CTRL |
|||
...and press the button labelled Tune (the LED above the button lights up).
2.Use the Program Up/Down buttons to the left of the display, to change the value.
00 is normal 440Hz tuning. Lower pitches are indicated by a dot to the right of the number and values higher than normal pitch are indicated without a dot. The values are in cents (hundreds of a semitone).
3.Press the Shift button again.
Using a Sustain Pedal
A foot switch connected to the Sustain Pedal input works as a sustain pedal on a piano. Set it up as follows:
1.Hold down the Shift button, and press the “System” button.
2.Press the System button until the two first digits in the display are “SP”.
3.Use the Program Up/Down buttons to switch the right digit between “0” (Sustain Pedal – open when pressed) and “1” (Sustain pedal – closed when pressed).
4.Press the Shift button again.
Nord Lead 2 will also recognize Sustain Pedal messages via MIDI (Controller message 64).
Page 18 |
Basic Operations |
Using a Control (Expression) Pedal
As indicated in the illustration on page 8, a regular expression pedal can be connected to the Control Pedal input, using a stereo cable. The connected pedal will either duplicate the Modulation wheel or independently control one of a number of parameters. You can select different Control Pedal functions for each of the four Program slots. Set it up as follows:
1.Hold down the Shift button, and press the “Special” button.
2.Press the Special button repeatedly, until the left character in the display is an “E” (for “Expression Pedal”).
3.Select a slot for which you want to set the pedal function by pressing one of the buttons A to D.
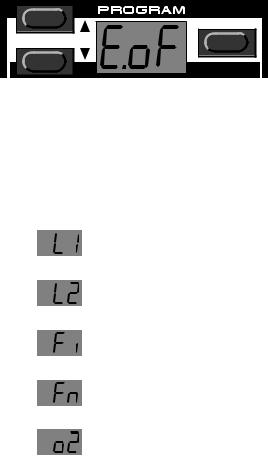
4.If you want the connected pedal to duplicate the functionality of the Modulation wheel, press the Program Down button until the display shows “Eof”).
STORE
With this setting, the expression pedal will have the same function as the Modulation wheel.
5.If you instead want to select an independent control function for the pedal, press Store.
The display will flash, showing one of the abbreviations in the table below.
6.‘Use the Program Up/Down buttons to select one of the following control functions:
Display shows: |
Pedal assigned to: |
||
|
|
|
|
|
|
|
|
|
|
|
LFO 1 Amount. |
|
|
|
|
|
|
|
|
|
|
|
|
|
|
|
LFO 2 Amount. |
|
|
|
|
|
|
|
|
|
|
|
|
|
|
|
Filter Cutoff Frequency. |
|
|
|
|
|
|
|
|
|
|
|
|
|
|
|
FM Amount. |
|
|
|
|
|
|
|
|
|
|
|
|
|
|
|
Oscillator 2 Pitch. |
|
|
|
|
|
|
|
|
|
|
|
|
7.After you have made your choice, press Store again.
You return to the “E” display.
8.Use the Program Up/Down buttons to select a control amount value (“1” to “7”).
This value (shown to the right in the display) determines the range of the pedal control signal. Lower values give a smaller difference between the pedal’s “full up” and “full down” states. High values give a big difference between the pedal’s up and down states.

Basic Operations |
Page 19 |
9.If needed, repeat steps 5 to 10 to set pedal control function for the other slots.
10.Press Shift to exit the Special menu and return to play mode.
Nord Lead 2 will also recognize Expression pedal messages via MIDI (Controller message 11).
The “Panic” button
If notes “get stuck” or the Nord Lead 2 behaves strangely all you need to do is hold down the Shift button and press “Panic” (the Distortion button in the Filter section). This will execute an internal All Notes Off, and reset certain parameters to normal values.
HP 24 db  LP 24 db
 LP 12 db
BP
NOTCH + LP
|
2 3 |
FULL |
|
|
1 |
||
VELOCITY |
DISTORTION |
||
3 |
PANIC
The Panic button.
Page 20 |
Basic Operations |