

Basic Operations |
Page 13 |
Layering
Activating
You can play more than one Program at a time. Proceed as follows:
1.Set up the Program slots to play the Programs you want to use.
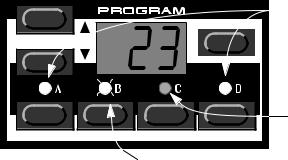
2.To activate more than one Program slot, simply press all the Program Slot buttons you want to use, at the same time.
All those slots’ LEDs light up. The one you pressed last is blinking. This will be the one you are editing from the front panel, but more on this on page 21.
STORE |
|
|
Slots A and D (LEDs lit) are activated. |
|
|
||
|
|
|
|
|
|
|
|
Slot C (LED dark) is not activated.
TUNE |
OUT MODE |
LOCAL |
PROG. CTRL |
Slot B (blinking) is selected. Any editing will apply to this Program slot.
Deactivating
To turn of the layer, press a slot button that is not part of the layer, or press all the buttons that make up the layer.
Polyphony
How many notes you can play when layering sounds depends on what Play modes and Unison settings each Program uses. See page 54.
Replacing One Program In the Layer
You might want to select another Program for one of the slots in the layer:
1.Press the Program Slot button that you want to select Programs for.
Its LED will flash to indicate it is the active slot.
2. Select a new Program for that slot.
Page 14 |
Basic Operations |
Splitting the Keyboard
The Keyboard Split function allows you to divide the keyboard in two sections, each playing a separate Program. This can be extremely useful when you are playing live, since it lets you use the Nord Lead 2 as if it were two independent synthesizers, with different sounds. When Keyboard Split is activated, Slots A and B will be played from the left part of the keyboard, while Slots C and D will be played from the right part. Activate Keyboard Split as follows:
1.Select Slot A and select a Program for it. This will be the sound heard when you play the left part of the keyboard.
2.Select Slot C and select a Program for it. This will be the sound heard when you play the right part of the keyboard.
3.Press the buttons for Slot A and C at the same time, so that the indicators above both buttons stay lit.
4.Press the Kbd Split button. The green indicator next to the button lights up to indicate that the keyboard is split.
CLEAR
 KBD SPLIT
SPLIT POINT
PERF. MODE
If you now play the keyboard, you will hear the sound of Slot A from the left part of the keyboard, and the sound of Slot C from the right part of the keyboard.
5. To exit the Keyboard Split mode, press the Kbd Split button again.
Setting the Split Point
You can set the Split Point (the key where the keyboard should be split) in the following way:
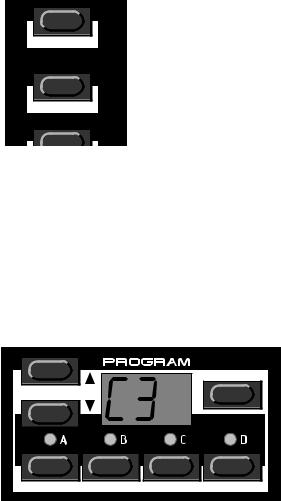
6.Hold down Shift and press the Kbd Split button.
The display shows the current Split Point for as long as you keep both buttons pressed.
STORE
TUNE |
OUT MODE |
LOCAL |
PROG. CTRL |
7.While holding down both the Shift and Kbd Split buttons, press the lowest key for the right-hand section of the keyboard. The display shows the name of the key you press.
8.Release the Shift and Kbd Split buttons.
Basic Operations |
Page 15 |
Combining Split and Layer
Since both Slots A and B will be played from the left part of the split keyboard, and Slots C and D from the right part, you could split the keyboard and still play layers on each keyboard half. Just select all the Slots you want to use, and activate Keyboard Split.
Selecting Performances
A Performance is a collection of four Programs, one for each slot. Furthermore, the Performance contains information about which Programs should be active (layered), and settings for Keyboard Split.
In fact, a Performance also contains information about what MIDI Channels to use for each slot, and a number of other settings, but this is described in detail on page 33. This text is only meant as a quick introduction to playing the factory Performances.
1.If you have the rack version of the Nord Lead 2, make sure you transmit on MIDI Channel 1.
This is because the factory Performances are set to receive on MIDI Channel 1.
2.Enter Performance mode by pressing Performance.
The display shows the latest selected Performance.
The Performances are organised in 10 Banks, named alphabetically from A to L (the letters I and K are excluded because they’re hard to write clearly on the display). In each Bank there are 10 Performances, for a total of 100. If you have a PCMCIA card inserted, the Banks on the card are found after the internal (ROM) Banks and labelled in the same way, but indicated with the digit 1, to the left in the display.
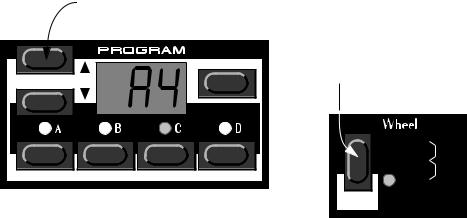
3.If you want to select another Bank (A to L), hold down Shift and press the Up and Down buttons.
4.To select a Performance in the Bank use the Up and Down buttons.
The Performance is instantly loaded and you can try it out. For a list of the factory Performances, see page 104.
Use the Up/Down buttons to change Performance (indicated by the digit 1-9 to the right in the display).
STORE
TUNE |
OUT MODE |
LOCAL |
PROG. CTRL |
If you hold down the Shift button, you can change Performance Bank (A-L) with the Up/Down buttons.
 MORPH
MORPH
LFO 1
 OSC 2
OSC 2
FM
FILTER
SHIFT
5. When you are done, exit Performance mode by again holding down Shift and pressing Performance (Manual).
Page 16 |
Basic Operations |
Monophonic and Polyphonic Operation
For each Program you can set a Play Mode (Poly, Mono, Legato). The exact nature of these modes is described on page 54.
To make a sound fatter, you can activate Unison. This reduces polyphony. See page 55 for details.
Press this button to turn |
POLY |
|
Unison on and off. The LED |
LEGATO |
|
above the button indicates |
|
|
UNISON |
MONO |
AUTO |
that Unison is activated. |
|
|
MIDI CH |
SPECIAL |
SYSTEM |
Stereo/Mono
If you are using more than one output, or headphones, you might want to know something about how the sounds get positioned in the stereo image.
The complex answer is that this depends on the Out Mode settings as described on page 59. However, the simple truth is that in the basic mode, which the Nord Lead 2 is set to when it comes from the factory, all Programs are in mono. In fact, there’s one exception: If a Program is set to Unison, the instrument is switched to stereo operation.
Pitch Stick and Modulation Wheel
Pitch Stick
The Pitch Stick is used to bend the notes, just as with a pitch bend wheel on traditional instruments. The pitch stick differs from other pitch bend devices in a couple of ways:
▼There is no dead centre in the middle of the throw. This allows you to use the pitch stick for natural vibrato, pretty much like a guitarist can.
▼The effect on pitch is logarithmic, that is, the further you move the stick away from the centre position, the more drastic the effect will be.
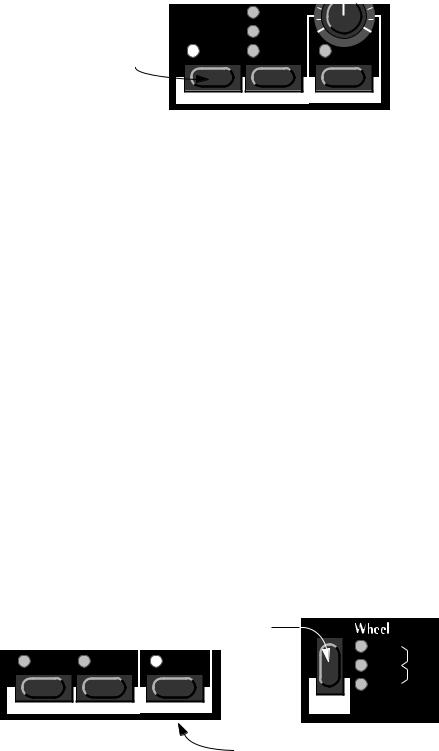
To set the range of the Pitch Stick, proceed as follows:
1. Hold down the Shift button and press the button labelled System.
Hold down the Shift button...
|
|
|
MORPH |
UNISON |
MONO |
AUTO |
LFO 1 |
OSC 2 |
|||
|
|
|
FM |
|
|
|
FILTER |
MIDI CH |
SPECIAL |
SYSTEM |
SHIFT |
|
...and press the button labelled System (the LED above the button lights up).