


MIDI |
Page 73 |
Bulk Dump
To dump one or more Programs or Performances via MIDI as System Exclusive data, for reprogramming of another Nord Lead 2 or for recording the data into another MIDI device, proceed as follows:
1.Connect a cable from MIDI Out on the Nord Lead 2 to MIDI In on the other device.
2.Set up the receiving device so that it accepts System Exclusive data.
3.To Dump Performances, enter “Performance Mode” (see page 33). To Dump Programs or Percussion Kits, make sure you are not in Performance mode.
4.If you want to transmit one Program/Performance only, select it.
5.If needed, set the other device to its “recording mode”.
6.Hold down the Shift button and press “Dump One” (Oct Shift +) to transmit the current Program/Performance only or “Dump All” (Oct Shift –) to transmit all Programs/Performances.
To receive a Bulk Dump, proceed as follows:
1.Connect a cable from MIDI Out on the transmitting device to MIDI In on the Nord Lead 2.
2.If you are about to receive a complete Bank, you need to scroll to a program number in the Bank (single Sound Bank or Performance Bank) you want to replace with the received Bank.
3.Initiate the transmission on the transmitting device.
If the dump contained a complete Bank, it will take the place of the selected Bank in the Nord Lead 2. If the dump contained one Program/Performance only, this will be put in the “edit buffer” of the active slot, instead of the Program/Performance you were playing. However, it is not saved permanently. To save it, use Store as described on page 22 and page 35.
Remember that any Percussion Kits in a Performance, will only be included as “references” when you dump the Performance. If you want to dump Percussion Kits including all parameters, you have to be in Program mode!
Page 74 |
MIDI |
About Subtractive Synthesis |
Page 75 |
11. About Subtractive
Synthesis
Introduction
Subtractive synthesis is one of the oldest and most widely spread forms of synthesizing sounds. It is the method employed in such classics as the Moog synthesizers, the Sequential Prophet-5 and 10, Arp synthesizers, most Oberheim synthesizers, the Roland Jupiter models, the TB-303 etc; the list is practically endless. Even new digital instruments such as workstations and sample playback devices employ many of the basic principles of subtractive synthesis.
With the first Nord Lead, Clavia introduced a new concept: a modern digital instrument that combined a faithful reproduction of the behaviour of the old analog favourites with the convenience and stability of the newer designs. The Nord Lead 2 takes this concept even further, adding valuable new features and functionalities.
The purpose of this chapter is to give you a quick introduction to this world of subtractive synthesis as used in he Nord Lead 2 and its analog predecessors. If you’d like to know more, there are number of text books on the subject.
The Building Blocks
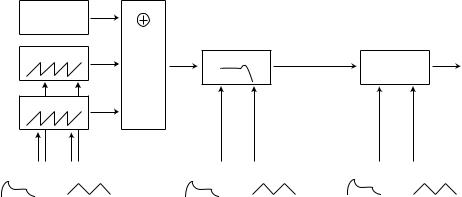
Subtractive synthesis started its life in modular synthesizers, large cabinets housing separate electronic modules, connected via patch cords. With the advancement of technology, the functionality of many of these modules could be put onto one single circuit board. But functionality-wise, subtractive synthesizers are still built out of the same modules (or building blocks) as they were decades ago.
We will now take a closer look at these building blocks. Let’s first talk about the three that actually create and process sound:
Oscillator
The Oscillator is actually the only thing in a synthesizer that actually produces any sound, (all the other modules only shape the sound from the oscillator.) The oscillator is a bit like the string on a string instrument, it vibrates to create sound.
Filter
The signal from the oscillator is sent through the Filter which shapes the timbre of the sound to make it “bright”, “dull”, “thin”, etc.
Amplifier
The Amplifier shapes the volume of the sound making it “soft” or “hard”, “slow” or “short”.
In addition to these major three modules all synthesizers also have “modulators”, devices that can make the volume, timbre pitch and other qualities of sound vary continuously when you play a key. It is these modulators that basically add animation to the sound, taking it from a dull organ drone to a dynamic and interesting timbre. The two most common modulators are Envelopes and LFOs:
Page 76 |
About Subtractive Synthesis |
Envelopes
An envelope is used to give a sound a “shape”. If you apply an envelope to the amplifier (which controls the volume) you are able to make the sound for example slowly fade in and then fade out when you press and hold a key.
LFOs
LFO is an abbreviation for Low Frequency Oscillator. It is used for repeating variations in a sound, such as vibrato or tremolo.
Connections
There are many ways in which the modules outlined above can be connected in a synthesizer, but the one in the picture below is a basic and common one, used in the Nord Lead 2 (although the illustration depicts far from all the possibilities in this instrument!)
Noise |
Mixer |
|
Oscillator |
Filter |
Amplifier |
|
||
|
|
Output |
Oscillator |
Envelope |
|
LFO |
|
Envelope |
|
LFO |
|
Envelope |
|
LFO |
|
|
|
|
|
|
|
|
|
|
|
 Audio Signal
 Control Signal
Note that the horizontal lines indicate the way the sound travels. The vertical lines indicate control signals. The envelopes for example only modulate (control) the oscillator, filter and amplifiers, they do not affect the sound directly.
The Oscillators and Waveforms
The two basic qualities of an oscillator is waveform and pitch.
Pitch
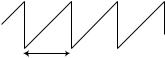
The picture of the sawtooth on the Nord Lead 2 front panel displays a sawtooth during one period of sound. During this time, the wave raises gradually up to maximum level and then instantly drops back to minimum level.
About Subtractive Synthesis |
Page 77 |
The length of the period determines the pitch (frequency) of the sound. The shorter the period, the higher the pitch. If you for example make the oscillator play at a frequency of 440Hz, there will be 440 periods of identical Sawtooth waves generated per second.
One Period
Normally there are three ways to change the frequency of an oscillator:
▼By making settings on the front panel.
On the Nord Lead 2 for example, you have an “Oct Shift” setting for both oscillators and separate Semitone and Fine Tune adjustments for Oscillator 2.
▼By playing the keyboard.
The keyboard is if course connected to the oscillator so that pressing different key produces different pitches. In some cases this connection can be turned off, so that the oscillator always plays the same pitch, regardless of which key is pressed. In the Nord Lead 2, this can be done for Oscillator 2, by deactivating “Kbd Track”.
▼By Modulation
Modulation allows you to make the pitch vary “automatically”. The most common example is probably to use an LFO to make pitch go up and down, to create a vibrato. But you can also put the pitch under envelope control, or make the pitch vary with your striking force (velocity).
Waveform
The waveform of the oscillator affects its harmonic content and thereby its “sound quality” (timbre). The three most common waveforms are sawtooth, pulse wave and triangle.
Looking at the shape of a waveform tells very little about how it sounds. Instead, there’s a better way to draw it, called a spectrum. Let’s introduce some quick theory:
Mathematically, all waveforms can be considered as built from a number of harmonics, added together.
Each of the harmonics consists of a sine wave, the purest and simple waveform there is (a sine wave has no harmonics at all). In other words, if you add a number of sine waves together, each one with its own pitch (frequency) and volume (amplitude), then you can build any waveform you like.
The lowest harmonic is called the fundamental. The fundamental determines the basic pitch of the sound. If the fundamental has a frequency of 440Hz, we will perceive the entire sound as having a pitch of 440Hz.
Other harmonics are then added to the fundamental, called overtones. Normally the first overtone appears at a frequency twice the fundamental (in our example 880 Hz). The next harmonic appears at a frequency three times the fundamental (in our example 1320Hz) and so on.
In a spectral display of a waveform you can see the frequency (pitch) of each harmonic and its amplitude (level). This is done by drawing each harmonic as a line raising up from a horizontal scale.
Each line’s position on this scale indicates the harmonic’s frequency. The line furthest to the left is the fundamental, the next is the first harmonic etc. To make life easier, one usually doesn’t label the horizontal scale with frequency in Hz, but rather with the number of the harmonic.
Page 78 |
About Subtractive Synthesis |
The height of each line represents the amplitude of each harmonic.
If you understand the principle, you also understand that if the harmonics with high numbers have a high amplitude, the sound will be perceived as bright.
Let’s take a look at some common waveforms and their spectra.
In the illustrations below, only some of the first harmonics are displayed. In reality, waveforms like these have an infinite amount of harmonics.
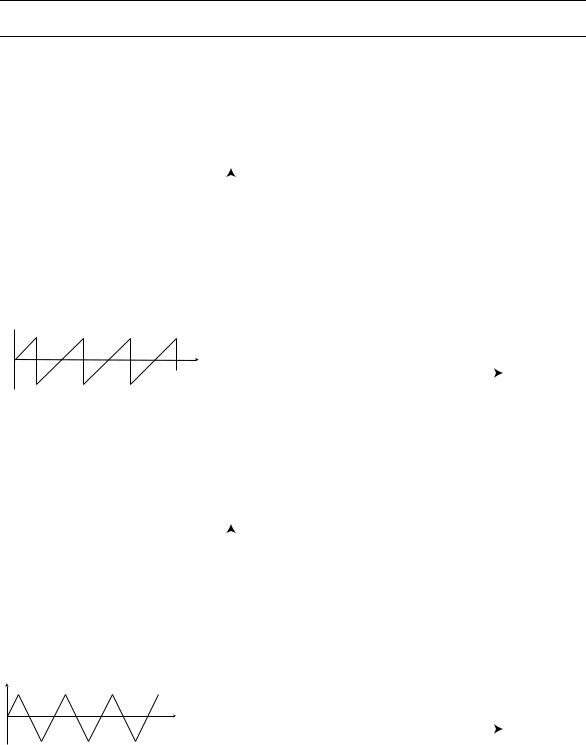
Sawtooth
The Sawtooth wave has a simple spectrum. All harmonics are present in the wave, in proportional values. As you can see, the high harmonics have a fairly high amplitude, which makes this waveform sound bright.
Amplitude
 Amplitude
Time
Harmonic number
10 |
20 |
30 |
40 |
(Frequency) |
Triangle
The triangle wave does not have very strong harmonics. Furthermore they only appear at odd harmonic numbers. The first fact makes the tone pure, a bit like a flute, and the second fact gives the sound a slightly “hollow” character.
Amplitude |
Time |
Amplitude |
|
|
|
|
|
|
|
|
Harmonic number |
10 |
20 |
30 |
40 |
(Frequency) |
About Subtractive Synthesis |
Page 79 |
Pulse Wave
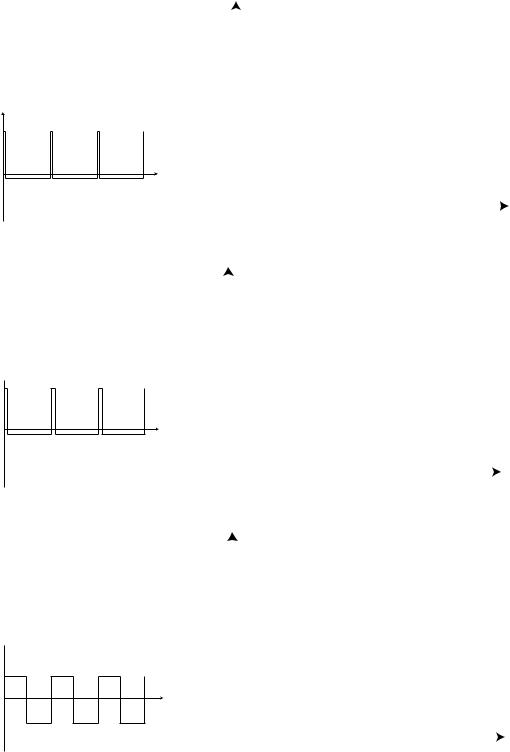
The pulse wave is slightly more complicated, because it is not one waveform, it is many different ones. A pulse wave is a waveform that during one period jumps once between full positive amplitude and full negative and then back.The thing that can be varied is where within the period you jump from maximum to minimum amplitude. Let’s look at three examples:
Amplitude
Amplitude |
|
|
|
|
5% |
|
|
|
|
Time |
|
|
|
|
95% |
|
|
|
|
|
|
|
|
Harmonic number |
10 |
20 |
30 |
40 |
(Frequency) |
Amplitude |
|
|
|
|
 Amplitude 10%
Time |
90% |
|
|
|
|
Harmonic number |
10 |
20 |
30 |
40 |
(Frequency) |
Amplitude
 Amplitude
50% |
Time |
50% |
|
|
|
|
Harmonic number |
10 |
20 |
30 |
40 |
(Frequency) |
Page 80 |
About Subtractive Synthesis |
In the first, the jump happens 5% in from the beginning of the period. This is referred to as a pulse wave with a 5% pulse width (sometimes called duty cycle). The second wave has a pulse width of 10%. The third wave has a pulse width of 50%.
This third wave is a special case of the pulse wave, called a square wave, and this has one peculiarity, it only contains odd number harmonics, which gives it a “hollow” quality.
On many synthesizers (including the Nord Lead) the pulse width can be adjusted, to set the timbre of the pulse wave. The more narrow the pulse width, the more “thin” the sound will be.
You can also have the pulse width vary continuously, for example from an LFO or envelope. This is referred to as pulse width modulation. Modulating pulse widths from an LFO creates a rich, chorus-like effect often used in “string” sounds.
About Inharmonic Spectra
Above we have only discussed spectra where the overtones appear at perfect harmonics. While this is true for the basic waveforms discussed above, it is definitely not true for all sound. If you for example use the frequency modulation (FM) or Ring Modulation capabilities in the Nord Lead 2, with the two oscillators set to an “unusual” interval (not octaves or fifths, for example), you will get a spectrum where the overtones appear at frequencies somewhere between the perfect harmonics. This results in an inharmonic sound, which often sounds “metallic”.
Amplitude
Amplitude |
Time |
|
|
|
|
|
|
|
|
|
|
|
|
Harmonic number |
|
|
|
|
|
|
|
|
|
|
|
|
|
|
|
|
|
|
|
|
|
|
|
|
|
|
|
|
|
|
|
|
|
|
|
|
|
|
|
|
|
|
|
|
|
|
|
|
|
|
|
|
|
|
|
|
|
|
|
|
|
|
|
|
|
|
|
|
|
|
|
|
|
|
|
|
|
|
|
|
|
|
|
|
|
|
|
|
|
|
|
1 |
2 |
3 |
4 |
5 |
|
6 |
7 |
8 |
|
(Frequency) |
||
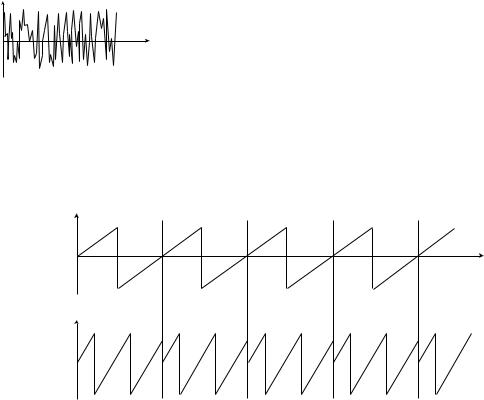
Sync
One some instruments (including the Nord Lead 2), two Oscillators can be synchronized. If you for example synchronize Oscillator 2 to Oscillator 1, Oscillator 2 will start over with a new period of the waveform, each time Oscillator 1 does so. If Oscillator 2 then has a higher frequency than 1, it will get a complex waveform that depends both on its own pitch and on that of the other oscillator.
Oscillator 1
Oscillator 2 (synchronized) 