- •Features
- •1. Pin Configurations
- •1.1 Pin Descriptions
- •1.1.3 Port B (PB5:PB0)
- •1.1.4 RESET
- •2. Overview
- •2.1 Block Diagram
- •3. General Information
- •3.1 Resources
- •3.2 Code Examples
- •3.3 Data Retention
- •4. CPU Core
- •4.1 Architectural Overview
- •4.2 ALU – Arithmetic Logic Unit
- •4.3 Status Register
- •4.3.1 SREG – Status Register
- •4.4 General Purpose Register File
- •4.5 Stack Pointer
- •4.5.1 SPL - Stack Pointer Low.
- •4.6 Instruction Execution Timing
- •4.7 Reset and Interrupt Handling
- •4.7.1 Interrupt Response Time
- •5. Memories
- •5.2 SRAM Data Memory
- •5.2.1 Data Memory Access Times
- •5.3 EEPROM Data Memory
- •5.3.1 EEPROM Read/Write Access
- •5.3.2 Atomic Byte Programming
- •5.3.3 Split Byte Programming
- •5.3.4 Erase
- •5.3.5 Write
- •5.3.6 Preventing EEPROM Corruption
- •5.4 I/O Memory
- •5.5 Register Description
- •5.5.1 EEARL – EEPROM Address Register
- •5.5.2 EEDR – EEPROM Data Register
- •5.5.3 EECR – EEPROM Control Register
- •6. System Clock and Clock Options
- •6.1 Clock Systems and their Distribution
- •6.2 Clock Sources
- •6.2.1 External Clock
- •6.2.2 Calibrated Internal 4.8/9.6 MHz Oscillator
- •6.2.3 Internal 128 kHz Oscillator
- •6.2.4 Default Clock Source
- •6.3 System Clock Prescaler
- •6.3.1 Switching Time
- •6.4 Register Description
- •6.4.1 OSCCAL – Oscillator Calibration Register
- •6.4.2 CLKPR – Clock Prescale Register
- •7. Power Management and Sleep Modes
- •7.1 Sleep Modes
- •7.1.1 Idle Mode
- •7.1.2 ADC Noise Reduction Mode
- •7.2 Minimizing Power Consumption
- •7.2.1 Analog to Digital Converter
- •7.2.2 Analog Comparator
- •7.2.4 Internal Voltage Reference
- •7.2.5 Watchdog Timer
- •7.2.6 Port Pins
- •7.3 Register Description
- •7.3.1 MCUCR – MCU Control Register
- •8. System Control and Reset
- •8.0.1 Resetting the AVR
- •8.1 Reset Sources
- •8.1.2 External Reset
- •8.1.4 Watchdog Reset
- •8.2 Internal Voltage Reference
- •8.3 Watchdog Timer
- •8.4 Register Description
- •8.4.1 MCUSR – MCU Status Register
- •8.4.2 WDTCR – Watchdog Timer Control Register
- •9. Interrupts
- •9.1 Interrupt Vectors
- •9.2 External Interrupts
- •9.2.1 Low Level Interrupt
- •9.2.2 Pin Change Interrupt Timing
- •9.3 Register Description
- •9.3.1 MCUCR – MCU Control Register
- •9.3.2 GIMSK – General Interrupt Mask Register
- •9.3.3 GIFR – General Interrupt Flag Register
- •9.3.4 PCMSK – Pin Change Mask Register
- •10. I/O Ports
- •10.1 Overview
- •10.2 Ports as General Digital I/O
- •10.2.1 Configuring the Pin
- •10.2.2 Toggling the Pin
- •10.2.3 Switching Between Input and Output
- •10.2.4 Reading the Pin Value
- •10.2.5 Digital Input Enable and Sleep Modes
- •10.2.6 Unconnected Pins
- •10.3 Alternate Port Functions
- •10.3.1 Alternate Functions of Port B
- •10.4 Register Description
- •10.4.1 MCUCR – MCU Control Register
- •10.4.2 PORTB – Port B Data Register
- •10.4.3 DDRB – Port B Data Direction Register
- •10.4.4 PINB – Port B Input Pins Address
- •11. 8-bit Timer/Counter0 with PWM
- •11.1 Features
- •11.2 Overview
- •11.2.1 Registers
- •11.2.2 Definitions
- •11.3 Timer/Counter Clock Sources
- •11.4 Counter Unit
- •11.5 Output Compare Unit
- •11.5.1 Force Output Compare
- •11.5.2 Compare Match Blocking by TCNT0 Write
- •11.5.3 Using the Output Compare Unit
- •11.6 Compare Match Output Unit
- •11.6.1 Compare Output Mode and Waveform Generation
- •11.7 Modes of Operation
- •11.7.1 Normal Mode
- •11.7.2 Clear Timer on Compare Match (CTC) Mode
- •11.7.3 Fast PWM Mode
- •11.7.4 Phase Correct PWM Mode
- •11.8 Timer/Counter Timing Diagrams
- •11.9 Register Description
- •11.9.1 TCCR0A – Timer/Counter Control Register A
- •11.9.2 TCCR0B – Timer/Counter Control Register B
- •11.9.3 TCNT0 – Timer/Counter Register
- •11.9.4 OCR0A – Output Compare Register A
- •11.9.5 OCR0B – Output Compare Register B
- •11.9.6 TIMSK0 – Timer/Counter Interrupt Mask Register
- •11.9.7 TIFR0 – Timer/Counter 0 Interrupt Flag Register
- •12. Timer/Counter Prescaler
- •12.1 Overview
- •12.2 Prescaler Reset
- •12.3 External Clock Source
- •12.4 Register Description.
- •12.4.1 GTCCR – General Timer/Counter Control Register
- •13. Analog Comparator
- •13.1 Analog Comparator Multiplexed Input
- •13.2 Register Description
- •13.2.1 ADCSRB – ADC Control and Status Register
- •13.2.2 ACSR– Analog Comparator Control and Status Register
- •13.2.3 DIDR0 – Digital Input Disable Register 0
- •14. Analog to Digital Converter
- •14.1 Features
- •14.2 Overview
- •14.3 Operation
- •14.4 Starting a Conversion
- •14.5 Prescaling and Conversion Timing
- •14.6 Changing Channel or Reference Selection
- •14.6.1 ADC Input Channels
- •14.6.2 ADC Voltage Reference
- •14.7 ADC Noise Canceler
- •14.8 Analog Input Circuitry
- •14.9 Analog Noise Canceling Techniques
- •14.10 ADC Accuracy Definitions
- •14.11 ADC Conversion Result
- •14.12 Register Description
- •14.12.1 ADMUX – ADC Multiplexer Selection Register
- •14.12.2 ADCSRA – ADC Control and Status Register A
- •14.12.3 ADCL and ADCH – The ADC Data Register
- •14.12.3.1 ADLAR = 0
- •14.12.3.2 ADLAR = 1
- •14.12.4 ADCSRB – ADC Control and Status Register B
- •14.12.5 DIDR0 – Digital Input Disable Register 0
- •15. debugWIRE On-chip Debug System
- •15.1 Features
- •15.2 Overview
- •15.3 Physical Interface
- •15.4 Software Break Points
- •15.5 Limitations of debugWIRE
- •15.6 Register Description
- •16. Self-Programming the Flash
- •16.1 Performing Page Erase by SPM
- •16.2 Filling the Temporary Buffer (Page Loading)
- •16.3 Performing a Page Write
- •16.5 EEPROM Write Prevents Writing to SPMCSR
- •16.6 Reading Fuse and Lock Bits from Firmware
- •16.6.1 Reading Lock Bits from Firmware
- •16.6.2 Reading Fuse Bits from Firmware
- •16.7 Preventing Flash Corruption
- •16.8 Programming Time for Flash when Using SPM
- •16.9 Register Description
- •16.9.1 SPMCSR – Store Program Memory Control and Status Register
- •17. Memory Programming
- •17.1 Program And Data Memory Lock Bits
- •17.2 Fuse Bytes
- •17.2.1 Latching of Fuses
- •17.3 Calibration Bytes
- •17.4 Signature Bytes
- •17.5 Page Size
- •17.6 Serial Programming
- •17.6.1 Serial Programming Algorithm
- •17.6.2 Serial Programming Instruction set
- •17.7 High-Voltage Serial Programming
- •17.8 Considerations for Efficient Programming
- •17.8.1 Chip Erase
- •17.8.2 Programming the Flash
- •17.8.3 Programming the EEPROM
- •17.8.4 Reading the Flash
- •17.8.5 Reading the EEPROM
- •17.8.6 Programming and Reading the Fuse and Lock Bits
- •17.8.7 Reading the Signature Bytes and Calibration Byte
- •18. Electrical Characteristics
- •18.1 Absolute Maximum Ratings*
- •18.2 DC Characteristics
- •18.3 Speed Grades
- •18.4 Clock Characteristics
- •18.4.1 Calibrated Internal RC Oscillator Accuracy
- •18.4.2 External Clock Drive
- •18.5 System and Reset Characteristics
- •18.6 Analog Comparator Characteristics
- •18.7 ADC Characteristics
- •18.8 Serial Programming Characteristics
- •18.9 High-voltage Serial Programming Characteristics
- •19. Typical Characteristics
- •19.1 Active Supply Current
- •19.2 Idle Supply Current
- •19.5 Pin Driver Strength
- •19.6 Pin Thresholds and Hysteresis
- •19.7 BOD Thresholds and Analog Comparator Offset
- •19.8 Internal Oscillator Speed
- •19.9 Current Consumption of Peripheral Units
- •19.10 Current Consumption in Reset and Reset Pulse width
- •20. Register Summary
- •21. Instruction Set Summary
- •22. Ordering Information
- •23. Packaging Information
- •24. Errata
- •24.1 ATtiny13 Rev. D
- •24.2 ATtiny13 Rev. C
- •24.3 ATtiny13 Rev. B
- •24.3.1 Wrong values read after Erase Only operation
- •24.3.2 High Voltage Serial Programming Flash, EEPROM, Fuse and Lock Bits may fail
- •24.3.3 Device may lock for further programming
- •24.3.5 Watchdog Timer Interrupt disabled
- •24.3.6 EEPROM can not be written below 1.9 Volt
- •24.4 ATtiny13 Rev. A
- •25. Datasheet Revision History
- •Table of Contents
ATtiny13
The Timer/Counter Overflow Flag (TOV0) is set each time the counter reaches BOTTOM. The Interrupt Flag can be used to generate an interrupt each time the counter reaches the BOTTOM value.
In phase correct PWM mode, the compare unit allows generation of PWM waveforms on the OC0x pins. Setting the COM0x1:0 bits to two will produce a non-inverted PWM. An inverted PWM output can be generated by setting the COM0x1:0 to three: Setting the COM0A0 bits to one allows the OC0A pin to toggle on Compare Matches if the WGM02 bit is set. This option is not available for the OC0B pin (See Table 11-4 on page 70). The actual OC0x value will only be visible on the port pin if the data direction for the port pin is set as output. The PWM waveform is generated by clearing (or setting) the OC0x Register at the Compare Match between OCR0x and TCNT0 when the counter increments, and setting (or clearing) the OC0x Register at Compare Match between OCR0x and TCNT0 when the counter decrements. The PWM frequency for the output when using phase correct PWM can be calculated by the following equation:
fOCnxPCPWM = |
fclk_I/O |
N---------510--------- |
The N variable represents the prescale factor (1, 8, 64, 256, or 1024).
The extreme values for the OCR0A Register represent special cases when generating a PWM waveform output in the phase correct PWM mode. If the OCR0A is set equal to BOTTOM, the output will be continuously low and if set equal to MAX the output will be continuously high for non-inverted PWM mode. For inverted PWM the output will have the opposite logic values.
At the very start of period 2 in Figure 11-7 on page 66 OCn has a transition from high to low even though there is no Compare Match. The point of this transition is to guarantee symmetry around BOTTOM. There are two cases that give a transition without Compare Match.
•OCR0A changes its value from MAX, like in Figure 11-7 on page 66. When the OCR0A value is MAX the OCn pin value is the same as the result of a down-counting Compare Match. To ensure symmetry around BOTTOM the OCn value at MAX must correspond to the result of an up-counting Compare Match.
•The timer starts counting from a value higher than the one in OCR0A, and for that reason misses the Compare Match and hence the OCn change that would have happened on the way up.
11.8Timer/Counter Timing Diagrams
The Timer/Counter is a synchronous design and the timer clock (clkT0) is therefore shown as a clock enable signal in the following figures. The figures include information on when Interrupt Flags are set. Figure 11-8 on page 68 contains timing data for basic Timer/Counter operation. The figure shows the count sequence close to the MAX value in all modes other than phase correct PWM mode.
67
2535J–AVR–08/10
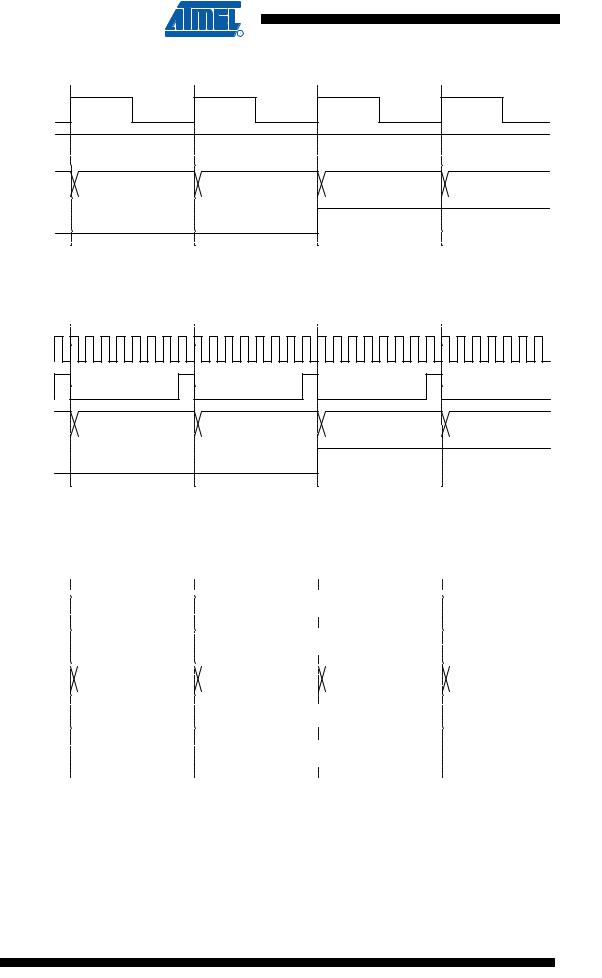
Figure 11-8. Timer/Counter Timing Diagram, no Prescaling
clkI/O
clkTn
(clkI/O/1)
TCNTn |
MAX - 1 |
|
MAX |
|
BOTTOM |
|
BOTTOM + 1 |
||
|
|
|
|
|
|
|
|
|
|
TOVn
Figure 11-9 shows the same timing data, but with the prescaler enabled.
Figure 11-9. Timer/Counter Timing Diagram, with Prescaler (fclk_I/O/8)
clkI/O
clkTn
(clkI/O/8)
TCNTn |
MAX - 1 |
|
MAX |
|
BOTTOM |
|
BOTTOM + 1 |
||
|
|
|
|
|
|
|
|
|
|
TOVn
Figure 11-10 shows the setting of OCF0B in all modes and OCF0A in all modes except CTC mode and PWM mode, where OCR0A is TOP.
Figure 11-10. Timer/Counter Timing Diagram, Setting of OCF0x, with Prescaler (fclk_I/O/8)
clkI/O |
|
|
|
|
|
|
|
|
|
|
|
|
|
|
|
|
|
|
|
|
|
|
|
|
|
|
|
|
|
|
|
|
|
|
|
|
|
|
|
|
|
|
|
|
|
|
|
|
|
|
|
|
|
|
|
|
|
|
|
|
|
|
|
|
clkTn |
|
|
|
|
|
|
|
|
|
|
|
|
|
|
|
|
|
|
|
|
|
|
|
|
|
|
|
|
|
|
|
|
|
|
|
|
|
|
|
|
|
|
|
|
|
|
|
|
|
|
|
|
|
|
|
|
|
|
|
|
|
|
|
|
|
|
|
|
|
|
|
|
|
|
|
|
|
|
|
|
|
|
|
|
|
|
|
|
|
|
|
|
|
|
|
|
|
|
|
|
|
|
|
|
|
|
|
|
|
|
|
|
|
|
|
|
|
|
|
|
|
|
|
|
|
|
|
|
|
(clkI/O/8) |
|
|
|
|
|
|
|
|
|
|
|
|
|
|
|
|
|
|
|
|
|
|
|
|
|
|
|
|
|
|
|
|
|
|
|
|
|
|
|
|
|
|
|
|
|
|
|
|
|
|
|
|
|
|
|
|
|
|
|
|
|
|
|
|
TCNTn |
|
|
|
|
|
|
|
|
|
|
|
|
|
|
|
|
|
|
|
|
|
|
|
|
|
|
|
|
|
|
|
|
|
|
|
|
|
|
|
|
|
|
|
|
|
|
|
|
|
|
|
|
|
|
|
|
|
|
|
|
|
|
|
|
|
|
|
|
|
|
|
|
|
|
|
|
|
|
|
|
|
|
|
|
|
|
|
|
|
|
|
|
|
|
|
|
|
|
|
|
|
|
|
|
|
|
|
|
|
|
|
|
|
|
|
|
|
|
|
|
|
|
|
|
|
|
|
|
|
|
|
|
|
|
|
|
|
OCRnx - 1 |
|
|
|
|
|
|
|
|
|
|
OCRnx |
|
|
OCRnx + 1 |
|
|
|
|
|
|
|
|
OCRnx + 2 |
|
|
|||||||||||||||||||||||||||||||
OCRnx |
|
|
|
|
|
|
|
|
|
|
|
|
|
|
|
|
|
|
|
|
|
|
|
|
|
|
|
|
|
|
|
|
|
|
|
|
|
|
|
|
|
|
|
|
|
|
|
|
|
|
|
|
|
|
|
|
|
|||||||
|
|
|
|
|
|
|
|
|
|
|
|
|
|
|
|
|
|
|
|
|
|
|
|
|
|
|
|
|
|
|
|
|
|
|
|
|
|
|
|
|
|
|
|
|
|
|
|
|
|
|
|
|
|
|
|
|
|
|
|
|
|
|
|
|
|
|
|
|
|
|
|
|
|
|
|
|
|
|
|
|
|
|
|
|
|
|
|
|
|
|
|
|
|
OCRnx Value |
|
|
|
|
|
|
|
|
|
|
|
|
|
|
|
|
|
|
|
|
|
|
|
|
|
|
|||||||||
OCFnx |
|
|
|
|
|
|
|
|
|
|
|
|
|
|
|
|
|
|
|
|
|
|
|
|
|
|
|
|
|
|
|
|
|
|
|
|
|
|
|
|
|
|
|
|
|
|
|
|
|
|
|
|
|
|
|
|
|
|
|
|
|
|
|
|
|
|
|
|
|
|
|
|
|
|
|
|
|
|
|
|
|
|
|
|
|
|
|
|
|
|
|
|
|
|
|
|
|
|
|
|
|
|
|
|
|
|
|
|
|
|
|
|
|
|
|
|
|
|
|
|
|
|
|
|
|
|
|
|
|
|
|
|
|
|
|
|
|
|
|
|
|
|
|
|
|
|
|
|
|
|
|
|
|
|
|
|
|
|
|
|
|
|
|
|
|
|
|
|
|
|
|
|
|
|
|
|
|
|
|
|
|
|
|
|
|
|
|
|
|
|
|
|
|
|
|
|
|
|
|
|
|
|
|
|
|
|
|
|
|
|
|
|
|
|
|
|
|
|
|
|
|
|
|
|
|
|
|
|
|
|
|
|
|
|
|
|
|
|
|
|
|
|
|
|
|
|
|
|
|
|
|
|
|
|
|
|
|
|
|
Figure 11-11 on page 69 shows the setting of OCF0A and the clearing of TCNT0 in CTC mode and fast PWM mode where OCR0A is TOP.
68 ATtiny13
2535J–AVR–08/10