

P6 Professional User Guide
Work Product or Document
Work Product or Document Deliverable
Document assigned to current project
Using main windows
There are eleven main windows in P6 Professional. You can open as many windows as necessary; each open window displays as a tab below the active tab title bar, which is just below toolbar area. To navigate between open windows, click the appropriate tab. To close a window, click the x to the right on the active tab title bar.
The name of the currently active window appears in the active tab title bar below the toolbar area. Some menu commands and toolbar icons pertain only to specific windows, so the currently active window, as well as the layout currently displayed in the active window, determines which menu commands and toolbar icons are enabled and disabled.
In each main window, you can use the Display or Layout Options bar, which appears at the top left of each window's workspace, to customize your view of global and project data. For example, you can show window details; customize table columns; group, sort, and filter data; customize fonts and colors; expand or collapse all grouped data; set layout options; and more.
Tip
You can also access all of the functionality available in the Display or Layout Options bar from toolbars and menus.
Opening windows
Global (Enterprise) data windows
The following windows display enterprise-level (global) data. You can open each of these windows from the Enterprise toolbar or Enterprise menu except where noted.
Projects window — Use to globally review the global enterprise project structure (EPS), and to work with individual projects.
Resources window — Use to add or modify your organization’s resources.
Reports window — Use to product reports for all projects or the open project. To open the Reports window, choose Tools, Reports, Reports.
Tracking window — Use to display and create tracking layouts for the open project.
Project-specific data windows
The following windows display project-level data. You can open each of these windows from the Project toolbar or Project menu.
Work Breakdown Structure window — Use to add or modify the open project’s work breakdown structure (WBS).
34
Getting Started
Activities Window — Use to work with activities in the open project.
Resource Assignments window — Use to view, add, and delete resources assigned to activities.
WPs and Docs window — Use to create and assign work products and documents for the open project.
Project Expenses window — Use to work with expense items for the open project.
Project Thresholds window — Use to add or delete thresholds for the open project.
Project Issues window — Use to add or delete issues for the open project, review issue history, and notify other team members of issues.
When connected to a P6 Professional database: Risks view — Use to add, delete, or calculate risks for the open project.
Closing windows
Windows that display enterprise-level (global) data remain open until you close them. Windows that display project-level data also remain open until you close them; however, project-level windows close automatically when you close all open projects.
To close a window, select the tab and then click the X in the active tab title bar.
Tips
You can choose the window you want to display by default when you launch the module.
Window tabs are displayed in the order in which you opened them. To change the display order of window tabs, select a tab, then drag it to the appropriate location.
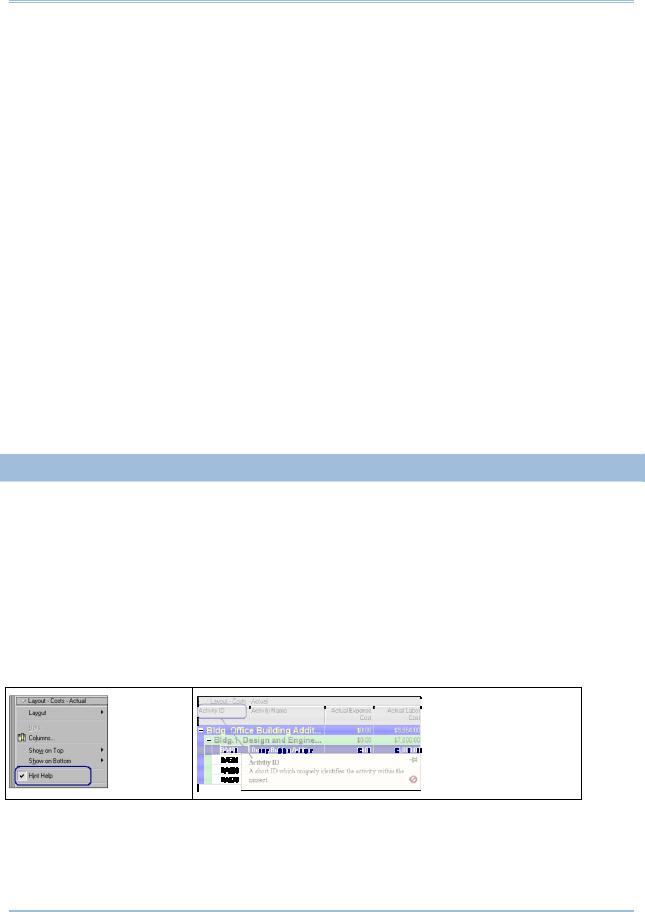
Using Hint Help
Field descriptions, called Hint Help, are provided for column values in various windows.
To access Hint Help
Choose View, Hint Help. Move the mouse pointer over any column.
Choose the Hint Help command again to turn off Hint Help.
Tip
When P6 Professional is connected to a P6 Professional database, you can also press Alt +F1 to access Hint Help.
35
P6 Professional User Guide
Using the Status Bar and Layout Options bar
Windows and dialog boxes contain a number of special and unique features.
Status bar
The Status bar is a message bar at the bottom of the window that displays information that can include the name of the current portfolio, the access mode, the data date, the current baseline, the job status of the last job request, the current user name, and the name of the database alias chosen at login as well as database type, where database type when connected to a P6 Professional database would display as (Professional) or where database type when connected to a P6 EPPM database would display as (EPPM).
Layout Options bar
Most windows and dialog boxes include an Options bar at the top of the screen that displays the name of the current layout and filter, and that you can click to display a number of commands that enable you to customize the current display. Click the Options bar to display a menu of the commands available for that window or dialog box.
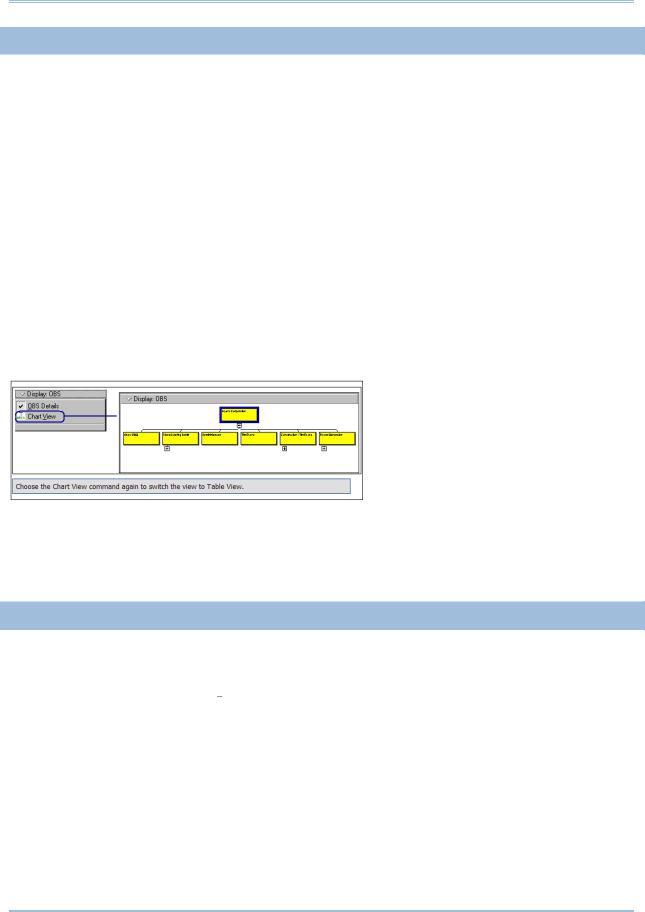
You can also view hierarchical information, such as the work breakdown structure, in table (list) or chart view (hierarchy) format.
Note
When you view data in chart view format, you can display up to 2,000 boxes.
Display window details
You can display detail information for many elements, such as projects, resources, and activities.
To display details for a window, such as Projects or Activities, choose View, Show on Bottom, Details, or click  on the Bottom Layout toolbar. See Bottom Layout Toolbar.
To display details in a dialog box, such as Roles or OBS, click the Display Options bar in the dialog box, then choose the Details option.
36

Getting Started
Tile windows horizontally or vertically
You can tile windows horizontally or vertically by opening multiple tab groups. Tiling is useful when you are working in multiple windows and do not want to toggle back and forth between window tabs. For example, you could tile the WBS and Activities windows to simultaneously work with the open project's WBS and activity list.
When you tile horizontally, the workspace is split into top and bottom tab groups. When you tile vertically, the workspace is split into left and right tab groups. You can display as many window tabs as necessary in each tab group, but you can not display the same window tab in more than one tab group. You can create a maximum of one tab group for each main window.
Notes:
For a tab group, only the active tab title bar appears, not a tab, when only one tab is open.
The name of the currently active tab appears in the active tab title bar.
To tile windows:
1)Open each window you want to work with.
2)To create a new tab group at the bottom of the screen, ensure the tab you want to move is the currently active tab. Then choose View, Tab Groups, New Horizontal Tab Group. If multiple views are tiled horizontally, the new view appears as the last group on the bottom.
You can also create a new tab group by dragging the tab or active tab title bar to the bottom of the screen and releasing (dropping) it when you see the formation of a rectangular outline. Repeat if necessary.
3)To create a new tab group at the side of the screen, ensure the tab you want to move is the currently active tab. Then choose View, Tab Groups, New Vertical Tab Group. If multiple views are tiled vertically, the new view appears as the last group on the outer-most side.
You can also create a new tab group by dragging the tab or active tab title bar to the side of the screen and releasing (dropping) it when you see the formation of a rectangular outline. Repeat if necessary.
4)To move additional tabs into an existing tab group, drag the tab or active tab title bar to the targeted tab group; release (drop) it when you see the formation of an outline with a tab under the active tab title bar of the targeted tab group. Repeat if necessary.
5)To remove all tab groupings and display all open tabs in one tab group, choose View, Tab Groups, Merge all Tab Groups.
Tip
Drag the horizontal splitter bar to increase or decrease the size of the top and bottom tab groups; drag the vertical splitter bar to increase or decrease the size of the left and right tab groups.
37