
- •Table of Contents
- •Preface
- •Primavera Products
- •Using Documentation and Help
- •Where to Get Support
- •Understanding Project Management
- •Why Use Project Portfolio Management?
- •Your Role in the Organization
- •Project Management Process Overview
- •Planning, Controlling, and Managing Projects
- •Quick Tour
- •Getting Started
- •Selecting a Language
- •The Workspace
- •What Is a Layout?
- •Customizing Displays
- •Sample Layouts
- •Using Wizards
- •Defining Administrative Preferences and Categories
- •Defining Default Settings
- •Allowing Users to Define the Default Hours per Time Period
- •Defining Standard Categories and Values
- •Defining Currencies
- •Setting User Preferences
- •Formatting Time Units
- •Formatting Dates
- •Setting View Currency and Symbols
- •Setting Mail Preferences
- •Implementing Wizards
- •Creating a Log of Tasks and Setting Startup, Group and Sort, and Column Options
- •Changing Your Password
- •Setting Profile and Spreadsheet Data Options
- •Setting Calculation Options for Resource and Role Assignments
- •Selecting Startup Filters
- •Structuring Projects
- •Setting Up the Enterprise Project Structure
- •Enterprise Project Structure Overview
- •Summarizing Projects
- •Setting Up the Enterprise Project Structure
- •Adding a New Project to the Enterprise Project Structure
- •Using Project Architect
- •Working with the Enterprise Project Structure
- •Using Root Nodes to Denote Project Status
- •Defining Enterprise Project Structure Details
- •Leveling Priority
- •Anticipated Dates
- •Auto-Numbering Activity IDs
- •Setting Up the Organizational Breakdown Structure
- •Viewing an OBS
- •Setting Up an OBS
- •Editing OBS Elements
- •Defining Resources and Roles
- •Resources Overview
- •Viewing and Adding Resources
- •Default Units/Time
- •Using Limits for Delayed Resource Start
- •Defining Resource Shifts
- •Defining and Assigning Resource Codes and Values
- •Setting Up Roles
- •Assigning Roles to Resources
- •Defining Custom Resource Curves
- •Reviewing Work Breakdown Structures
- •Viewing a WBS
- •Grouping by WBS Path
- •Adding WBS Elements and Assigning Properties
- •Using WBS Milestones
- •How Weights Affect Percent Complete
- •Assigning WBS Category Values
- •Defining Earned Value Settings for Specific WBS Elements
- •Assigning Estimation Weights to WBS Elements
- •Defining Budgets
- •Top-Down Budgeting
- •Establishing Budgets
- •Establishing a Monthly Spending Plan
- •Tracking Budget Changes
- •Establishing Funding
- •Tracking and Analyzing Budgets
- •Establishing Project Codes
- •Defining and Assigning Project Codes
- •Grouping, Summarizing, and Filtering by Codes
- •Working With User-Defined Fields
- •Creating User-Defined Fields
- •Working with User-Defined Fields
- •Working with Indicators
- •Creating Calendars
- •Adding Calendars
- •Modifying Calendars
- •Implementing the Schedule
- •Establishing Activity Codes
- •Creating Activity Codes and Values
- •Grouping and Summarizing by Codes
- •Working with Activities
- •Activities Overview
- •Adding Activities
- •Defining General Activity Information
- •Defining Schedule Information
- •Establishing Relationships
- •Dissolving Activities
- •Displaying Activity Details for Assignments
- •Assigning Resources and Roles
- •Recalculating Costs/Units for Assignments
- •Choosing the Rate Source and Rate Type for an Assignment
- •Assigning Resource Curves to Resource or Role Assignments
- •Manually Planning Future Period Assignments
- •Assigning Activity Codes and Adding Expenses
- •Viewing Activity Feedback and Posting Resource Notes
- •Assigning Work Products and Documents
- •Adding Steps
- •Setting Options for Using Weighted Steps
- •Creating and Assigning Activity Step Templates
- •Viewing Activity Summaries
- •Viewing Contract Manager Documents
- •Using Global Change
- •Working with Cost Accounts and Project Expenses
- •Cost Account and Expense Overview
- •Setting Up a Cost Account Structure
- •Adding Expenses and Entering Cost Information
- •Defining Expense Details
- •Analyzing Costs
- •Performing Top-down Estimation
- •Applying Saved Top-Down Estimates To a Project
- •Managing Baselines
- •Creating and Maintaining Baselines
- •Assigning Baselines to Projects
- •Comparing Current and Baseline Schedules
- •Updating Baselines
- •Ensuring Baseline Data Is Updated
- •Updating, Scheduling, and Leveling
- •The Update Process
- •Choosing a Method of Updating
- •Highlighting Activities for Updating
- •Updating Progress for Spotlighted Activities
- •Estimating Progress Automatically
- •Setting Auto Compute Actuals
- •Updating Using Timesheets
- •Updating Activities Manually
- •Removing Progress from Activities
- •Interrupting Activity Progress
- •Applying Actuals
- •Storing Period Performance (Past Period Actuals)
- •Scheduling Projects
- •Types of Activity Dates
- •Leveling Resources
- •Recalculating Resource and Role Assignment Costs
- •Managing Resource Assignments
- •Summarizing Projects
- •Setting Summarization Options
- •Summarizing Project Data
- •How Data Is Summarized
- •Managing Risks
- •Adding Risks
- •Calculating Exposure Values
- •Calculating a Risk’s Impact
- •Creating and Deleting Risk Types
- •Customizing Risk Layouts
- •Project Issues and Thresholds
- •Adding Issues
- •Assigning Tracking Layouts to Issues
- •Using the Issue Navigator
- •Adding Thresholds
- •Threshold Parameter Definitions
- •Monitoring Thresholds
- •Assigning Tracking Layouts to Thresholds
- •Maintaining a Project’s Document Library
- •Specifying Document Location References
- •Assigning Work Products and Documents
- •Tracking Projects
- •Creating Tracking Layouts
- •Working with Tracking Layouts
- •Customizing Tracking Layouts
- •Comparing Projects with Claim Digger
- •Claim Digger Overview
- •Comparing Projects/Baselines
- •Comparison Data
- •Creating and Using Reflections
- •Reflection Overview
- •Creating and Using Reflections
- •Reflection Guidelines
- •Checking Projects In and Out
- •Managing Remote Projects
- •Checking Out Projects
- •Checking In Projects
- •Customizing Projects
- •Working with Layouts
- •Layout Types
- •Creating, Opening, and Saving Layouts
- •Exporting and Importing Layouts
- •Copying and Pasting Resource Spreadsheet Data to Microsoft Excel
- •Grouping, Sorting, and Filtering Data
- •Grouping Data
- •Sorting Data
- •Reorganizing Data
- •Filtering Data
- •Combining Filters
- •Customizing Layouts
- •Modifying Columns
- •Adjusting the Timescale
- •Formatting Gantt Charts
- •Formatting Activity Network Layouts
- •Modifying Resource and Activity Usage Profile Settings
- •Customizing Reports
- •Reports Overview
- •Opening Reports
- •Creating and Modifying Reports
- •Using the Report Editor
- •Adding Data Sources and Rows to Reports
- •Adding Text Cells to Reports
- •Sorting Report Data Sources
- •Customizing a Report with the Report Editor: an Example
- •Using Report Groups
- •Setting Up Batch Reports
- •Printing Layouts and Reports
- •Defining Page Settings
- •Previewing Layouts and Reports
- •Printing Layouts and Reports
- •Selecting a Printer
- •Publishing Layouts and Reports in HTML Format
- •Publishing a Project on the World Wide Web
- •Project Web Site Overview
- •Publishing a Project Web Site
- •Customizing the Appearance of a Project Web Site
- •Publishing Activity and Tracking Layouts
- •Linking the Project Management and Contract Manager Modules
- •Linking the Project Management Module to Contract Manager
- •Linking a Project Management Project to a Contract Manager Project
- •Importing Contract Manager Data to a Project Management Module Project
- •Index

Working with Activities 237
Creating and Assigning Activity Step Templates
For more information on weighted steps, refer to the previous section, “Adding Steps.”
Your organization may have several activities that repeat within a project or across projects. For example, every time you construct a building, several specifications must be written and approved. Developing a specification is a multi-step process that never changes.
For example, the “Write Specifications” or “System Design” activity could have the following steps:
■Submit initial spec
■Review initial spec
■Revise initial spec
■Final review
■Final revision
These steps may apply to many or all “Write Specifications” activities in a project or across all projects. Rather than manually inputting these steps into each “Write Specifications” activity, you can create an activity step template containing these steps and assign the template to each applicable activity at once. You can create activity step templates manually or convert existing step(s) into a template.
Creating activity step templates manually Choose Enterprise, Activity Step Templates. In the top grid of the Activity Step Templates dialog, click Add. Type a name in the Step Template Name field (e.g., Specification steps). To add steps to the template, click Add in the bottom grid. Type a Step Name and a Step Weight. The Step Weight is used to calculate the progress of an activity; the greater the weight of the step, the more progress has been made on the activity when you mark a step complete. You can add an unlimited number steps to a template.
You can customize the bottom grid to display user-defined field columns in which you can add step data such as dates and costs. Any user-defined field data you enter in an activity step template is saved as part of the template.
Primavera - Project Management

238 Part 3: Implementing the Schedule
You can customize these columns to display user-defined fields.
Converting existing step(s) into an activity step template In the Activity Table, select the activity that contains the step(s) you want to convert to a template. In the Steps tab of Activity Details, ctrl-click to select the desired step(s), then right-click on the selected step(s) and choose Create Template. Enter a name for the template when prompted. The step(s) and their associated name, description, and weight are added to the new template. You can also choose to add the steps’ UDFs to the template.
Highlight the steps to include in the template, then rightclick and choose Create Template.
Mark to add UDFs assigned to the step(s) to the step template.
Primavera - Project Management

Working with Activities 239
The module automatically updates step UDF data in activity step templates when a step UDF is added, deleted, or modified in the User Defined Fields dialog box.
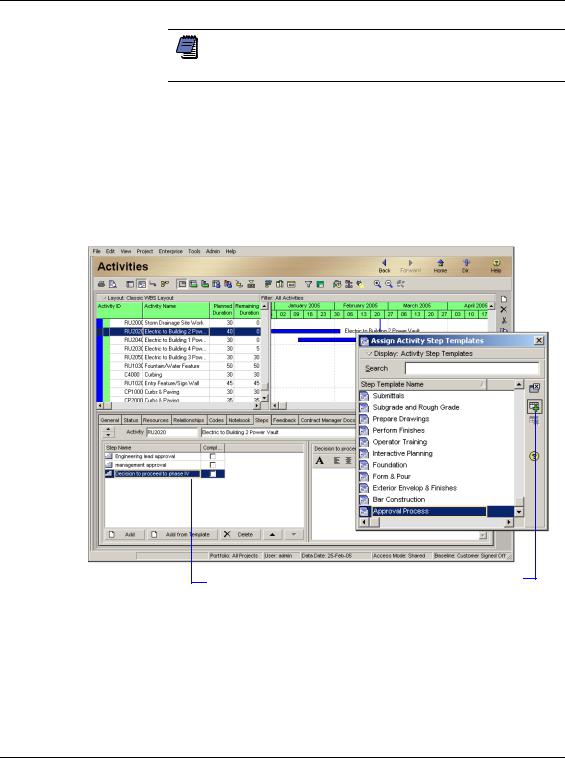
Assigning activity step templates to activities You can assign an activity step template to activities separately or to several activities at once. To assign a template to one activity, select the activity in the Activity Table. Click the Layout Options bar and choose Show on Bottom, Activity Details. In the Steps tab, click Add From Template. In the Assign Activity Step Templates dialog, select the template you want to add and click the Select icon (+ symbol). The Steps tab is automatically populated with the steps listed in the template.
Click to add steps from |
|
Click to add a template to |
|
more than one activity (the |
|
an activity step |
|
|
|
activities must be selected |
|
template, then select |
|
|
|
|
the template. |
in the Activity Table). |
|
You can also assign an activity step template to multiple activities at once. In the Activity Table, Ctrl-click each activity to which you want to assign a template. From the Command Bar, click Steps to launch the Assign Activity Step Templates dialog. Choose the template you want to add to the selected activities, then click Assign.
Primavera - Project Management

240 Part 3: Implementing the Schedule
Viewing Activity Summaries
In the Activities window, select the activity whose summary information you want to view. Click the Summary tab in Activity Details.
To view summary information about the activity’s units, choose Display
Units. To view summary information about the activity’s costs, choose
Display Cost. To view all of the activity’s start and finish dates, choose
Display Dates.
Primavera - Project Management