


Setting User Preferences 53
Setting View Currency and Symbols
Choose Edit, User Preferences, then click the Currency tab to specify the currency used to view cost data, and whether to show or hide the currency symbol and/or decimal values in cost values.
Mark to include the symbol used for the currency.
You must enter all cost data in the view currency selected in User Preferences.
Click to select the currency for viewing costs; this may differ from the base currency used to store monetary values.
 Mark to show decimal values for costs.
The currencies available for viewing monetary units are defined by your administrator in the Currencies dialog box.
Primavera - Project Management

54 Part 1: Overview and Configuration
Setting Mail Preferences
Choose Edit, User Preferences, then click the E-Mail tab to configure the module to transfer information to and from e-mail installations.
Not needed for
Internet mail
 This is typically the project administrator’s address.
Configure mail settings The module supports both MAPI (Messaging Application Interface) and SMTP (Internet) for sending issues to users via e-mail. Select the applicable protocol for your mail system in the E-Mail Protocol field. When using SMTP, select Internet. If you are using MAPI as the protocol, type the profile name in the Mail Login Name/Profile Name field. The profile name is set in Control Panel in the Mail Settings dialog box (accessible from the Mail and Fax icon) on the workstation running the module. Click Password to enter the password to the MAPI profile.
In the Outgoing Mail Server (SMTP) field, type either the fully qualified domain name of the Internet mail server or its IP address. In the User E- Mail Address field, type the Internet mail address for the user from whom the mail will be sent. If you have a MAPI configuration, clear the Outgoing Mail Server (SMTP) field, and type the Microsoft Exchange e- mail address of the person sending the e-mail notification in the User E- Mail Address field.
Primavera - Project Management

Setting User Preferences 55
Implementing Wizards
To discontinue a wizard’s use, you can either clear the checkbox in this dialog box or mark the Do Not Show This Wizard Again checkbox in the wizard dialog box. To enable a wizard for future sessions, mark the applicable checkbox again in the Assistance tab of the User Preferences dialog box.
Choose Edit, User Preferences, then click the Assistance tab to enable the use of wizards when adding resources and activities.
If you clear one or both checkboxes and add a new resource or activity, you will need to use the current layout to add the information.
Set assistance options Wizards guide you through the steps necessary to complete a function. Once you feel comfortable adding resources and activities, you may not need to use them. Mark the checkboxes in the Wizards section to automatically display the New Resource Wizard when you add a new resource, and the New Activity Wizard when you add a new activity.
Primavera - Project Management
56 Part 1: Overview and Configuration
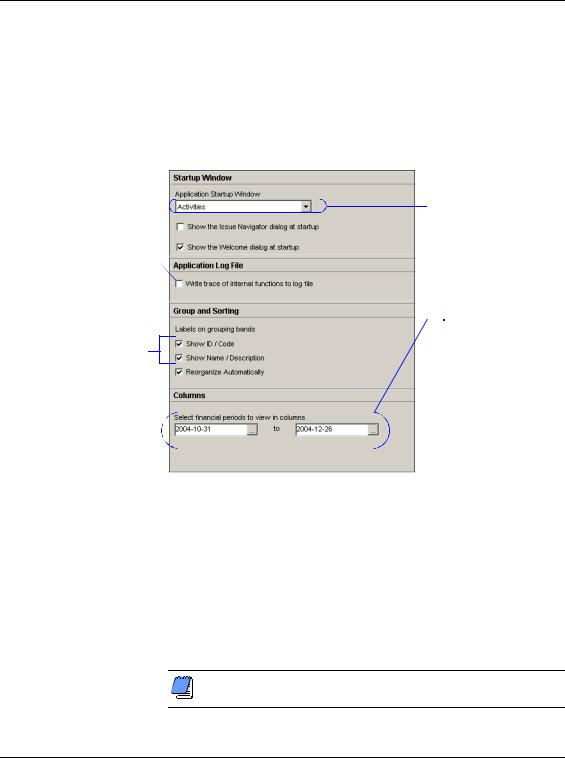
Creating a Log of Tasks and Setting Startup, Group and Sort, and Column Options
Choose Edit, User Preferences, then click the Application tab to establish the default window and dialog box that displays when you start the module, and to record the actions you perform to a log file. You can also set options for grouping and sorting.
Mark to automatically create a log file called ERRORS.LOG each time you work in the Project Management module.
You must choose Show ID/ Code, Show Name/ Description, or both.
Make your selection based on the area in which you work most often; you can change this setting as your requirements change.
 Select the range of financial periods available for display as columns. If you do not select a range, all financial periods are viewable as columns.
Set startup and log file options Select the window to display each time you start the module. Select Home if your work varies each day; the Home workspace enables you to select the applicable window or layout for each session.
You can also indicate whether to display the Issue Navigator dialog box, which contains outstanding issues that are generated based on your preset thresholds, and the Welcome dialog box, which enables you to choose to create a new project, open an existing project, open the last project opened in your previous session, or display global data only.
Primavera recommends that you use the log file only with the assistance of Primavera Customer Support staff.
Primavera - Project Management

Setting User Preferences 57
Set grouping and sorting options You can show or hide the ID/ Code or Name/Description fields as labels in the group-by bands when grouping by hierarchies that include both an ID/code and a name description. This user preference setting affects windows/dialog boxes where you cannot access a Group and Sort dialog box.
Mark the Reorganize Automatically checkbox to enable the Project Management module to immediately re-sort any changes to activity data in the current view to reflect the layout’s grouping and sorting criteria.
If you do not want the module to automatically reorganize data, you can choose Reorganize Now from the Tools menu to apply the group and sort criteria to the updates in the current view.
Set column options for financial periods You can make a range of financial periods available as columns in the Activities and Resource Assignments windows, as well as the Resources tab of Activity Details. Selecting a range limits the number of financial periods that appear in the Columns dialog box. You may want to enter a range when the Financial Period dictionary contains several financial periods. For example, if each financial period in the Financial Period dictionary has a duration of one month, you may only want to view the previous six financial periods (six months). If you do not enter a range, every financial period is available for selection in the Columns dialog box.
Primavera - Project Management