
- •Table of Contents
- •Preface
- •Primavera Products
- •Using Documentation and Help
- •Where to Get Support
- •Understanding Project Management
- •Why Use Project Portfolio Management?
- •Your Role in the Organization
- •Project Management Process Overview
- •Planning, Controlling, and Managing Projects
- •Quick Tour
- •Getting Started
- •Selecting a Language
- •The Workspace
- •What Is a Layout?
- •Customizing Displays
- •Sample Layouts
- •Using Wizards
- •Defining Administrative Preferences and Categories
- •Defining Default Settings
- •Allowing Users to Define the Default Hours per Time Period
- •Defining Standard Categories and Values
- •Defining Currencies
- •Setting User Preferences
- •Formatting Time Units
- •Formatting Dates
- •Setting View Currency and Symbols
- •Setting Mail Preferences
- •Implementing Wizards
- •Creating a Log of Tasks and Setting Startup, Group and Sort, and Column Options
- •Changing Your Password
- •Setting Profile and Spreadsheet Data Options
- •Setting Calculation Options for Resource and Role Assignments
- •Selecting Startup Filters
- •Structuring Projects
- •Setting Up the Enterprise Project Structure
- •Enterprise Project Structure Overview
- •Summarizing Projects
- •Setting Up the Enterprise Project Structure
- •Adding a New Project to the Enterprise Project Structure
- •Using Project Architect
- •Working with the Enterprise Project Structure
- •Using Root Nodes to Denote Project Status
- •Defining Enterprise Project Structure Details
- •Leveling Priority
- •Anticipated Dates
- •Auto-Numbering Activity IDs
- •Setting Up the Organizational Breakdown Structure
- •Viewing an OBS
- •Setting Up an OBS
- •Editing OBS Elements
- •Defining Resources and Roles
- •Resources Overview
- •Viewing and Adding Resources
- •Default Units/Time
- •Using Limits for Delayed Resource Start
- •Defining Resource Shifts
- •Defining and Assigning Resource Codes and Values
- •Setting Up Roles
- •Assigning Roles to Resources
- •Defining Custom Resource Curves
- •Reviewing Work Breakdown Structures
- •Viewing a WBS
- •Grouping by WBS Path
- •Adding WBS Elements and Assigning Properties
- •Using WBS Milestones
- •How Weights Affect Percent Complete
- •Assigning WBS Category Values
- •Defining Earned Value Settings for Specific WBS Elements
- •Assigning Estimation Weights to WBS Elements
- •Defining Budgets
- •Top-Down Budgeting
- •Establishing Budgets
- •Establishing a Monthly Spending Plan
- •Tracking Budget Changes
- •Establishing Funding
- •Tracking and Analyzing Budgets
- •Establishing Project Codes
- •Defining and Assigning Project Codes
- •Grouping, Summarizing, and Filtering by Codes
- •Working With User-Defined Fields
- •Creating User-Defined Fields
- •Working with User-Defined Fields
- •Working with Indicators
- •Creating Calendars
- •Adding Calendars
- •Modifying Calendars
- •Implementing the Schedule
- •Establishing Activity Codes
- •Creating Activity Codes and Values
- •Grouping and Summarizing by Codes
- •Working with Activities
- •Activities Overview
- •Adding Activities
- •Defining General Activity Information
- •Defining Schedule Information
- •Establishing Relationships
- •Dissolving Activities
- •Displaying Activity Details for Assignments
- •Assigning Resources and Roles
- •Recalculating Costs/Units for Assignments
- •Choosing the Rate Source and Rate Type for an Assignment
- •Assigning Resource Curves to Resource or Role Assignments
- •Manually Planning Future Period Assignments
- •Assigning Activity Codes and Adding Expenses
- •Viewing Activity Feedback and Posting Resource Notes
- •Assigning Work Products and Documents
- •Adding Steps
- •Setting Options for Using Weighted Steps
- •Creating and Assigning Activity Step Templates
- •Viewing Activity Summaries
- •Viewing Contract Manager Documents
- •Using Global Change
- •Working with Cost Accounts and Project Expenses
- •Cost Account and Expense Overview
- •Setting Up a Cost Account Structure
- •Adding Expenses and Entering Cost Information
- •Defining Expense Details
- •Analyzing Costs
- •Performing Top-down Estimation
- •Applying Saved Top-Down Estimates To a Project
- •Managing Baselines
- •Creating and Maintaining Baselines
- •Assigning Baselines to Projects
- •Comparing Current and Baseline Schedules
- •Updating Baselines
- •Ensuring Baseline Data Is Updated
- •Updating, Scheduling, and Leveling
- •The Update Process
- •Choosing a Method of Updating
- •Highlighting Activities for Updating
- •Updating Progress for Spotlighted Activities
- •Estimating Progress Automatically
- •Setting Auto Compute Actuals
- •Updating Using Timesheets
- •Updating Activities Manually
- •Removing Progress from Activities
- •Interrupting Activity Progress
- •Applying Actuals
- •Storing Period Performance (Past Period Actuals)
- •Scheduling Projects
- •Types of Activity Dates
- •Leveling Resources
- •Recalculating Resource and Role Assignment Costs
- •Managing Resource Assignments
- •Summarizing Projects
- •Setting Summarization Options
- •Summarizing Project Data
- •How Data Is Summarized
- •Managing Risks
- •Adding Risks
- •Calculating Exposure Values
- •Calculating a Risk’s Impact
- •Creating and Deleting Risk Types
- •Customizing Risk Layouts
- •Project Issues and Thresholds
- •Adding Issues
- •Assigning Tracking Layouts to Issues
- •Using the Issue Navigator
- •Adding Thresholds
- •Threshold Parameter Definitions
- •Monitoring Thresholds
- •Assigning Tracking Layouts to Thresholds
- •Maintaining a Project’s Document Library
- •Specifying Document Location References
- •Assigning Work Products and Documents
- •Tracking Projects
- •Creating Tracking Layouts
- •Working with Tracking Layouts
- •Customizing Tracking Layouts
- •Comparing Projects with Claim Digger
- •Claim Digger Overview
- •Comparing Projects/Baselines
- •Comparison Data
- •Creating and Using Reflections
- •Reflection Overview
- •Creating and Using Reflections
- •Reflection Guidelines
- •Checking Projects In and Out
- •Managing Remote Projects
- •Checking Out Projects
- •Checking In Projects
- •Customizing Projects
- •Working with Layouts
- •Layout Types
- •Creating, Opening, and Saving Layouts
- •Exporting and Importing Layouts
- •Copying and Pasting Resource Spreadsheet Data to Microsoft Excel
- •Grouping, Sorting, and Filtering Data
- •Grouping Data
- •Sorting Data
- •Reorganizing Data
- •Filtering Data
- •Combining Filters
- •Customizing Layouts
- •Modifying Columns
- •Adjusting the Timescale
- •Formatting Gantt Charts
- •Formatting Activity Network Layouts
- •Modifying Resource and Activity Usage Profile Settings
- •Customizing Reports
- •Reports Overview
- •Opening Reports
- •Creating and Modifying Reports
- •Using the Report Editor
- •Adding Data Sources and Rows to Reports
- •Adding Text Cells to Reports
- •Sorting Report Data Sources
- •Customizing a Report with the Report Editor: an Example
- •Using Report Groups
- •Setting Up Batch Reports
- •Printing Layouts and Reports
- •Defining Page Settings
- •Previewing Layouts and Reports
- •Printing Layouts and Reports
- •Selecting a Printer
- •Publishing Layouts and Reports in HTML Format
- •Publishing a Project on the World Wide Web
- •Project Web Site Overview
- •Publishing a Project Web Site
- •Customizing the Appearance of a Project Web Site
- •Publishing Activity and Tracking Layouts
- •Linking the Project Management and Contract Manager Modules
- •Linking the Project Management Module to Contract Manager
- •Linking a Project Management Project to a Contract Manager Project
- •Importing Contract Manager Data to a Project Management Module Project
- •Index

Setting User Preferences 49
Setting User Preferences
In this chapter
Formatting Time Units
Formatting Dates
Setting View Currency and
Symbols
Setting Mail Preferences
Implementing Wizards
Creating a Log of Tasks and
Setting Startup, Group and Sort,
and Column Options
Changing Your Password
Setting Profile and Spreadsheet
Data Options
Setting Calculation Options for Resource and Role Assignments
Selecting Startup Filters
You can tailor certain options to fit your specific needs. For example, indicate the format for displaying time units and dates, specify the currency to use for viewing costs, and set startup display preferences. You can also indicate how you want to transfer information to and from e-mail installations of the module, and specify whether you want to use the latest calculated summarized data or the most current data in Activity/Resource Usage Spreadsheets and Profiles.
This chapter describes how to set these options.
Primavera - Project Management

50 Part 1: Overview and Configuration
Formatting Time Units
Time unit settings affect how time unit values are displayed in tracking layouts, activity durations, resource prices, availability, and work efforts. Choose Edit, User Preferences, then click the Time Units tab.
|
|
|
|
|
This option is disabled |
|
|
|
|
|
|
|
|
|
|
|
when Show Unit label |
Mark to display the time |
|
|
|
|
or Show Duration label |
|
|||||
unit abbreviation with the |
|
is not marked. |
|||
time/duration value. |
|
|
|||
For each time period, |
|
|
|||
specify the number of hours |
|
|
|||
to use as a conversion |
|
|
|||
factor when you display time |
|
|
|||
unit fields in increments |
|
|
|||
other than hours. These |
|
|
|||
fields are disabled when the |
|
|
|||
Admin Preference 'Allow |
|
|
|||
users to specify the number |
|
|
|||
of work hours for each time |
|
|
|||
period' is not selected. |
|
|
|||
|
Set time unit options |
In the Units Format section, select the time unit |
used to display work efforts, and resource/role prices and availability. In the Durations Format section, select the time unit used to display activity duration values.
Mark the Sub-Unit checkbox to include the next smallest time interval for the Unit of Time selected; the field name changes accordingly. For example, if you select Day in the Units field, the Sub-Units field displays Hours. You can also select the number of decimal places you want to include in time unit displays.
In the Units/Time Format section, choose to show resource units per time as percentages or as units per duration. Your choice determines how rates are displayed. For example, 4h/d is the same as 50 percent of an eight-hour day.
Primavera - Project Management

Setting User Preferences 51
Define the Hours per Time Period Primavera calculates and stores time unit values in hourly increments. When you display or enter data in time unit fields in increments other than hours, the Project Management module converts the data based on the Hours per Time Period settings (either Admin Preference or User Preference - see note below). Conversely, if you enter time units in increments other than hours, the Hours per Time Period settings (either Admin Preference or User Preference - see note below) are used to convert these input values to hours for database calculation and storage.
In order to display time unit data accurately, you should set the Hours per Time Period values according to the activity calendar used by your role in the organization. For example, if you are an engineer and engineers use an 8-hour activity calendar, enter 8 as the Hours/Day value. If you do not enter a value that corresponds to your role's activity calendar, activity durations may be displayed incorrectly when you view your activities in spreadsheets, reports, etc.
If the Admin Preference option 'Allow users to specify the number of work hours for each time period' is not selected, these fields are not editable. When the option is not selected, the Hours per Time Period settings in the Admin Preferences, Time Periods tab, are used to calculate display values for time unit fields.
Primavera - Project Management

52 Part 1: Overview and Configuration
Formatting Dates
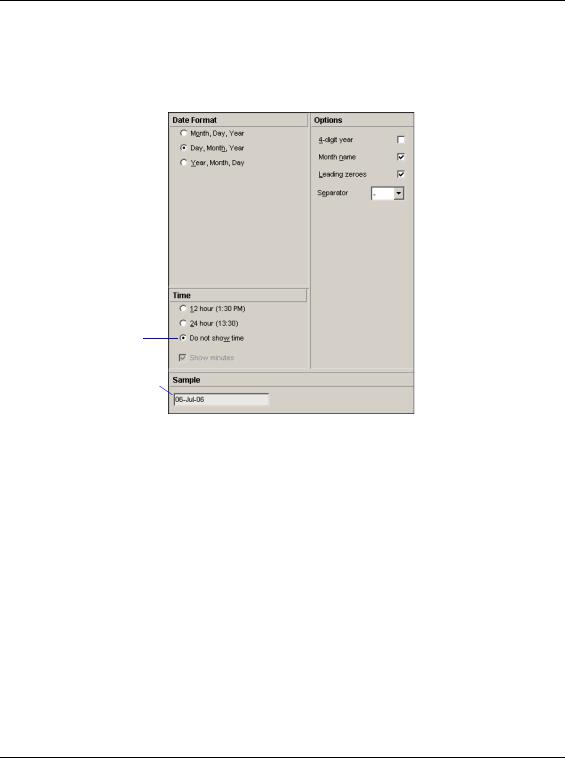
Choose Edit, User Preferences, then click the Dates tab to specify how to display dates.
Choose to exclude the time from date fields.
Displays an example of your format preferences
Specify date format Choose the date format you want to use, then choose how to display time values in date fields. Mark the applicable checkboxes in the Options area to indicate how the selected date format should appear. In the Separator field, select the character you want to use to separate days, months, and years.
Primavera - Project Management