
- •Table of Contents
- •Preface
- •Primavera Products
- •Using Documentation and Help
- •Where to Get Support
- •Understanding Project Management
- •Why Use Project Portfolio Management?
- •Your Role in the Organization
- •Project Management Process Overview
- •Planning, Controlling, and Managing Projects
- •Quick Tour
- •Getting Started
- •Selecting a Language
- •The Workspace
- •What Is a Layout?
- •Customizing Displays
- •Sample Layouts
- •Using Wizards
- •Defining Administrative Preferences and Categories
- •Defining Default Settings
- •Allowing Users to Define the Default Hours per Time Period
- •Defining Standard Categories and Values
- •Defining Currencies
- •Setting User Preferences
- •Formatting Time Units
- •Formatting Dates
- •Setting View Currency and Symbols
- •Setting Mail Preferences
- •Implementing Wizards
- •Creating a Log of Tasks and Setting Startup, Group and Sort, and Column Options
- •Changing Your Password
- •Setting Profile and Spreadsheet Data Options
- •Setting Calculation Options for Resource and Role Assignments
- •Selecting Startup Filters
- •Structuring Projects
- •Setting Up the Enterprise Project Structure
- •Enterprise Project Structure Overview
- •Summarizing Projects
- •Setting Up the Enterprise Project Structure
- •Adding a New Project to the Enterprise Project Structure
- •Using Project Architect
- •Working with the Enterprise Project Structure
- •Using Root Nodes to Denote Project Status
- •Defining Enterprise Project Structure Details
- •Leveling Priority
- •Anticipated Dates
- •Auto-Numbering Activity IDs
- •Setting Up the Organizational Breakdown Structure
- •Viewing an OBS
- •Setting Up an OBS
- •Editing OBS Elements
- •Defining Resources and Roles
- •Resources Overview
- •Viewing and Adding Resources
- •Default Units/Time
- •Using Limits for Delayed Resource Start
- •Defining Resource Shifts
- •Defining and Assigning Resource Codes and Values
- •Setting Up Roles
- •Assigning Roles to Resources
- •Defining Custom Resource Curves
- •Reviewing Work Breakdown Structures
- •Viewing a WBS
- •Grouping by WBS Path
- •Adding WBS Elements and Assigning Properties
- •Using WBS Milestones
- •How Weights Affect Percent Complete
- •Assigning WBS Category Values
- •Defining Earned Value Settings for Specific WBS Elements
- •Assigning Estimation Weights to WBS Elements
- •Defining Budgets
- •Top-Down Budgeting
- •Establishing Budgets
- •Establishing a Monthly Spending Plan
- •Tracking Budget Changes
- •Establishing Funding
- •Tracking and Analyzing Budgets
- •Establishing Project Codes
- •Defining and Assigning Project Codes
- •Grouping, Summarizing, and Filtering by Codes
- •Working With User-Defined Fields
- •Creating User-Defined Fields
- •Working with User-Defined Fields
- •Working with Indicators
- •Creating Calendars
- •Adding Calendars
- •Modifying Calendars
- •Implementing the Schedule
- •Establishing Activity Codes
- •Creating Activity Codes and Values
- •Grouping and Summarizing by Codes
- •Working with Activities
- •Activities Overview
- •Adding Activities
- •Defining General Activity Information
- •Defining Schedule Information
- •Establishing Relationships
- •Dissolving Activities
- •Displaying Activity Details for Assignments
- •Assigning Resources and Roles
- •Recalculating Costs/Units for Assignments
- •Choosing the Rate Source and Rate Type for an Assignment
- •Assigning Resource Curves to Resource or Role Assignments
- •Manually Planning Future Period Assignments
- •Assigning Activity Codes and Adding Expenses
- •Viewing Activity Feedback and Posting Resource Notes
- •Assigning Work Products and Documents
- •Adding Steps
- •Setting Options for Using Weighted Steps
- •Creating and Assigning Activity Step Templates
- •Viewing Activity Summaries
- •Viewing Contract Manager Documents
- •Using Global Change
- •Working with Cost Accounts and Project Expenses
- •Cost Account and Expense Overview
- •Setting Up a Cost Account Structure
- •Adding Expenses and Entering Cost Information
- •Defining Expense Details
- •Analyzing Costs
- •Performing Top-down Estimation
- •Applying Saved Top-Down Estimates To a Project
- •Managing Baselines
- •Creating and Maintaining Baselines
- •Assigning Baselines to Projects
- •Comparing Current and Baseline Schedules
- •Updating Baselines
- •Ensuring Baseline Data Is Updated
- •Updating, Scheduling, and Leveling
- •The Update Process
- •Choosing a Method of Updating
- •Highlighting Activities for Updating
- •Updating Progress for Spotlighted Activities
- •Estimating Progress Automatically
- •Setting Auto Compute Actuals
- •Updating Using Timesheets
- •Updating Activities Manually
- •Removing Progress from Activities
- •Interrupting Activity Progress
- •Applying Actuals
- •Storing Period Performance (Past Period Actuals)
- •Scheduling Projects
- •Types of Activity Dates
- •Leveling Resources
- •Recalculating Resource and Role Assignment Costs
- •Managing Resource Assignments
- •Summarizing Projects
- •Setting Summarization Options
- •Summarizing Project Data
- •How Data Is Summarized
- •Managing Risks
- •Adding Risks
- •Calculating Exposure Values
- •Calculating a Risk’s Impact
- •Creating and Deleting Risk Types
- •Customizing Risk Layouts
- •Project Issues and Thresholds
- •Adding Issues
- •Assigning Tracking Layouts to Issues
- •Using the Issue Navigator
- •Adding Thresholds
- •Threshold Parameter Definitions
- •Monitoring Thresholds
- •Assigning Tracking Layouts to Thresholds
- •Maintaining a Project’s Document Library
- •Specifying Document Location References
- •Assigning Work Products and Documents
- •Tracking Projects
- •Creating Tracking Layouts
- •Working with Tracking Layouts
- •Customizing Tracking Layouts
- •Comparing Projects with Claim Digger
- •Claim Digger Overview
- •Comparing Projects/Baselines
- •Comparison Data
- •Creating and Using Reflections
- •Reflection Overview
- •Creating and Using Reflections
- •Reflection Guidelines
- •Checking Projects In and Out
- •Managing Remote Projects
- •Checking Out Projects
- •Checking In Projects
- •Customizing Projects
- •Working with Layouts
- •Layout Types
- •Creating, Opening, and Saving Layouts
- •Exporting and Importing Layouts
- •Copying and Pasting Resource Spreadsheet Data to Microsoft Excel
- •Grouping, Sorting, and Filtering Data
- •Grouping Data
- •Sorting Data
- •Reorganizing Data
- •Filtering Data
- •Combining Filters
- •Customizing Layouts
- •Modifying Columns
- •Adjusting the Timescale
- •Formatting Gantt Charts
- •Formatting Activity Network Layouts
- •Modifying Resource and Activity Usage Profile Settings
- •Customizing Reports
- •Reports Overview
- •Opening Reports
- •Creating and Modifying Reports
- •Using the Report Editor
- •Adding Data Sources and Rows to Reports
- •Adding Text Cells to Reports
- •Sorting Report Data Sources
- •Customizing a Report with the Report Editor: an Example
- •Using Report Groups
- •Setting Up Batch Reports
- •Printing Layouts and Reports
- •Defining Page Settings
- •Previewing Layouts and Reports
- •Printing Layouts and Reports
- •Selecting a Printer
- •Publishing Layouts and Reports in HTML Format
- •Publishing a Project on the World Wide Web
- •Project Web Site Overview
- •Publishing a Project Web Site
- •Customizing the Appearance of a Project Web Site
- •Publishing Activity and Tracking Layouts
- •Linking the Project Management and Contract Manager Modules
- •Linking the Project Management Module to Contract Manager
- •Linking a Project Management Project to a Contract Manager Project
- •Importing Contract Manager Data to a Project Management Module Project
- •Index

40 Part 1: Overview and Configuration
Defining Standard Categories and Values
For more information about baselines, see “Managing Baselines” on page 271.
Use the Admin Categories dialog box to define standard categories and values that you can apply to all projects. Choose Admin, Admin Categories.
Baseline types Use the Baseline Types tab to create, edit, and delete baseline types. Baseline types enable you to categorize and standardize baselines across projects. To change the name of a baseline type, doubleclick it, then type a new name. The change applies to all projects to which the baseline is assigned.
Click the Shift Up/Shift Down buttons to move the selected category/type to a higher/lower position in the display. This changes the order in which the categories/types are listed when you assign them. These buttons are available only when the list is not sorted alphabetically.
Primavera - Project Management

Defining Administrative Preferences and Categories 41
For more information about expenses, see “Working with Cost Accounts and Project Expenses” on page 247.
For more information about the WBS, see “Reviewing Work Breakdown Structures” on page 133.
Expense categories Use the Expense Categories tab to create, edit, and delete expense categories. Expense categories can be used to categorize and standardize project expenses, and to organize and maintain your expense information. To change an expense category, double-click it, then type a new name. The change applies to all projects to which the expense item is assigned.
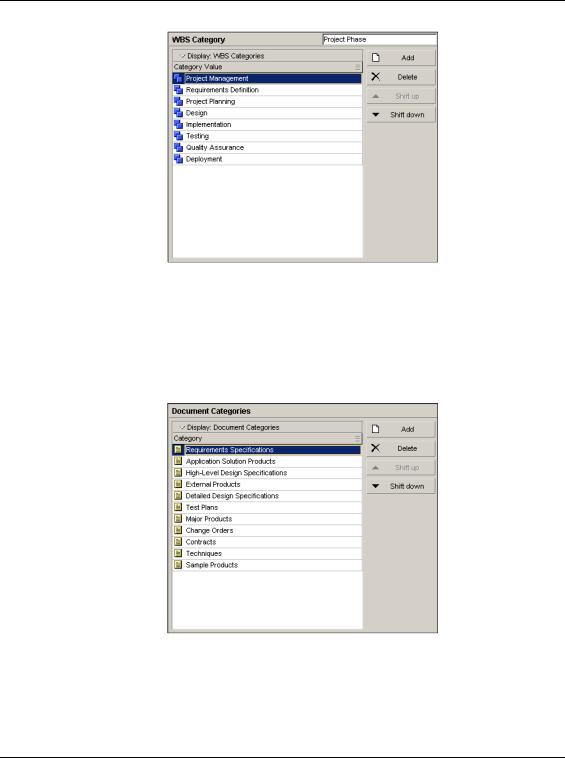
WBS custom category Use the third tab on the Admin Categories dialog box to define a custom WBS category and category values. The tab displays the name you define. To change the category name, click in the field in the top right, then type a new name. Use this category to organize, filter, and report WBS information in all projects. To change a category value, double-click it, then type a new name. The change applies to all projects to which the WBS item is assigned.
If you change the WBS category, the category’s values or value assignments do not change.
Primavera - Project Management

42 Part 1: Overview and Configuration
Document categories Use the Document Categories tab to set up categories for work products and documents, then assign these categories to documents in the Work Products and Documents window and activities in the WPs & Docs tab of Activities Details. To change a document category, double-click it, then type a new name. The change applies to all projects to which the document is assigned.
Primavera - Project Management

Defining Administrative Preferences and Categories 43
For more information about work products and documents, see “Maintaining a Project’s Document Library” on page 359.
For more information about the Timesheets module, see “Defining Resources and Roles” on page 109.
Document status Use the Document Status tab to create, edit, and delete document status types. Status types identify the current status of work products and documents within a project. Use them to determine which documents can be assigned to activities or WBS elements. To change a status type, double-click it, then type a new name. The change applies to all projects to which the document is assigned.
Overhead codes Use the Overhead Codes tab to create, edit, and delete overhead activity codes for Timesheets module users. Timesheets module users add overhead activities to their timesheets to log timesheet hours that are not associated with project activities. To change a code, double-click it, then type a new name. The change applies to all projects in which the code is assigned.
Primavera - Project Management

44 Part 1: Overview and Configuration
For more information about risks, see “Managing Risks” on page 335.
Risk types Use the Risk Types tab to create, edit, and delete risk types, or categories of possible risks. Risk types allow you to classify and standardize risks across projects. To change a risk type, double-click it, then type a new name. The change applies to all projects in which the risk is assigned.
Primavera - Project Management

Defining Administrative Preferences and Categories 45
For more information about activity notes, see “Working with Activities” on page 201.
Notebook topics Use the Notebook Topics tab to create, edit, and delete notebook topics. Notebook topics typically consist of instructions or descriptions for performing an activity. However, notebook topics can also be assigned at the EPS, project, and WBS levels. Examples include Purpose, Entry Criteria, Tools and Techniques, and Exit Criteria. To change a notebook topic, double-click it, then type a new name. The change applies to all notebook assignments.
Units of Measure Use the Units of Measure tab to set up units of measure labels that you can assign to material resources. To change a unit of measure label, double-click it, then type a new name. The change applies to all unit of measure assignments.
Primavera - Project Management