

- •Table of Contents
- •Preface
- •Primavera Products
- •Using Documentation and Help
- •Where to Get Support
- •Understanding Project Management
- •Why Use Project Portfolio Management?
- •Your Role in the Organization
- •Project Management Process Overview
- •Planning, Controlling, and Managing Projects
- •Quick Tour
- •Getting Started
- •Selecting a Language
- •The Workspace
- •What Is a Layout?
- •Customizing Displays
- •Sample Layouts
- •Using Wizards
- •Defining Administrative Preferences and Categories
- •Defining Default Settings
- •Allowing Users to Define the Default Hours per Time Period
- •Defining Standard Categories and Values
- •Defining Currencies
- •Setting User Preferences
- •Formatting Time Units
- •Formatting Dates
- •Setting View Currency and Symbols
- •Setting Mail Preferences
- •Implementing Wizards
- •Creating a Log of Tasks and Setting Startup, Group and Sort, and Column Options
- •Changing Your Password
- •Setting Profile and Spreadsheet Data Options
- •Setting Calculation Options for Resource and Role Assignments
- •Selecting Startup Filters
- •Structuring Projects
- •Setting Up the Enterprise Project Structure
- •Enterprise Project Structure Overview
- •Summarizing Projects
- •Setting Up the Enterprise Project Structure
- •Adding a New Project to the Enterprise Project Structure
- •Using Project Architect
- •Working with the Enterprise Project Structure
- •Using Root Nodes to Denote Project Status
- •Defining Enterprise Project Structure Details
- •Leveling Priority
- •Anticipated Dates
- •Auto-Numbering Activity IDs
- •Setting Up the Organizational Breakdown Structure
- •Viewing an OBS
- •Setting Up an OBS
- •Editing OBS Elements
- •Defining Resources and Roles
- •Resources Overview
- •Viewing and Adding Resources
- •Default Units/Time
- •Using Limits for Delayed Resource Start
- •Defining Resource Shifts
- •Defining and Assigning Resource Codes and Values
- •Setting Up Roles
- •Assigning Roles to Resources
- •Defining Custom Resource Curves
- •Reviewing Work Breakdown Structures
- •Viewing a WBS
- •Grouping by WBS Path
- •Adding WBS Elements and Assigning Properties
- •Using WBS Milestones
- •How Weights Affect Percent Complete
- •Assigning WBS Category Values
- •Defining Earned Value Settings for Specific WBS Elements
- •Assigning Estimation Weights to WBS Elements
- •Defining Budgets
- •Top-Down Budgeting
- •Establishing Budgets
- •Establishing a Monthly Spending Plan
- •Tracking Budget Changes
- •Establishing Funding
- •Tracking and Analyzing Budgets
- •Establishing Project Codes
- •Defining and Assigning Project Codes
- •Grouping, Summarizing, and Filtering by Codes
- •Working With User-Defined Fields
- •Creating User-Defined Fields
- •Working with User-Defined Fields
- •Working with Indicators
- •Creating Calendars
- •Adding Calendars
- •Modifying Calendars
- •Implementing the Schedule
- •Establishing Activity Codes
- •Creating Activity Codes and Values
- •Grouping and Summarizing by Codes
- •Working with Activities
- •Activities Overview
- •Adding Activities
- •Defining General Activity Information
- •Defining Schedule Information
- •Establishing Relationships
- •Dissolving Activities
- •Displaying Activity Details for Assignments
- •Assigning Resources and Roles
- •Recalculating Costs/Units for Assignments
- •Choosing the Rate Source and Rate Type for an Assignment
- •Assigning Resource Curves to Resource or Role Assignments
- •Manually Planning Future Period Assignments
- •Assigning Activity Codes and Adding Expenses
- •Viewing Activity Feedback and Posting Resource Notes
- •Assigning Work Products and Documents
- •Adding Steps
- •Setting Options for Using Weighted Steps
- •Creating and Assigning Activity Step Templates
- •Viewing Activity Summaries
- •Viewing Contract Manager Documents
- •Using Global Change
- •Working with Cost Accounts and Project Expenses
- •Cost Account and Expense Overview
- •Setting Up a Cost Account Structure
- •Adding Expenses and Entering Cost Information
- •Defining Expense Details
- •Analyzing Costs
- •Performing Top-down Estimation
- •Performing Top-down Estimation
- •Applying Saved Top-Down Estimates To a Project
- •Managing Baselines
- •Creating and Maintaining Baselines
- •Assigning Baselines to Projects
- •Comparing Current and Baseline Schedules
- •Updating Baselines
- •Ensuring Baseline Data Is Updated
- •Updating, Scheduling, and Leveling
- •The Update Process
- •Choosing a Method of Updating
- •Highlighting Activities for Updating
- •Updating Progress for Spotlighted Activities
- •Estimating Progress Automatically
- •Setting Auto Compute Actuals
- •Updating Using Timesheets
- •Updating Activities Manually
- •Removing Progress from Activities
- •Interrupting Activity Progress
- •Applying Actuals
- •Storing Period Performance (Past Period Actuals)
- •Scheduling Projects
- •Types of Activity Dates
- •Leveling Resources
- •Recalculating Resource and Role Assignment Costs
- •Managing Resource Assignments
- •Summarizing Projects
- •Setting Summarization Options
- •Summarizing Project Data
- •How Data Is Summarized
- •Managing Risks
- •Adding Risks
- •Calculating Exposure Values
- •Calculating a Risk’s Impact
- •Creating and Deleting Risk Types
- •Customizing Risk Layouts
- •Project Issues and Thresholds
- •Adding Issues
- •Assigning Tracking Layouts to Issues
- •Using the Issue Navigator
- •Adding Thresholds
- •Threshold Parameter Definitions
- •Monitoring Thresholds
- •Assigning Tracking Layouts to Thresholds
- •Maintaining a Project’s Document Library
- •Specifying Document Location References
- •Assigning Work Products and Documents
- •Tracking Projects
- •Creating Tracking Layouts
- •Working with Tracking Layouts
- •Customizing Tracking Layouts
- •Comparing Projects with Claim Digger
- •Claim Digger Overview
- •Comparing Projects/Baselines
- •Comparison Data
- •Creating and Using Reflections
- •Reflection Overview
- •Creating and Using Reflections
- •Reflection Guidelines
- •Checking Projects In and Out
- •Managing Remote Projects
- •Checking Out Projects
- •Checking In Projects
- •Customizing Projects
- •Working with Layouts
- •Layout Types
- •Creating, Opening, and Saving Layouts
- •Exporting and Importing Layouts
- •Copying and Pasting Resource Spreadsheet Data to Microsoft Excel
- •Grouping, Sorting, and Filtering Data
- •Grouping Data
- •Sorting Data
- •Reorganizing Data
- •Filtering Data
- •Combining Filters
- •Customizing Layouts
- •Modifying Columns
- •Adjusting the Timescale
- •Formatting Gantt Charts
- •Formatting Activity Network Layouts
- •Modifying Resource and Activity Usage Profile Settings
- •Customizing Reports
- •Reports Overview
- •Opening Reports
- •Creating and Modifying Reports
- •Using the Report Editor
- •Adding Data Sources and Rows to Reports
- •Adding Text Cells to Reports
- •Sorting Report Data Sources
- •Customizing a Report with the Report Editor: an Example
- •Using Report Groups
- •Setting Up Batch Reports
- •Printing Layouts and Reports
- •Defining Page Settings
- •Previewing Layouts and Reports
- •Printing Layouts and Reports
- •Selecting a Printer
- •Publishing Layouts and Reports in HTML Format
- •Publishing a Project on the World Wide Web
- •Project Web Site Overview
- •Publishing a Project Web Site
- •Customizing the Appearance of a Project Web Site
- •Publishing Activity and Tracking Layouts
- •Linking the Project Management and Contract Manager Modules
- •Linking the Project Management Module to Contract Manager
- •Linking a Project Management Project to a Contract Manager Project
- •Importing Contract Manager Data to a Project Management Module Project
- •Index
Printing Layouts and Reports 491
Printing Layouts and Reports
In this chapter
Defining Page Settings
Previewing Layouts and Reports
Printing Layouts and Reports
Publishing Layouts and Reports
in HTML Format
Printing layouts and reports for distribution is an effective way to communicate project data. This chapter discusses how to define page settings (such as page orientation, margins, and header/footer settings), preview layouts/ reports, and print them (including how to convert them to Web reports).
Primavera - Project Management
492 Part 5: Customizing Projects
Defining Page Settings
You can customize printed layouts and reports in a number of ways. For example, customize header and footer settings and change margins for the printed page.
Define page settings From the Print Preview window, click the Page
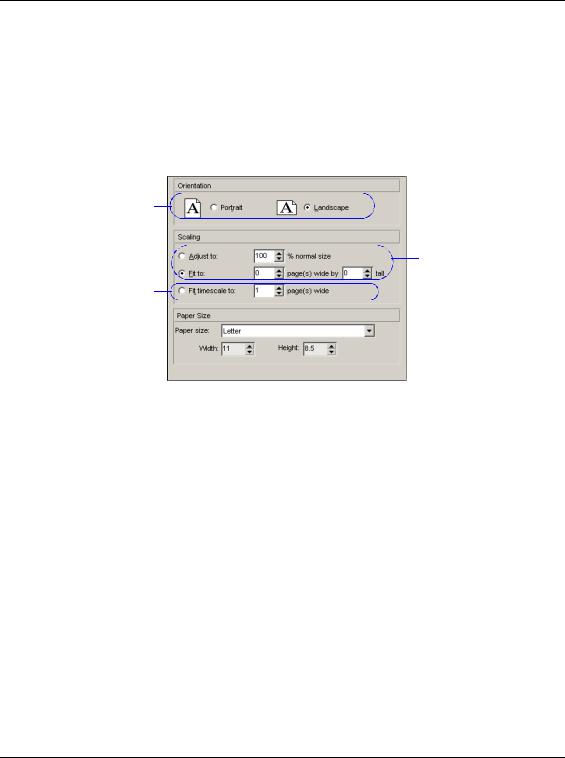
Setup button. Click the Page tab to set orientation, scaling, and paper size.
Portrait orientation prints vertically on the page; landscape orientation prints horizontally on the page.
Use Print Preview to see the number of pages the layout will span. Choose this option to compress spacing by specifying the number of pages. This option is available for layouts only.
To increase or reduce the size of the printed layout/ report, specify a percentage in the Adjust To field. To increase or reduce the number of pages to be printed horizontally and vertically, choose Fit to, then specify a value in the Pages Wide field.
Primavera - Project Management
Printing Layouts and Reports 493
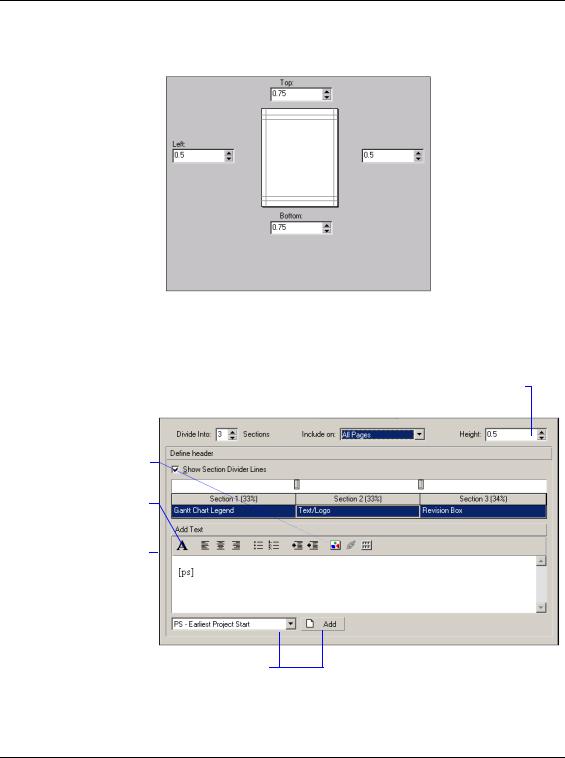
Set page margins Click the Margins tab, then specify the values for each margin.
Add headers and footers You can customize the header and footer. You can also insert a graphic, such as your company logo, in the header or footer. Click the Header or Footer tab.
Type or select the amount of sections |
|
Select when you want to |
|
Select the height of |
|
|
|||
to divide the header or footer into. |
print the header/footer. |
the header/footer. |
||
|
|
|
|
|
|
|
|
|
|
Click to add a logo to the selected section.
Click to change the font, then specify font settings and click OK.
In the Text/Logo section, add text to the header or footer by typing directly in the selected tab. Do not modify any text between square brackets [ ].
Select a global variable and click Add. Global variables include portfolio properties (earliest project start, earliest data date, and so on).
Primavera - Project Management

494 Part 5: Customizing Projects
In the Define Header/Footer section, mark the Show Section Divider Lines checkbox to display lines between each section of the header or footer. Define the values you want to insert in the header or footer. Choose Text/Logo to add text variables or a logo, such as your company logo. Choose Revision Box to allow space in the header/footer to be able to enter dates, approvals, and revision information. If displaying the Gantt Chart in your layout, you can choose to display the Gantt Chart Legend in the header or footer.
Add a logo to a header or footer Click the Header or Footer tab, in the Define header/footer section, choose Text/Logo for the selected section. In the Add Text section, click the Picture button. Click the Browse button in the Picture dialog box, then select a filename and click Open. Specify the layout and spacing options and click OK. The logo image is displayed in the Header or Footer Sample area.
If you change the report page setup from the Print Preview dialog box, the changes will be applied only to the current printing. To save changes to the report page setup permanently, make the changes from the Properties palette in the Report Editor.
Primavera - Project Management
Printing Layouts and Reports 495
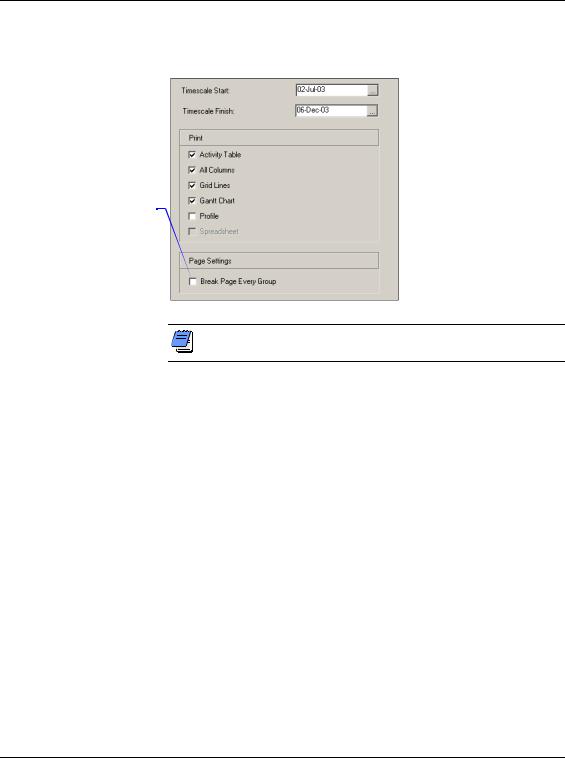
Specify layout options Use the Options tab to select the layout areas and timeframe to include in the printed layout.
Mark this checkbox if you want each group printed on its own page. For example, you may want to group your activities by resource and distribute a printout to each individual.
The Options tab contains different options when printing reports.
Primavera - Project Management