

- •Table of Contents
- •Preface
- •Primavera Products
- •Using Documentation and Help
- •Where to Get Support
- •Understanding Project Management
- •Why Use Project Portfolio Management?
- •Your Role in the Organization
- •Project Management Process Overview
- •Planning, Controlling, and Managing Projects
- •Quick Tour
- •Getting Started
- •Selecting a Language
- •The Workspace
- •What Is a Layout?
- •Customizing Displays
- •Sample Layouts
- •Using Wizards
- •Defining Administrative Preferences and Categories
- •Defining Default Settings
- •Allowing Users to Define the Default Hours per Time Period
- •Defining Standard Categories and Values
- •Defining Currencies
- •Setting User Preferences
- •Formatting Time Units
- •Formatting Dates
- •Setting View Currency and Symbols
- •Setting Mail Preferences
- •Implementing Wizards
- •Creating a Log of Tasks and Setting Startup, Group and Sort, and Column Options
- •Changing Your Password
- •Setting Profile and Spreadsheet Data Options
- •Setting Calculation Options for Resource and Role Assignments
- •Selecting Startup Filters
- •Structuring Projects
- •Setting Up the Enterprise Project Structure
- •Enterprise Project Structure Overview
- •Summarizing Projects
- •Setting Up the Enterprise Project Structure
- •Adding a New Project to the Enterprise Project Structure
- •Using Project Architect
- •Working with the Enterprise Project Structure
- •Using Root Nodes to Denote Project Status
- •Defining Enterprise Project Structure Details
- •Leveling Priority
- •Anticipated Dates
- •Auto-Numbering Activity IDs
- •Setting Up the Organizational Breakdown Structure
- •Viewing an OBS
- •Setting Up an OBS
- •Editing OBS Elements
- •Defining Resources and Roles
- •Resources Overview
- •Viewing and Adding Resources
- •Default Units/Time
- •Using Limits for Delayed Resource Start
- •Defining Resource Shifts
- •Defining and Assigning Resource Codes and Values
- •Setting Up Roles
- •Assigning Roles to Resources
- •Defining Custom Resource Curves
- •Reviewing Work Breakdown Structures
- •Viewing a WBS
- •Grouping by WBS Path
- •Adding WBS Elements and Assigning Properties
- •Using WBS Milestones
- •How Weights Affect Percent Complete
- •Assigning WBS Category Values
- •Defining Earned Value Settings for Specific WBS Elements
- •Assigning Estimation Weights to WBS Elements
- •Defining Budgets
- •Top-Down Budgeting
- •Establishing Budgets
- •Establishing a Monthly Spending Plan
- •Tracking Budget Changes
- •Establishing Funding
- •Tracking and Analyzing Budgets
- •Establishing Project Codes
- •Defining and Assigning Project Codes
- •Grouping, Summarizing, and Filtering by Codes
- •Working With User-Defined Fields
- •Creating User-Defined Fields
- •Working with User-Defined Fields
- •Working with Indicators
- •Creating Calendars
- •Adding Calendars
- •Modifying Calendars
- •Implementing the Schedule
- •Establishing Activity Codes
- •Creating Activity Codes and Values
- •Grouping and Summarizing by Codes
- •Working with Activities
- •Activities Overview
- •Adding Activities
- •Defining General Activity Information
- •Defining Schedule Information
- •Establishing Relationships
- •Dissolving Activities
- •Displaying Activity Details for Assignments
- •Assigning Resources and Roles
- •Recalculating Costs/Units for Assignments
- •Choosing the Rate Source and Rate Type for an Assignment
- •Assigning Resource Curves to Resource or Role Assignments
- •Manually Planning Future Period Assignments
- •Assigning Activity Codes and Adding Expenses
- •Viewing Activity Feedback and Posting Resource Notes
- •Assigning Work Products and Documents
- •Adding Steps
- •Setting Options for Using Weighted Steps
- •Creating and Assigning Activity Step Templates
- •Viewing Activity Summaries
- •Viewing Contract Manager Documents
- •Using Global Change
- •Working with Cost Accounts and Project Expenses
- •Cost Account and Expense Overview
- •Setting Up a Cost Account Structure
- •Adding Expenses and Entering Cost Information
- •Defining Expense Details
- •Analyzing Costs
- •Performing Top-down Estimation
- •Performing Top-down Estimation
- •Applying Saved Top-Down Estimates To a Project
- •Managing Baselines
- •Creating and Maintaining Baselines
- •Assigning Baselines to Projects
- •Comparing Current and Baseline Schedules
- •Updating Baselines
- •Ensuring Baseline Data Is Updated
- •Updating, Scheduling, and Leveling
- •The Update Process
- •Choosing a Method of Updating
- •Highlighting Activities for Updating
- •Updating Progress for Spotlighted Activities
- •Estimating Progress Automatically
- •Setting Auto Compute Actuals
- •Updating Using Timesheets
- •Updating Activities Manually
- •Removing Progress from Activities
- •Interrupting Activity Progress
- •Applying Actuals
- •Storing Period Performance (Past Period Actuals)
- •Scheduling Projects
- •Types of Activity Dates
- •Leveling Resources
- •Recalculating Resource and Role Assignment Costs
- •Managing Resource Assignments
- •Summarizing Projects
- •Setting Summarization Options
- •Summarizing Project Data
- •How Data Is Summarized
- •Managing Risks
- •Adding Risks
- •Calculating Exposure Values
- •Calculating a Risk’s Impact
- •Creating and Deleting Risk Types
- •Customizing Risk Layouts
- •Project Issues and Thresholds
- •Adding Issues
- •Assigning Tracking Layouts to Issues
- •Using the Issue Navigator
- •Adding Thresholds
- •Threshold Parameter Definitions
- •Monitoring Thresholds
- •Assigning Tracking Layouts to Thresholds
- •Maintaining a Project’s Document Library
- •Specifying Document Location References
- •Assigning Work Products and Documents
- •Tracking Projects
- •Creating Tracking Layouts
- •Working with Tracking Layouts
- •Customizing Tracking Layouts
- •Comparing Projects with Claim Digger
- •Claim Digger Overview
- •Comparing Projects/Baselines
- •Comparison Data
- •Creating and Using Reflections
- •Reflection Overview
- •Creating and Using Reflections
- •Reflection Guidelines
- •Checking Projects In and Out
- •Managing Remote Projects
- •Checking Out Projects
- •Checking In Projects
- •Customizing Projects
- •Working with Layouts
- •Layout Types
- •Creating, Opening, and Saving Layouts
- •Exporting and Importing Layouts
- •Copying and Pasting Resource Spreadsheet Data to Microsoft Excel
- •Grouping, Sorting, and Filtering Data
- •Grouping Data
- •Sorting Data
- •Reorganizing Data
- •Filtering Data
- •Combining Filters
- •Customizing Layouts
- •Modifying Columns
- •Adjusting the Timescale
- •Formatting Gantt Charts
- •Formatting Activity Network Layouts
- •Modifying Resource and Activity Usage Profile Settings
- •Customizing Reports
- •Reports Overview
- •Opening Reports
- •Creating and Modifying Reports
- •Using the Report Editor
- •Adding Data Sources and Rows to Reports
- •Adding Text Cells to Reports
- •Sorting Report Data Sources
- •Customizing a Report with the Report Editor: an Example
- •Using Report Groups
- •Setting Up Batch Reports
- •Printing Layouts and Reports
- •Defining Page Settings
- •Previewing Layouts and Reports
- •Printing Layouts and Reports
- •Selecting a Printer
- •Publishing Layouts and Reports in HTML Format
- •Publishing a Project on the World Wide Web
- •Project Web Site Overview
- •Publishing a Project Web Site
- •Customizing the Appearance of a Project Web Site
- •Publishing Activity and Tracking Layouts
- •Linking the Project Management and Contract Manager Modules
- •Linking the Project Management Module to Contract Manager
- •Linking a Project Management Project to a Contract Manager Project
- •Importing Contract Manager Data to a Project Management Module Project
- •Index

Customizing Reports 455
Customizing Reports
In this chapter
Reports Overview
Opening Reports
Creating and Modifying Reports
Using the Report Editor
Adding Data Sources and Rows to Reports
Adding Text Cells to Reports
Sorting Report Data Sources
Customizing a Report with the Report Editor: an Example
Setting Up Batch Reports
Reporting is a key part of monitoring a project and communicating its progress to team members and executive management. This chapter discusses how to open standard reports, create new reports, and modify existing reports. It also describes how you can organize reports in hierarchical groups.
Refer to “Printing Layouts and Reports” on page 491 for instructions on setting page and print options, previewing and printing layouts and reports, and publishing layouts and reports in HTML format.
Primavera - Project Management

456 Part 5: Customizing Projects
Reports Overview
You can create new reports, or modify existing ones, using the Report Wizard or Report Editor. A large library of standard reports is provided for your use.
The Report Wizard enables you to create a wide variety of complex reports very rapidly using a wizard-style interface. You can also use the wizard to modify reports created using the wizard.
The Report Editor is a “what-you-see-is-what-you-get” (WYSIWYG) report writer that allows you to group, sort, filter, and roll up project information. You can also display time distributions for units and costs, and include graphics and HTML links in reports. Use the Report Editor to modify and custom tailor reports created in the Report Wizard.
The report icon shows whether it was created in the Report Wizard or the
Report Editor.
Indicates the reports were created using the Report Wizard 
Indicates the reports were created using the Report Editor
After you create a report, you can preview, print, or save it to a text or HTML file. Saving the report to a file enables you to import data to a spreadsheet program, e-mail it, archive it, or publish it on a Web site.
Primavera - Project Management
Customizing Reports 457
Opening Reports
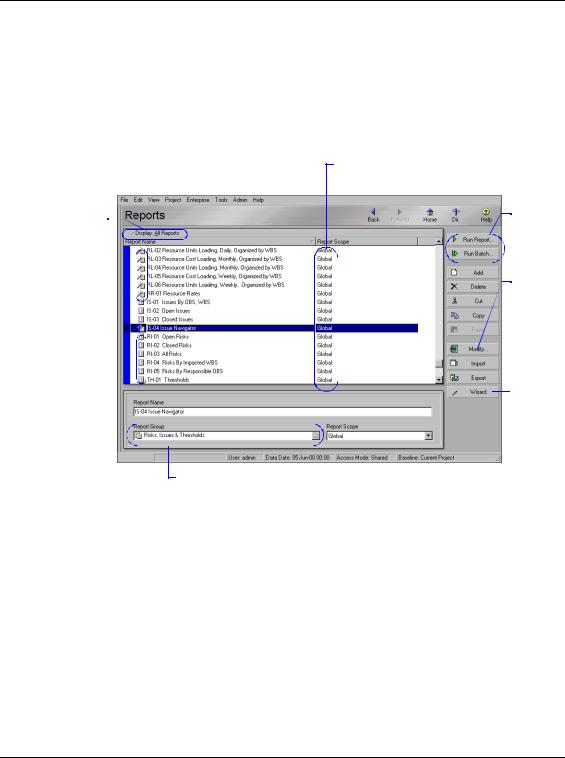
Click the Display Options bar to sort and filter the reports listed in this window and to define screen fonts and colors.
Use the Reports window to create, edit, run, and delete global and project reports. You can also use the Reports window to export and import reports to and from other module installations.
Open the Reports window Choose Tools, Reports, Reports.
Reports can be global or project specific.
Print single or batch reports.
Click to build reports using the Report Editor.
Click to easily create ad hoc reports.
Each report can belong to one report group. To add, modify, or delete these groups, choose Tools, Reports, Report Groups.
Primavera - Project Management
458 Part 5: Customizing Projects
Creating and Modifying Reports
For additional information about creating and modifying reports using the Report Wizard and Report Editor, refer to the Help.
You can create and modify reports using the Report Wizard or Report Editor. Use the Report Wizard to quickly create a report using the wizard interface. Use the Report Editor to modify and custom tailor your reports according to your needs.
The Report Wizard quickly guides you through creating ad hoc reports and enables you to group, sort, and filter the data. If a report is modified using the Report Editor, and you decide to change it again using the Report Wizard, the changes made in the Report Editor will be lost.
To include a new report in a particular report group, select the report group in the Reports window before you start the wizard. When you finish creating the report, it will be saved in the selected report group.
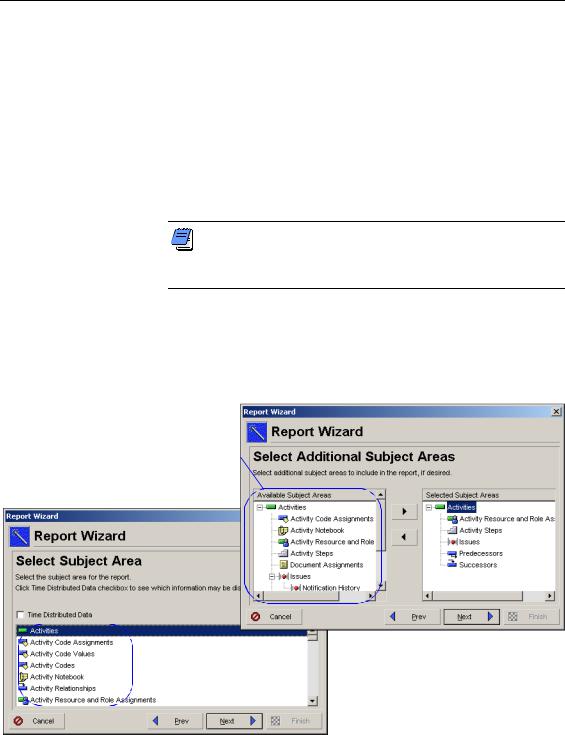
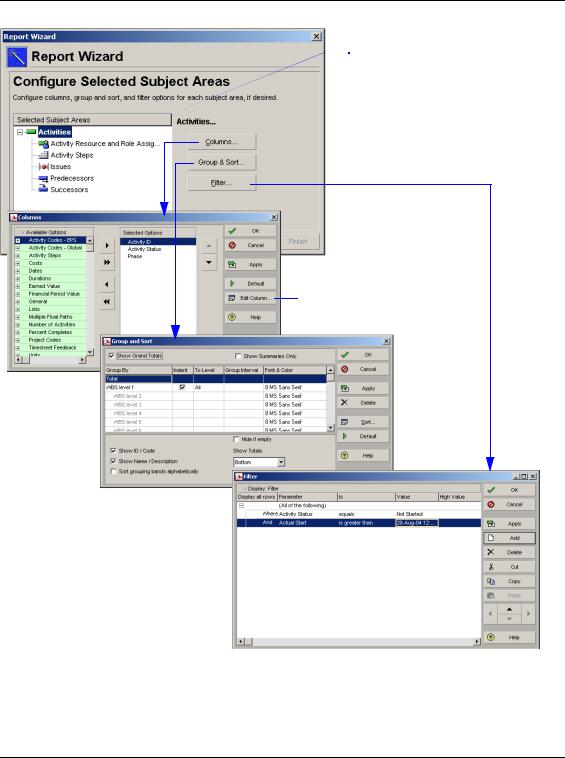
Create a report with the Report Wizard Choose Tools, Report Wizard, and follow the prompts. Using the Wizard, you can select multiple subject areas for the report. For each selected subject area you can customize columns and apply group, sort, and filter options. When you are finished defining the report parameters, click Finish.
The subject |
|
...determines the |
|
|
|
||||
area selected |
|
additional subject areas |
||
here... |
|
available for the report. |
||
|
|
|
|
|
|
|
|
|
|
Primavera - Project Management
Customizing Reports 459
Select the subject area to configure. You can customize columns and apply group, sort, and filter options.
Click to change the name of a field as it appears on the report.
Primavera - Project Management
460 Part 5: Customizing Projects
For more information on using the Report Editor, refer to the next section, “Using the Report Editor”.
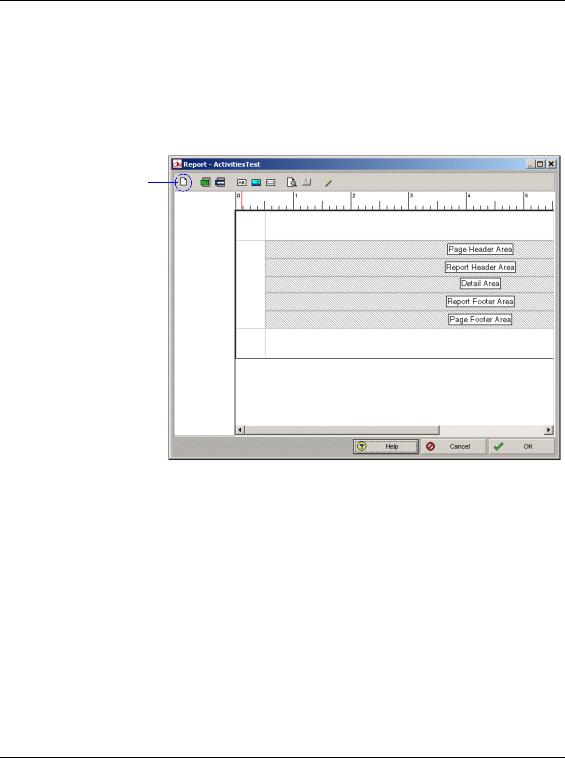
Create a report with the Report Editor To create a blank report with the Report Editor, you need to select an existing report first. If you do not want to modify your original report, make a copy of it before you edit it with the Report Editor. Once you select a report, click Modify, and confirm that you want to use the Report Editor. Within the Report Editor, click the new report icon and confirm your decision. You have now a blank report that you can customize.
Click the New Report icon to create a blank report.
Modify a report You can modify reports using the Report Wizard or the Report Editor. In the Reports window, select the name of the report you want to modify. To use the wizard, click the Wizard button. To use the Report Editor, click Modify.
Primavera - Project Management