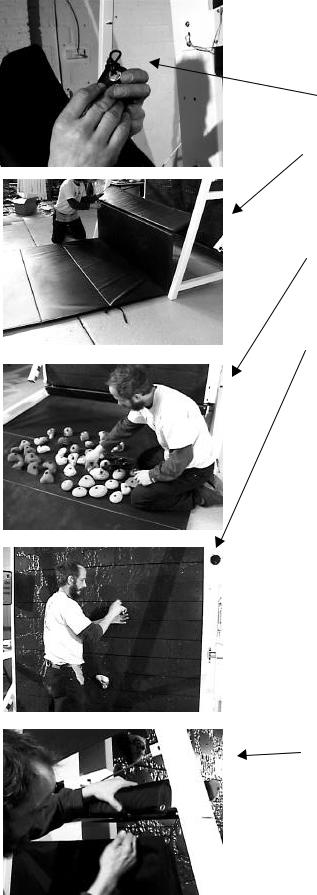

qAttach the stiffy. On the front of the panel there is one hole near the middle that does not have a flat 'island' around it. There is a bag of short round-head bolts in the hardware box. Screw one of these bolts through this special hole to hold on the stiffy.
qSlip the first panels into the front of the channels and bolt to the chains.
The nuts go to the rear. Make the bolts firm, but not tight enough to sink the heads into the panels. If you are using a cordless drill, use a very low setting on the clutch. On a DeWalt drill, we use a setting of 3.
qAlign the sprocket. After the first panel is installed, rotate it around by pulling the chains down until the panel has made one complete rotation. This will align the sliding sprocket on the lower shaft. You may have to tap the sprocket into alignment with a hammer.
IMPORTANT: NOTE THAT THERE ARE TWO TYPES OF PANELS – PANELS WITH WHITE CORNER BUTTONS AND PANELS WITH BLACK BUTTONS.
Alternate the panels. The black-button and white-button panels alternate during installation. The panels must be oriented so that the buttons face outward at the upper corners of the panel. This will insure that the hold-mounting holes will also alternate
As you progress, and the panels are moving up the back of the machine, it takes a lot of effort to push them down. This is normal. You will need to hold the panels in front to keep them from sliding up.
q Use short pieces (12" or so) of 2x3 lumber to jam the wall. Simply slip them between panels at the bottom of the wall on each side. As the panels try to ride up, the block will hold them in place.
.
11 |
Install Body 010710a with slots.doc |
|

Align the main frames.
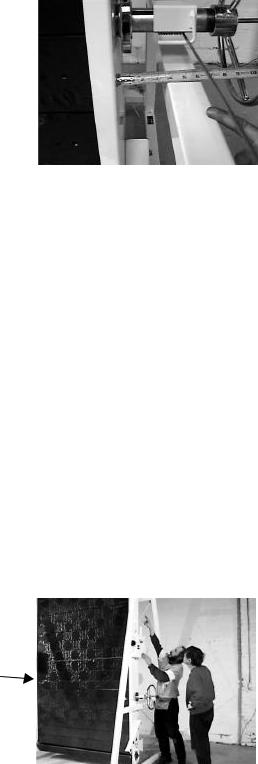
qMeasure the distance between the frame and the side of the  right channel. This space should be 3 1/2". Adjust the rear
turnbuckles to make this space 3-1/2". These turnbuckles should be quite tight when you finish.
If this spacing is wrong the angle-adjuster may not work too smoothly - it may be difficult to lock the chrome ring onto the stud.
qInstall the last three panels by slipping them in from the bottom.
Run the panels around until the gap is at the bottom front. Slip the panels in one at a time and install the bolts. Use the side openings at the channel bottom to access the nuts for tightening. Double check the orientation of each panel. Be careful not to pinch yourself.
Before installing the last panel, double-check to make sure everything is right inside. We usually wait until the holds are on so we can test the machine.
The last panel is somewhat awkward - be patient. Put the bolts and nuts in with the panel at the bottom or carefully rotate the panel upward until you can reach the nuts through the access hole.
Final adjustment of drive chain
The drive chain is kept in tension by the hold-down bolt at the top of the control panel (see page 8). The drive chain stretches at first and continues to lengthen during the first-month break-in period.
qCheck the hold-down bolt at the top of the pump. If there is a gap between the bolt and the top of the pump, turn it down finger-tight again and re-lock it in place with the lock-nut.
qMake sure that someone at the facility knows how to adjust the hold-down bolt. Emphasize that the chain will stretch during the first week of use and the bolt will have to be re-adjusted. It should be checked periodically and adjusted if necessary.
12 |
Install Body 010710a with slots.doc |
|

Side Covers, Mat, Holds and Post Pads:
qMount the side covers on the frame hooks. Use wire ties for the top grommets – leave them quite loose. Use o-rings for the bottoms. Push an o-ring into each grommet and loop it back through itself.
qPlace the mat between the frames and attach the loops around the front legs of the frame. The short folded section goes to the rear.
qAttach the LadderLine tm rung set. Instructions are packed in the box.
The standard Treadwall hold set has 30 holds.
qUnpack all the holds and lay them out on the mat in front of the machine.
qMatch the holds with hold-bolts. The bolt should project at least 3/4" from the back of the hold. Sometimes
a few of the larger holds need longer bolts.
Bolt the holds firmly onto the panels. Start with one color and bolt one hold onto each 5th panel. Distribute them evenly from side to side as you go along. Repeat for each color. This will distribute the colors evenly around the machine, and you will have a few holds left to fill in any gaps.
Each hold has a positive edge. Generally speaking, these positive edges should face up so that the climb will not be too intimidating, but put a few on as side-grips or under-clings to add interest. Once the holds are on you can fine-tune it by rotating holds and moving a few around. It’s OK for some of the holds to share wall space with the LadderLine rungs.
qEach color of holds can be a separate climbing route. Or you can combine colors to make a route. You will find that some routes are much easier than others
Very important - Don't allow larger holds to overlap onto the next panel. Most of the holds supplied with the Treadwall are designed so that they will not overlap, but some may need to be correctly oriented. Other holds from different suppliers may be larger. Also, holds must not stick out more than 2 ½” from surface of wall.
qAttach the two post pads under the cables on either side of the machine.
qUse 3 cable ties for each pad. position the ratchets at the bottom of the pad and space them evenly for appearance.
Cleaning up the machine completes the Treadwall installation.
13 |
Install Body 010710a with slots.doc |
|
Instruction Card:
A laminated instruction card with a ball chain is included with the Treadwall. Hang it from the right frame on the cable attachment pin. This pin uses a split ring instead of a cotter pin, and the instruction card hangs from this ring.
Purging the Hydraulic System:
Sometimes when the Treadwall is first assembled, the control system runs a bit rough and noisy - almost a grinding sound - and the wall doesn't descend smoothly. This is due to air in the system that foams into the oil and causes cavitation in the pump. To purge the air, put the wall at the steepest angle, set the control valve at the fastest setting, and pull the wall around steadily and slowly for about 15 seconds. Let the wall sit for about 5 - 10 minutes, and do it again. If you do this about 3 times, the air will percolate up into the reservoir where it belongs, and the wall will run smoothly.
Climbing tips:
♦Some people like to climb fast and some climb slowly.
♦Fast climbing provides a quick pump, and - at easy angles - an excellent aerobic workout.
♦Slow climbing promotes fluid motion, balance, flexibility, and - at harder angles - a great upper-body workout.
♦The braking system in the Treadwall insures that the wall will always stop before the climber reaches the bottom of the wall.
♦Some climbers like the wall to operate continuously without the brake stopping the wall. A switch on the control panel allows you to put the Treadwall into this mode. Continuous operation is particularly good for aerobic climbing.
♦Climbing is most comfortable when the speed of descent is matched to the climbing speed, so that the wall rarely stops. Adjust the speed dial as you climb to a comfortable level.
Why is climbing on the Treadwall one of the world's best forms of exercise?
♦Climbing is a true whole-body exercise. Climbing naturally works out almost every muscle in the body.
♦Climbing is non repetitive. Many forms of exercise work out the same muscles over and over, but not climbing.
♦Climbing is progressive. Anyone can climb, but the more you climb, the better you get - even if you climb for years and years.
♦Treadwall Climbing promotes balance, stretching, flexibility, upper-body strength and aerobic conditioning. No other form of exercise is so versatile.
♦Climbing is fun and engages the mind.
♦There are no age limits and very few physical handicaps preclude climbing on the Treadwall.
14 |
Install Body 010710a with slots.doc |
|
The last word:
NOBODY LIKES GOING BACK!
Treadwalls get installed in the darndest places, sometimes hundreds of miles from where installers call home. Making that long trip across the panhandle and down through the wastelands to fix some stupid little problem is a project to avoid, even if you have a keen appreciation for big sky and deja-vue.
Its the little things that count - at least that's what we have found. Those little tiresome details have a tendency to sneak around to your backside and take a big bite. Here are some things that have shown up on the whack-your-head-and-say-duh screen:
îMasterlink or Monsterlink?
Every masterlink has three parts. What if you leave off the plate with two holes? What if the spring clip isn’t put on right? It can get pretty ugly!
îWhy are my cables all frayed?
Oops – someone forgot to tell you to keep the cables tight. Stretch them! (page 7). Make sure someone knows: Tighten those turnbuckles every day for the first week!!! And show them how to adjust the drive chain hold-down bolt too!!!
îI seem to have lost my bearings!
Well – maybe not lost, but maybe too tight?? The shaft bearings at the bottom of each channel must be totally free to pivot so they can self-adjust under spring tension. If the bolts are tightened, this whole system stops working, the wall will jam up, panels will start chipping, and hair will be pulled off of scalps. Better a little too loose than too tight!
îWhat the hell is a Climbometer?
Time? Distance? calories? Whatever. It ain’t gonna work if the sensor and magnets aren’t adjusted right. And treat that reed-switch sensor with respect! And make sure the wires are out of harm’s way.
îBolts and nuts are falling downM falling downN falling downN and for some reason the shroud only has one bolt on the right side!
Yes – it’s actually happened. Loss of concentration is my guess – or maybe glue sniffing. Check everything before putting on panels.
îMommy! Mommy! What’s that thing sticking out of the Treadwall?
Well technically, it a piece of 5/16 hot rolled round, threaded at one end. But now it’s a chunk of twisted scrap metal that’s gonna be nasty to replace – and all because someone forgot to lock down that internal turnbuckle. Make the lock-nuts really tight on the inside turnbuckles!!
îChain-chain-chainN chains that foolN.
Drive chain too tight? Works great for Ralph but Alice can’t budge it. Too loose? Could be worse. Make that hold-down bolt finger tight, and lock it down, but don’t over-tighten. Check it one last time before leaving, and make sure someone knows how and when to adjust it!!!
îHold it right there! Its all about the holds!, and if they are unclimbable, the Treadwall is too. Take a minute to try out the routes and adjust the holds to a friendly state, and make sure they are good and tight too!
15 |
Install Body 010710a with slots.doc |
|
