Транспортные и мультисервисные системы и сети связи.-5
.pdf
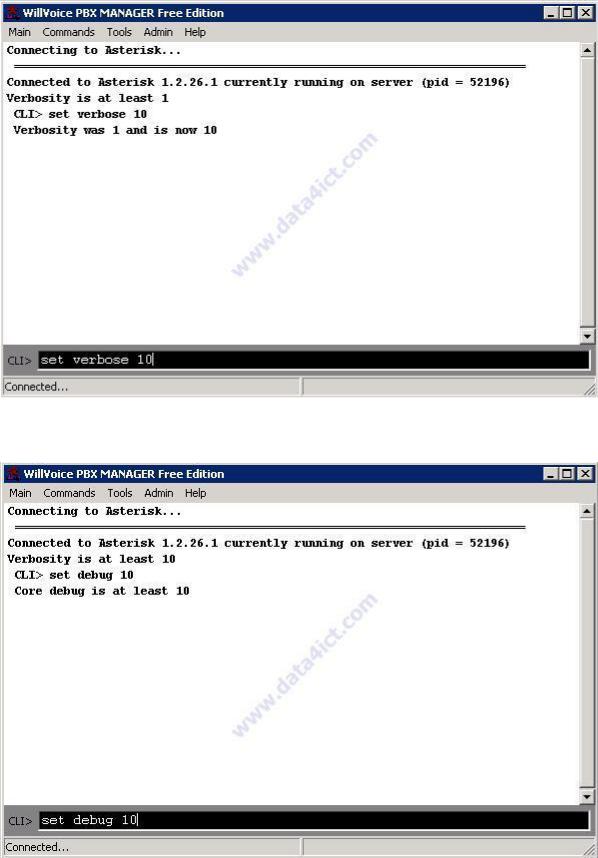
Рис. 6.41. Настройка PBX Manager
Затем выставите set debug 10
Рис. 6.42. Настройка PBX Manager
Так же возможно активировать другие типы отладки системы: (see asterisk CLI command) debug channel / no debug channel
agi debug / agi no debug
142
iax2 debug / iax2 no debug sip debug / sip no debug
Воспроизведение основных звонков
sip.conf |
|
|
Измените |
название файла sip.conf file (Location: C:\cygroot\asterisk\etc\sip.conf) на |
|
sip_old.conf. Затем создайте новый файл sip.conf и вставьте следующее: |
||
[general] |
|
|
context = asterisk |
; Default context for incoming calls |
|
allowguest = no |
; Allow or reject guest calls (default is yes, this can also be set to 'osp' |
|
realm=data4ict.com |
; Realm for digest authentication |
|
bindport = 5060 |
; UDP Port to bind to (SIP standard port is 5060) |
|
bindaddr = 0.0.0.0 |
; IP address to bind to (0.0.0.0 binds to all) |
|
srvlookup = yes |
; Enable DNS SRV lookups on outbound calls |
|
disallow = all |
; First disallow all codecs |
|
allow = ulaw |
; Allow codecs in order of preference |
|
allow = alaw |
|
|
allow = gsm |
|
|
dtmfmode = rfc2833 |
; Set default dtmfmode for sending DTMF. |
|
canreinvite=no
nat=yes
[authentication]
[1001]
type=friend
context=asterisk
username=1001
secret=1001
host=dynamic
callerid="Phone1"
[1002]
type=friend
context=asterisk
username=1002
secret=1002
host=dynamic
callerid="Phone2"
143
extensions.conf
The second file to configure is the extensions.conf file (Location: C:\cygroot\asterisk\etc\extensions.conf). Rename it to extensions_old.conf and create a new extensions.conf empty file. Insert the following lines into the file:
Сконфигурируйте файл extensions.conf file (Location: C:\cygroot\asterisk\etc\extensions.conf). Переименуйте его в extensions_old.conf и создайте новый файл extensions.conf, включающий себя :
[general]
;
;If static is set to no, or omitted, then the pbx_config will rewrite
;this file when extensions are modified. Remember that all comments
;made in the file will be lost when that happens.
static=yes
;
;if static=yes and writeprotect=no, you can save dialplan by
;CLI command 'save dialplan' too
;
writeprotect=yes
;
;If autofallthrough is set, then if an extension runs out of
;things to do, it will terminate the call with BUSY, CONGESTION
;or HANGUP depending on Asterisk's best guess (strongly recommended).
autofallthrough=yes
;If clearglobalvars is set, global variables will be cleared
;and reparsed on an extensions reload, or Asterisk reload.
;
clearglobalvars=no
;
;If priorityjumping is set to 'yes', then applications that support
;'jumping' to a different priority based on the result of their operations
;will do so (this is backwards compatible behavior with pre-1.2 releases
;of Asterisk). Individual applications can also be requested to do this
;by passing a 'j' option in their arguments.
144
;
priorityjumping=yes
;
;[globals]
;
[internal]
exten => 1001,1,Dial(SIP/1001,20,Tr) exten => 1001,2,Hangup()
exten => 1002,1,Dial(SIP/1002,20,Tr) exten => 1002,2,Hangup()
[asterisk]
include => internal
;
; Create an extension, 600, for evaluating echo latency.
;
exten => 600,1,Playback(demo-echotest) |
; Let them know what's going on |
|
exten => 600,2,Echo |
; Do the echo test |
|
exten => 600,3,Playback(demo-echodone) |
; Let them know it's over |
|
Настройка ответных звонков sip.conf
Чтобы включить эту функцию, аккаунт нуждается в номере sip оператора.
С этим аккаунтом вы получите имя пользователя, пароль и sipадрес или IPадрес
поставщика шлюза sip.
Конфигурация для основных и обратных звонков почти тоже самое, за исключением параметра "type=friend" становится "type=peer". Добавьте следующие строки в sip.conf file
(Location: C:\cygroot\asterisk\etc\sip.conf).
[DATA4ICT] |
- Your provider name |
|
type=peer |
|
|
username=1008100945 |
- Your account username |
|
fromuser=1008100945 |
- Your account username |
|
secret=aZ4kbY3i |
- Your account password |
|
host=178.63.114.87 |
|
- Your provider gateway |
В sip.conf file до [general] добавить регистрационное определение: register => 1008100945:aZ4kbY3i@178.63.114.87
145
Витоге файл sip.conf должен содержать:
[general]
context = asterisk |
; Default context for incoming calls |
allowguest = no |
; Allow or reject guest calls (default is yes, this can also be set |
to 'osp' |
|
realm=data4ict.com |
; Realm for digest authentication |
bindport = 5060 |
; UDP Port to bind to (SIP standard port is 5060) |
bindaddr = 0.0.0.0 |
; IP address to bind to (0.0.0.0 binds to all) |
srvlookup = yes |
; Enable DNS SRV lookups on outbound calls |
videosupport = yes |
; Enable video |
disallow = all |
; First disallow all codecs |
allow = ulaw |
; Allow codecs in order of preference |
allow = alaw |
|
allow = gsm |
|
allow = h263 |
; H.263 is our video codec |
allow = h263p |
; H.263p is the enhanced video codec |
dtmfmode = rfc2833 |
; Set default dtmfmode for sending DTMF. |
canreinvite=no |
|
nat=yes
register => 1008100945:aZ4kbY3i@178.63.114.87 [authentication]
[1001]
type=friend
context=asterisk
username=1001
secret=1001
host=dynamic
callerid="Phone1"
[1002]
type=friend
context=asterisk
username=1002
secret=1002
host=dynamic
146
callerid="Phone2"
[DATA4ICT]
type=peer
username=1008100945
fromuser=1008100945
secret=aZ4kbY3i
host=178.63.114.87
extensions.conf
Во втором файле настройте extensions.conf (Местонахождение: C:\cygroot\asterisk\etc\extensions.conf). Вставьте следующую строку:
exten => _0.,1,Dial(SIP/DATA4ICT/${EXTEN})
В итоге файл должен содержать:
[general]
;
;If static is set to no, or omitted, then the pbx_config will rewrite
;this file when extensions are modified. Remember that all comments
;made in the file will be lost when that happens.
static=yes
;
;if static=yes and writeprotect=no, you can save dialplan by
;CLI command 'save dialplan' too
;
writeprotect=yes
;
;If autofallthrough is set, then if an extension runs out of
;things to do, it will terminate the call with BUSY, CONGESTION
;or HANGUP depending on Asterisk's best guess (strongly recommended).
autofallthrough=yes
;If clearglobalvars is set, global variables will be cleared
;and reparsed on an extensions reload, or Asterisk reload.
;
clearglobalvars=no
;
147
;If priorityjumping is set to 'yes', then applications that support
;'jumping' to a different priority based on the result of their operations
;will do so (this is backwards compatible behavior with pre-1.2 releases
;of Asterisk). Individual applications can also be requested to do this
;by passing a 'j' option in their arguments.
;
priorityjumping=yes
;
;[globals]
;
[internal]
exten => 1001,1,Dial(SIP/1001,20,Tr) exten => 1001,2,Hangup()
exten => 1002,1,Dial(SIP/1002,20,Tr) exten => 1002,2,Hangup()
[asterisk]
include => internal
;
; Create an extension, 600, for evaluating echo latency.
;
exten => 600,1,Playback(demo-echotest); Let them know what's going on
exten => 600,2,Echo |
; Do the echo test |
|
exten => 600,3,Playback(demo-echodone) |
; Let them know it's over |
|
exten => _0.,1,Dial(SIP/DATA4ICT/${EXTEN})
Установка ПО
ПО на первом компьютере (серверный)
Сейчас основная установка системы завершена. Скачайте софтфон X-Lite (бесплатный sip
телефон) и установите его. Линк: http://www.counterpath.com/x-lite-download.html/.
Двойной клик по скачанному файлу"X-Lite_Win32_4.0_58832" и начнется установка.
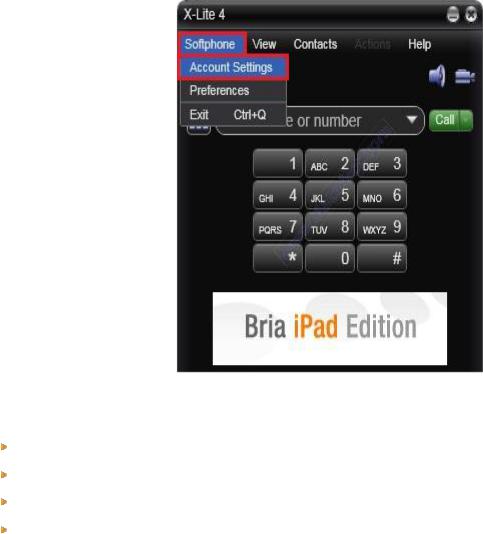
После запустите программу, кликните "Softphone", затем по "Account Settings"
148

|
|
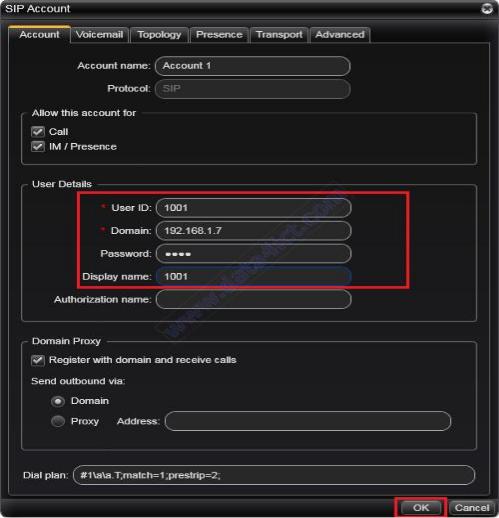
Рис. 6.43. Настройка X-Lite |
|
|
||
В |
поле |
User |
ID |
введите |
: |
1001 |
Domain: |
IP |
address |
of |
the |
asterisk |
server |
Password: |
|
|
|
|
|
1001 |
Display |
|
|
name: |
|
|
1001 |
Click "OK" |
|
|
|
|
|
|
Как показано на рисунке 2.44
149

Рис. 6.44. Регистрация абонента После регистрации , телефон готов производить звонки.
X-Lite (Второй компьютер)
Установите Xlite на втором компьютере по следующим конфигурациям:
User ID: 1002
Domain: IP address of the asterisk server
Password: 1002
Display name: 1002
Проверка
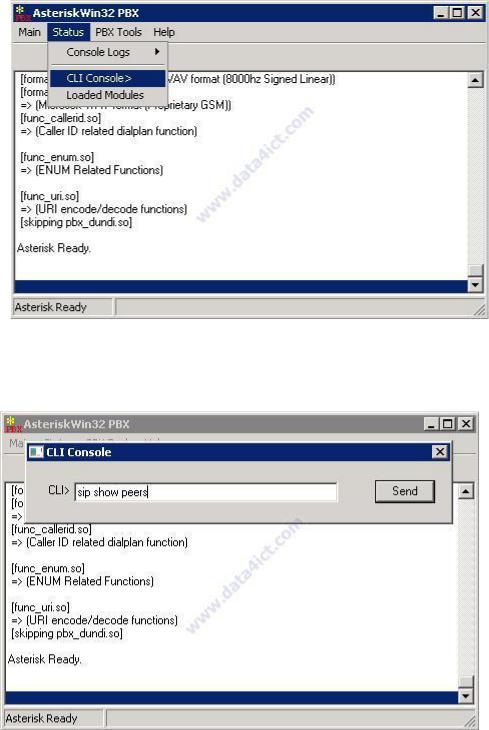
Откройте AsteriskWin32 PBX, откройте вкладку Status, затем CLI Console.
150

Рис. 6.45. Проверка правильности регистрации абонентов
В открытом окне CLI Console введите команду sip show peers, эта команда позволит просмотреть сведения о зарегистрированных абонентах в сети.
Рис. 6.46. CLI Console
Если все сделали по инструкции, то должно вывести информацию об абонентах: Имя,IP-
адрес, Порт, Статус.
151
