

Bodice and collar for Fig 24
Bodice - Trace the bodice Block to waist only.
Draw a vertical CB line starting 0.5-1 cm outside the Block neckline. The short vertical CF line runs from the Block waist to the base of the collar. The collar is shown as a deep V-shape, which could be shortened. Draw straight side seam lines starting
1.5-2 cm outside and 1 cm down from UP. Redraw the armholes to match.
Draw the new curved back neckline 2-5 cm
below the Block neck. Measure from NP to a on the back shoulder, and mark a on the front shoulder to match. Rule the front collar fold line from a to CF (fine broken line).
Collar - This is a 3-piece collar. The back is cut separately in one piece on a fold, and the fronts in one with the gown Fronts. For making up see Methods, Fig 14. For contrasting facings see Methods: Collars and cuffs.
Back collar - Plan the shape, shown by the heavy broken line, on the bodice Back. The collar extends slightly beyond the gown shoulders. Trace off the pattern, to be cut on the fold.
Front collar - Measure off a-(b) on the Front shoulder to equal a-(b) on the Back. Rule from (b) to CF (heavy broken line). Fold back the pattern paper along the fine broken line, a-CF. Trace off the shape of the front collar and open it out again, marking b as shown. The line ab may slope up or down. It may help to fit the collar and Front in calico at this stage, before tracing off the working pattern.
159
 26
26
CB
![]()
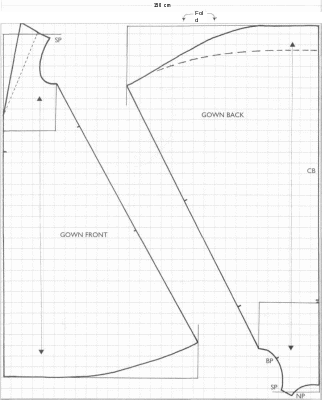
Full pattern and layout for Fig 24
The Back and Front are shown on cloth 150 cm wide folded crossways.
Gown length is 160 cm. Add 10 cm to the length at CB to give a slight train, as shown. Side seam length is 138 cm and hem width is 90 cm, giving a total hem of 360 cm.
To prepare your pattern see Planning above and
Blocks, p. 42.
160
 2
2
![]()
Sleeve for Fig 24
This narrow sleeve has an extension forming a cuff, which may be worn over the hand or turned back, showing the lining or a contrasting facing.
The sleeve is adapted from the Block, with the wrist widened (here by 5 cm) to a slip-on fit.
Measure the armhole of the gown bodice to find the sleeve head increase, here 4 cm.
Trace the Block and cut it in two along the Front line. Rule a new extended Front line on fresh paper. Centre the cut pieces on this line, half the sleeve head increase apart (here 2 cm) all the way down, and paste them in position.
Divide the other half of the increase between the upper and lower BP (here 1 cm at each) and redraw the sleeve head. Widen the wrist just enough to slip over the hand, and mark the balance points, A. Draw new seam lines, BP-A, checking they are of equal length.
Lengthen the sleeve below the wrist by 10-15 cm. Make the cuff end wide enough to flare when turned back over the sleeve. Check on the pattern by folding it back at the wrist, then trace it off. For a tight-fitting sleeve see Fig 31 .
161
Fitted gown
 28
28
Late medieval fitted gown, later 15th century This fashionable gown fits the body to hip level, worn over the tight kirtle (Kirtles, Fig 7). To achieve this look it is planned like a kirtle or cotehardie. The belt is worn lower to emphasise the new look. The edge-to-edge front opening is laced to hip level through concealed metal rings (Methods, Fig 17c). The collar; often of fur, dips below the neckline at
the front. The gown was sometimes worn without a collar. The tight sleeves with conical cuffs are shown in Fig 31.
 31
31