

Фгбоу впо «Национальный исследовательский университет «мэи»
Кафедра иностранных языков
Перевод статьи
по специальности №______________________(шифр специальности)
15 Тыс. Печатных знаков
Аспирант / магистр ____________________________________________
Кафедра ____________________________________________
Научный руководитель __________________________________________
Преподаватель ______________________________ оценка ____________
«__» ___________ 201_г.
Москва 201_ г.
Статья.
«Intro to Metro», Miguel Castro
«CoDe» Magazine (2012 Jul/Aug)
Intro to Metro
Ten years after the release of the .NET Framework, Microsoft is stirring the pot again with a new development platform that set’s to focus your talents on what everyone is betting is the next big thing, mobile devices; specifically in this case, tablets. The Windows Runtime, or WinRT, is the foundation for the development of applications designed to target Windows 8-driven touch-enabled devices, but what does that mean for .NET developers and their existing skill sets?
The move from VB6, which was from where many of us came, to .NET, was pretty significant. For the first time, Microsoft-centric, non C++ developers saw true object orientation, and many other new concepts and features. Even IDE-related programming characteristics shifted considerably: code files independent of classes, many new project templates, and language independence (of course that started a whole new war, didn’t it). The move to WinRT and Metro applications will not be that drastic. Your skills as .NET developers, whether you’re a VB or C# programmer, will be far more leveraged than was the case a decade ago.
What Is Metro and WinRT?
WinRT is short for the Windows Runtime and it is the new generation runtime that will replace Win32. Metro is Microsoft’s new UX style for applications. For the most part, Metro is for a touch-enabled device such as a tablet or a phone. But this does not necessarily rule out the ability for a desktop app to be designed with Metro in mind. Metro apps are designed to be content-centric. This means that they are immersive and chromeless. The best definition I read once for an “immersive application” was an application that has the complete attention of the user. This means an application that is intuitive, attractive and requires very little or even no training in order to use quickly. The Metro UI achieves this through its concentration on content and easy navigation through the use of tiles. Chromeless is essentially the antithesis of the kinds of applications we’ve been designing for many years.
That is not to say that Metro made our older applications bad or ugly. Metro apps with their lack of window border, group frames, ribbons, toolbars, and conventional menus are merely different, and the user interface that they represent fits nicely into the hardware that they target. I’ve worked with and designed applications with ribbons, dockable tool windows, and MDI tabs that looked beautiful and were very intuitive. The style that many are calling legacy now, served very well for many years and will more than likely still have a place going forward for some time. Take any of the Office apps for example; the non-Metro look and feel works perfectly for them. In fact, I can’t honestly imagine how a Metro version of Word or Excel would look or behave.
I’m saying this because it is too often that I see developers embrace something new and automatically label the previous technology, design, or platform as bad and wrong. That is not the case with Metro apps and the next version of the .NET Framework (4.5) will keep and enforce the technologies we use today. And as you’ll soon learn, .NET is alive and well in Metro style apps themselves. Also, please note that Metro and Visual Studio 11 are still not in full release and we may still see changes down the line in both the style of the UI and the development environment.
The Metro Style Apps Development Environment
Developing Metro style apps will require Visual Studio 11 and Windows 8. As of the time of this writing, Microsoft has just released the Windows 8 Consumer Preview (Beta) as well as the Visual Studio 11 Beta.
Visual Studio 11’s New Project dialog is broken up into languages, similar to Visual Studio 2010, and under Visual Basic and Visual C# is a new project type called Windows Metro App. I will focus my attention on this project type in this article. Selecting “Windows Metro App” under either of these two languages will let you build a Metro style app using C# or VB in conjunction with the .NET API for Metro Apps. This API contains a set of managed types used for building Metro apps with XAML. So for you WPF or Silverlight developers (such as myself), your skills are far from lost and will be crucial going forward down this particular path. The .NET API for Metro style apps can be considered a subset of the whole .NET Framework but in fact, it’s a bit different. The .NET API for Metro style apps also serves as the abstraction layer between your code and the Windows Runtime (WinRT).
A new language node in the New Project dialog of Visual Studio 11 is JavaScript. You can also create Metro style apps using HTML5/CSS and JavaScript/jQuery. In this case you would be using the Windows Library for JavaScript. This is a JavaScript API that serves as the abstraction layer to WinRT. I won’t be covering this platform any further in this article.
I’ll select “Windows Metro Style” from the C# node in the New Project dialog. I’m now presented with the five new project types under this category (see Figure 1). The “Grid” and “Split” applications are there to help you get started on some of the more commonly used navigation styles of a Metro application. This will be more important than you might think because if your goal is to eventually place your application in the Windows Marketplace, it will undergo a scrutiny phase and adhering to certain common navigation and display styles will be crucial. Keep in mind, at the time of this writing, the marketplace is for tablet Metro apps, but soon it will be expanded to include apps for Windows Phone 8 as well.
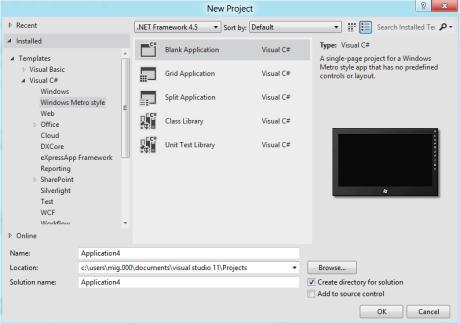
Figure 1: Metro «Add New Project».
The Class Library project is the typical assembly library that you would use to develop your components and down-level tiers in a Metro application. That’s not to say that you cannot interoperate with a conventional .NET 4.5 (or older) assembly. Referencing a non-Metro assembly is perfectly possible but you’ll have to use compiler directives to prohibit incompatible code-areas from compiling. I’ll make that the topic of another article; in this article I will stick to Metro-only projects to get you going quickly. For .NET developers like us, using the WinRT API will be nearly a no-brainer thanks to the way it integrates with .NET. In fact, thanks to the .NET APIs for WinRT, you probably will not even have an indication that you’re calling into WinRT.
For this article I’ll use the Blank Application project which will allow me to start from scratch and not be aided by any pre-built views.
Metro Application Characteristics
Metro apps have certain characteristics that make them just that, Metro. Before there was the term “Metro app”, there was the “Metro UI” introduced in the Windows Phone 7 platform. Metro UI defines a style of user interface components, typefaces, navigation techniques and animations that when combined, manifest themselves in a user interface that is unique from any other out there. Let’s look at some Metro style characteristics.
I’ll have to start with the tiles. Tiles make up the typical user interface list selection visual metaphor in a Metro app. When a view has to display a list of selectable items to the user, it can use tiles. This is sometimes a substitute for a conventional ListBox and sometimes a substitute for menu selections. You can use a grid of Metro tiles to display options to which a user can navigate and expand on for more detailed views. For this reason, the tiles have the ability to become alive. You can see live tiles in both WP7 and Windows 8 on their home pages. Home screen tiles in both of these operating systems have the ability to not only display a bit more information about what’s behind them, but also to actively change in content appearance when any information for which they are responsible changes. For example, the Mail tile on WP7 shows you how many unread emails you have and should a new one come in, the tile updates. The Photo tile may show you a preview of the first photo in the first album, and so on. Figure 2 shows a Windows Phone 7 home screen illustrating what I’ve explained.
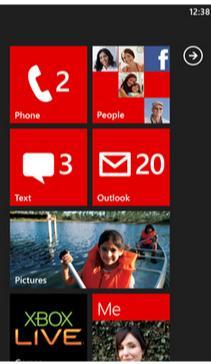
Figure 2: Windows Phone 7 Home screen.
The tiles, however, are not what make Metro identifiable. In fact, the latest version of MSN Messenger claims to have a “Metro interface” and has no tiles. There’s also a popular Twitter client called MetroTwit which has no tiles. If I had to look at a UI claiming to be Metro and attempt to isolate exactly what it is about it that makes it unique, I would have to say the use of a specific typeface, Segoe UI Light. Seeing the use of that typeface in all its various sizes and weights, snaps out to me more than anything else. Look at Windows 8 and WP7 and you’ll see the typeface used everywhere.
Menus are pretty distinctive in a Metro application as well. For one, they’re all in the aforementioned Segoe UI Light typeface. But what makes them really unique is the way Metro style applications lay out their menus for navigation. Metro menus consist simply of the selections placed next to each other with the currently selected one set in bold face. This style is followed down to sub-menus. In fact, the overall lack of chrome is a large part of the underlying philosophy of the Metro design style. See Figure 3 for an example of how the MSN Messenger application displays its menus now.

Figure3: MSN Messenger menus.
Metro applications have also done away with the concept of overlapping windows. This is a design that takes some time to get used to, but if you’re a WPF or Silverlight developer it should not be strange to you. The lack of form-inheritance in WPF and Silverlight in combination with the push toward MVVM-based client-tier architectures has driven WPF/SL developers to create more “containment”-based views. This is a style where the application consists of a primary or “shell” view which fires on startup. The shell view is split into various regions and their contents are filled with various views based on application usage. Microsoft themselves so embraced this development style that they have a framework to assist with it and more, called Prism.
Your First Metro App
Now that you have a basic understanding (I hope) of the makings of a Metro application, let’s jump in and create a simple one. Keep in mind; in this article I’m going to keep things very simple. I’ll create a simple application first, and then introduce some navigation and view details for displaying information. I’ll cover live tiles and other advanced features in a future article. My goal here is to make you comfortable with creating Metro applications and knowing you can leverage your existing XAML and C# (and even Visual Basic) skills, and almost ignore the fact that you’re going to be calling into a new runtime.
In the interest of simplicity, I’ll use conventional code-behind techniques in this article. In a real production application you should follow the Model-View-ViewModel pattern. Happily, you can apply the MVVM pattern to Metro applications in ways that are no different than in a WPF or Silverlight application.
Let’s create a new project. In Visual Studio 11 Beta, in the Add Project dialog, choose Visual C# and pick the Windows Metro Style selection. I’ll select Blank Application from the selections on the right. This will create a single view called BlankPage.xaml. If you look at the reference list in the project you’ll see two items. The Windows item is a reference to the WinRT library and the .NET for Metro Style Apps item is the .NET API for WinRT.
In a lot of ways, this project environment is similar to a WPF or Silverlight application. For example, there is an App.xaml file that gives me a place for application-wide resources just like there is in WPF/SL. The code-behind for the App.xaml file offers a virtual method called OnLaunched. Even in a blank project, I get some helper code in here to instantiate a new frame (something you’ll learn about later), navigate to my startup view, and tie all of that to the application. Think of this as the bootstrap process for a Metro application’s first view, in this case my BlankPage.xaml view.
The BlankPage.xaml view is for all intents and purposes (ours anyway) a regular XAML view and should be very familiar to anyone that has worked with XAML in the past. In fact, I’m going to whip together a quick example using skills that should not be new to you.
In the interest of not being cliché, I’m not going to do a “Hello World”, but instead a “Hello-x”, where x is a name you type in. How’s that for original and exciting?
Metro App’s Code
The App.xaml file, like in a WPF app, lets me contain resources that will be application-wide. One such resource is already included in this file, StandardStyles.xaml. This XAML file is included automatically in the Common folder and includes visual styles that will come in handy when adhering to Metro design guidelines and specifications. The first such guideline is the screen background. The brush that is set up to give me the correct background is included in a static resource called ApplicationPage-BackgroundBrush. I’ll use this resource as the background for the view’s primary panel, the Grid.
My simple example will allow you to enter text into a TextBox, let you press a button, and display that text in a TextBlock.
If the code in Listing 1 looks familiar to you, it should; especially if you’re a XAML developer already. It’s identical to what you would write to accomplish the same results in WPF or Silverlight. Let’s run this application and go over the results.
App Execution
First of all, in Visual Studio 11 you might have noticed that the green run-button is gone (yes, I miss it too). In fact, all trace of color is gone, isn’t it? Instead, we’ve been given a new “run” button whose action is changeable through its accompanying drop-down. The three options are Local Machine, Simulator and Remote Machine. I’m not going to connect to a remote machine in my execution so I’ll concentrate on the other two options.
Changing the “run” button to Simulator will launch a complete tablet emulator with your windows instance running in it. You’ll be able to do just about anything you can do from a real tablet including change orientation and access other apps from the start-screen. The default option for the “run” button is Local Machine and it’s the one that is most like what you are accustomed to in Visual Studio 2010. If I execute my app in this mode, my entire screen will display the execution as shown in Figure 4.
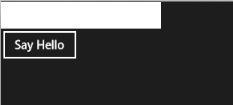
Figure4: Simple app execution.
I want to bring a few things to your attention here. First that controls have a flat appearance. I can, however, attach any type of styling I want to these elements. Metro controls have characteristics that appeal specifically to a touch environment, and you can see one of them here. The second I start to type into the textbox, an X appears in the TextBox over to the right. Tapping the X will clear the current text. When you’re using a Metro app from a touch device, it’s much more convenient to simply tap on this X to clear the TextBox than it is to touch the end of your text and use the virtual keyboard to backspace over all the text. Except for the black & white, flat appearance, the screen is nothing exciting and the behavior is what I programmed. If I enter text into the box and press the Say Hello button, I’ll see the text below the button. Now I need to stop the execution.
This is not so trivial. Metro apps are not really designed to “stop” in the sense of the word. Instead they suspend when you access another application or the Start page. I’ll discuss this in depth later. When you run an application from Visual Studio, you need to get back to Visual Studio to stop its execution. If I hover just below the upper-left corner on the screen against the left edge, a thumbnail of Visual Studio will appear. I can click (or tap, if I’m using a real tablet) now and VS will come back up. Of course, I can also simply ALT-TAB to return to VS where I can then press the Stop button. Let’s get back to the code now.
Views
What may look different in the XAML code is the top-level tag, which in this case is Page. Though available in WPF, most views you create are Window or UserControl-based in WPF. In a Metro app, it will be page.
The idea is that your application displays information by either switching between user controls displayed on a view (just like in WPF or Silverlight) or by navigating to another page, where you’d be given an easy ability to come back. Think about tablet or phone devices you’ve used to date and you’ll recognize this navigation style.
Overlapping windows are not possible in a Metro application and, in fact, would be undesired in the kind of environment Metro aims to target. When adding new views to an application, Visual Studio gives you two choices: Page and UserControl, not Window. Including UserControls in a page is no different than placing them in the XAML of a WPF window. Now I’ll show you how easy it is to navigate among views in a Metro application.
|
Listing 1: Simple Metro App |
|
<Page x:Class="IntroToMetro.FirstApp.BlankPage" xmlns="http://schemas.microsoft.com/winfx/2006/xaml/presentation" xmlns:x="http://schemas.microsoft.com/winfx/2006/xaml" xmlns:local="using:IntroToMetro.FirstApp" xmlns:d="http://schemas.microsoft.com/expression/blend/2008" xmlns:mc="http://schemas.openxmlformats.org/markup-compatibility/2006" mc:Ignorable="d"> <Grid Background="{StaticResource ApplicationPageBackgroundBrush}"> <Grid.RowDefinitions> <RowDefinition Height="Auto" /> <RowDefinition Height="*" /> </Grid.RowDefinitions> <StackPanel Grid.Row="0" Orientation="Vertical" HorizontalAlignment="Left"> <TextBox Width="200" Name="txtName" /> <Button Content="Say Hello" Name="btnSayHello" Click="btnSayHello_Click" /> <TextBlock Name="txtGreeting" /> </StackPanel> </Grid> </Page> |