

surgical knot tying manual covidien
.pdfStep 6.
Maintain Suture Loop with Left Index Finger
The rectangular configuration of the suture loop is maintained by keeping the tip of the index finger (arrow) in the suture loop.
Step 7.
Pass Left Thumb Up Into the Suture Loop
The left thumb passes up (arrow) through the suture loop, replacing the left index finger in preparation for the formation of the double-wrap first throw.
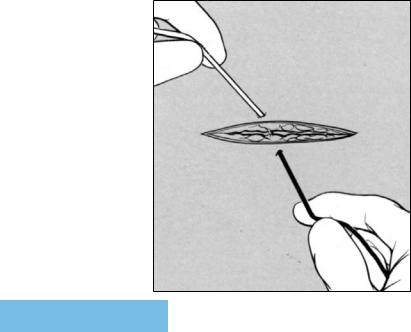
Step 8.
Pass Free Suture End Over the Suture Loop
The free suture end held by the right hand is passed over (arrow) the suture loop and grasped between the tips of the left thumb and index finger.
57

VIII. two-hand tie techniques — surgeon’s knot square (2=1) formation of the first, double-wrap throw (cont’d)
Step 9.
Pass Free Suture End
Down Through the Suture Loop to Form Double-Wrap,
First Throw
The free suture end grasped between the tips of the left thumb and index finger is passed down (arrow) through the suture loop. The right hand releases its suture end so that it can be withdrawn
through the suture loop. As the free suture end passes through the loop, it is regrasped by the right hand to withdraw it through the suture loop.
58

Step 10.
Advance Double-Wrap, First Throw to Wound Surface
With the suture ends grasped in the palms of the surgeon’s hands, the tips of the index fingers and thumbs position the suture ends in a direction (arrows) perpendicular to that of the wound. The surgeon applies constant tension to the suture ends, which advances the double-wrap, first throw of the surgeon’s knot square to the surface of the wound. Advancement of the first throw is complete when the divided edges of the mid-portion of the wound are approximated.
59

VIII. two-hand tie techniques — surgeon’s knot square (2=1) formation of the second throw
Step 11.
Begin Formation of the Second Suture Loop
The dorsum of the tip of the left thumb is passed under (arrow) its suture end in order to direct it beneath the other suture end that is held by the right hand. During formation of the second throw, constant tension is applied to the suture ends to maintain wound approximation.
60

Step 12.
Form the Second Suture Loop
The left thumb advances its suture end beneath the other suture end to form a suture loop. The tip of the left index finger passes down (arrow) to touch the left thumb.
Step 13.
Pass Index Finger Down Through Suture Loop
After the tip of the left index finger contacts the tip of the left thumb (tip- to-tip pinch), both are advanced down (arrow) through the suture loop so that only the tip of the left index finger remains in the suture loop.
Step 14.
Pass Free Suture End Under the Suture Loop
The free suture end held by the right hand is passed under the suture loop to be positioned (arrow) between the tips of the left index finger and thumb.
61

VIII. two-hand tie techniques — surgeon’s knot square (2=1) formation of the second throw (cont’d)
Step 15.
Pass Free Suture End Up
Through the Suture Loop To Form Single-Wrap Throw
The free suture end grasped between the tips of the left thumb and index finger is advanced upward though the suture loop. The right hand releases its free suture end to allow its passage through the suture loop, after which it regrasps the free suture end to withdraw (arrow) it through the suture loop.
62

Step 16.
Advance Surgeon’s Knot Square (2=1) to Wound Surface
The single-wrap throw is advanced and set against the first double-wrap throw by applying tension in a direction (arrows) perpendicular to that of the wound. Advancement of the second throw
is complete when the second throw contacts the first throw to form a surgeon’s knot square
(2=1). The direction of the tension applied to the suture ends of the first throw is opposite to that exerted on the suture ends of the second throw. Once exact approximation of the wound edges is accomplished, the surgeon will construct a knot with a sufficient number of throws and 3mm cut “ears” so that knot security is determined by knot breakage, rather than by slippage.3
63
VIII. two-hand tie techniques — slip knot (S=S) formation of the first throw
Step 1.
Hold Suture Ends
The suture end exiting from the side of the wound farther from the surgeon is grasped between the tips of the distal phalanges
of the left thumb and index finger (tip- to-tip pinch), while the tips of the distal phalanges of the right thumb and index finger grasp the suture end exiting from the closer side of the wound. The grasped fingers apply constant tension to the suture ends. The security of this tip-to-tip pinch of the suture ends can be enhanced by grasping the suture ends between the tips of the long fingers, ring fingers, small fingers and the palm of each hand (grip activity).
64

Step 2.
Form the First Suture Loop
The first suture loop is formed by the tip of
the left index finger that passes its suture end over the other suture end held by the right
hand. As the tip of the left index finger passes its suture end over the suture end held by the right hand, the left thumb passes under
(arrow) the suture end held by the right hand.
Step 3.
Pass Thumb Up Through the Suture Loop
The tip of the left thumb advances up through the suture loop, replacing the tip of the left index finger.
Step 4.
Pass Free Suture End Over the Suture Loop
The free suture end, held by the right hand, is passed over (arrow) the suture loop.
65

VIII. two-hand tie techniques — slip knot (S=S) formation of the first throw (cont’d)
Step 5.
Pass Free Suture End Down Through the Suture Loop
After the suture end is grasped between the tips of the left thumb and index finger, the pinched suture end is passed downward through the suture loop. The right hand releases its free suture end so that it can be passed down through the suture loop. The free suture end is regrasped between the tips of the right thumb and index finger
to withdraw (arrow) it through the suture loop.
66