

surgical knot tying manual covidien
.pdfFigure 8. Square knot (1=1) (A) is formed by first passing the free suture end up through the suture loop to create the first throw. The second throw is formed by passing the free suture end down through the suture loop. Square knot (1=1) (B)
is formed by passing the free suture end down through the suture loop to create the first throw. The second throw is formed by passing the free suture end up through the suture loop.
During surgery, knot construction involves two distinct steps. The purpose of the first step is to secure precise approximation of the wound edges by advancing either a one-throw or a two-throw knot to the wound surface. Once the throw or throws contact the wound, the surgeon will have a preview of the ultimate apposition of the wound edges. Ideally, the knotted suture loop should reapproximate the divided wound edges without strangulating the tissue encircled by the suture loop. If there is some separation of the wound edges, the onethrow or two-throw knot can be advanced to reduce the size of the suture loop and thereby bring the wound edges closer together.
When the surgeon forms a double-wrap throw, the first throw of the surgeon’s knot square (2=1) can maintain apposition of the wound edged by “locking” or temporarily securing it in place by reversing the direction of pull on its “ears.” The “locked” double throw is not
37

VI. tying techniques (cont’d)
a reliable means of maintaining wound apposition because any tension applied to the “ears” from the patient’s side of the knot will unlock the knot. The addition of the second throw to the surgeon’s knot square (2=1) will provide additional resistance to wound disruption, but this knot will not advance by slippage, limiting the surgeon’s ability to secure meticulous coaptation of the wound edges.24
In contrast, two-throw square (1=1) or granny (1x1) knots can be advanced to the wound surface to secure precise wound edge apposition. These two-throw square (1=1) or granny (1x1) knots can be easily converted into their respective slip knots by applying tension to only one “ear” in a direction that is perpendicular to that of the tissue surface. Square (S=S) or granny (SxS) slip knots require lower knot rundown force for knot advancement than either the square (1=1) or granny (1x1) knots, but will never reach knot security even with 5 throws. 9 The risk of tying slip knots can be obviated by applying tensions to both “ears” in horizontal planes parallel to the tissue surface. The second step in knot construction is the addition of a sufficient number of throws to the knot so that it does not fail by slippage. The magnitude of knot breakage force is always greater than that for knot slippage force of a comparable suture, ensuring optimal protection against wound dehiscence. The magnitude of knot breakage force is significantly influenced by the rate of application of forces to the
knot. When constant force is applied slowly to the knot “ears,” the knot breakage force is significantly greater than that for knots in which the same constant force is applied rapidly to the “ears.”
38

instrument tie
Knot construction can be accomplished by either an instrument or hand tie. An instrument tie occurs by the formation of suture loop over an instrument, usually a needle holder. The right hand holds the needle holder, while the left hand loops the fixed suture end around the instrument. The position of the instrument in relation to the suture ends during knot construction will determine the type of knot. When the instrument is placed above the fixed suture end during the first and second throws, a square-type knot will develop. In contrast, a granny-type knot will first result when the instrument is placed above the fixed suture end for the first throw and then below the fixed suture end for the second throw. By repeating this positioning, the instrument tie is a reliable and easy method to produce multiple throw granny knots (1x1x1), a circumstance not encountered in hand ties. Granny knots with more than two throws cannot be constructed by either the one-hand or two-hand technique, without releasing hold of both suture ends.
Instrument tying is accomplished primarily by the surgeon’s left hand, which holds the fixed suture end. Initially the length of the fixed suture end held by the left hand is long (17 in.), making it difficult to form knots without injuring the attending assistant. This assault can be avoided by shortening the length of the fixed suture end held by the left hand. Preferably, the fixed suture end should be coiled into loops, which are held between the tips of the thumb and index finger.
39

instrument tie
(cont’d)
This maneuver is accomplished by first grasping the fixed suture end with the small and ring fingers, while it is being pinched between the tips of the index finger and thumb. By pronating the wrist, a loop forms around the grasped fingers, and the top of the loop must again be grasped between the tips of the thumb and index fingers. The small and ring fingers are then withdrawn from the loop before coiling more suture. The rasped suture can be easily lengthened by releasing the coils held between the tips of the thumb and index finger.
When tying knots with an instrument, it is difficult to apply continuous tension to the suture ends. Consequently, widening of the suture loop due to slippage is frequently encountered in wounds subjected to strong tension. This technique, however, is ideally suited for closing a wound which is subjected to weak tensions. In this circumstance, instrument ties can be accomplished more rapidly and accurately than hand ties, while conserving considerably more suture. By using this technique, the parsimonious surgeon can complete 10 interrupted suture loops from one suture measuring 18 inches in length. This feat would be impossible if the knots had been tied by hand.
The value of instrument ties has become readily apparent in special situations in which hand ties are impractical or impossible. In microsurgical procedures, an instrument tie provides the most reliable and easiest method of knot construction. When employing suture in the recesses of the body (e.g. mouth, vagina, etc.) or during endoscopic surgery, instruments can also form knots in sites to which the hand could never gain access.
40

Hand tying of knots can be accomplished by either the two-hand or one-hand |
hand tie |
technique. Each technique has distinct advantages as well as drawbacks. The two-hand |
|
technique of knot tying is easier to learn than the one hand. An additional advantage |
|
of the two-hand tie is that the surgeon can apply continuous tension to the suture |
|
ends until a secure knot is formed. With the one-hand method, it is often difficult to |
|
maintain tension on the suture ends during the formation of the knot and slippage |
|
of the first or second throws will be encountered, especially by the inexperienced |
|
surgeon. When the surgeon attempts to shorten the resultant enlarged loop by |
|
advancing the knot, breakage of the suture may occur, requiring passage of another |
|
suture through the once punctured tissue. The student of surgery should master first |
|
the construction of square type knots because knot security can usually be achieved |
|
with fewer throws than the granny-type knots.21 The additional foreign bodies |
|
required to form a secure granny knot, predisposes the wound to the development |
|
of infection. |
|
The hand-tying techniques illustrated in this manual are those used by right-handed |
|
individuals. Using the two-hand technique, he/she constructs the knot predominantly |
|
with his/her left hand, which forms a suture loop through which the free suture end |
|
is passed. The left hand continually holds the suture end until knot construction |
|
is complete. In contrast, the right hand merely holds, lets go, and regrasps the free |
|
suture end. If the surgeon inadvertently manipulates the fixed suture end with his/her |
|
right hand, he/she will be passing either the needle or reel through the formed loop. |
|
The latter case is an invitation to needle puncture. |
|
Many right-handed surgeons prefer to manipulate the free end of the suture with |
|
their left and during two-hand ties. In such cases, the right hand performs the major |
|
manipula-tion of the suture during formation of the loop. An advantage of this |
|
41

hand tie
(cont’d)
technique is that a surgeon who ties his/her own knots by the two-hand technique during wound closure can hold the needle holder in his/her right hand during knot construction. If one desired to learn to tie knots using the left hand to manipulate the free end of the suture, study the illustrations in a mirror.
Using the one-hand tie, one hand forms the suture loop while manipulating the free suture end. The other hand merely holds the mother suture end taut. Most surgeons prefer to manipulate the free suture end with their left hand, allowing them to hold the needle holder in their right hand while they construct knots with their left hand.
There are several important recommendations for selecting a knot tying technique. First, position the hands on each side of and parallel to the suture loop. Second, grasp the appropriate suture ends and form the suture loop, without exchanging suture ends between the hands. While exchanging suture ends between the hands forms a triangular-shaped suture loop, it is an unnecessary step that wastes valuable time. Third pass the free suture end, rather than the fixed suture end, through the suture loop. Finally, reverse the position of the hands after
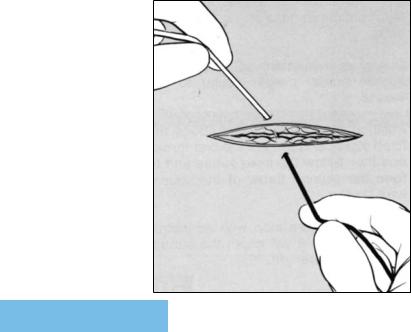
Figure 9. Standard format for illustrating the knot tying technique.
42

each additional throw. Most of the knot tying techniques in this manual comply with these recommendations. However, it is important to point out that the fixed end of the suture is being passed through the suture loops in the two-hand ties. Consequently, the surgeon must detach the needle from the fixed suture end before a two-hand tie.
A standard format for illustrating surgical knot tying techniques has been used throughout the manual (Figure 9). A horizontal incision is pictured in the top of each illustration. Because the wound edges are subjected to static tensions, there is retraction of the wound edges, with exposure of the underlying tissue. The surgeon is standing facing the wound from the bottom of each illustration. Because the surgeon usually passes the needle swaged to a suture toward himself (herself), the fixed end (black) of the suture with its attached needle enters the farther side of the mid-portion of the wound and exits from the side of the wound closer to the surgeon. The free end of the suture is white to facilitate illustration of the knot tying technique. The suture end (white) farther from the surgeon is grasped between the tips of the distal phalanges of the left thumb and index finger (tip-to-tip pinch). The tips of the distal phalanges of the thumb and index finger of the right hand grasp the suture end (black) exiting from the wound edge closer to the surgeon. The grasped fingers apply constant tension to the suture ends. The security of this tip-to-tip pinch can be enhanced by grasping the suture ends between the tips of the long fingers, ring fingers, small fingers, and the palm of each hand (grip activity).
The tying of square, slip, and surgeon’s knots using manual and instrument-tying techniques are illustrated in Sections VIII-X. The technique of tying slip knots has been included in the manual because it is an excellent method to approximate temporarily the edges of wounds subjected to strong tensions In fact, a slip knot has greater holding power than either a single-wrap or double-wrap throw.22 Once there is meticulous approximation of wound edges, the slip knot can be converted to a square knot, after which a sufficient number of throws are added to the knot to ensure knot security.
43

VII. essential elements
DO
1.Pass the surgical needle swaged to a suture through the wound edges in a direction toward you.
2.Construct a two-throw square knot that can be advanced to the wound edge, providing a preview of the ultimate apposition of the wound edges.
3.Approximate the edges of the divided tissue without strangulating the tissue encircled by the suture loop.
4.Once meticulous apposition of the wound edges is achieved, construct a knot that has has sufficient number of throws that allow it to fail by breakage rather than by slippage.
5.Position your hands on each side and parallel to the suture loop.
DON’T
1.Pass the surgical needle swaged to a suture through the wound edge in a direction away from you.
2.Construct a secure knot that cannot be advanced to the wound edges.
3.Apply frictional forces (sawing) between the suture “ears” during knot
construction that damage the suture and reduce its strength.
4.Add further throws to a knot that has the required number of throws for knot security.
5.Position your hands perpendicular to the suture loop.
44

DO
6.Apply opposing forces to the knot “ears” that are equal in magnitude and in a plane parallel to that of the wound surface.
7.After each throw, reverse the position of your hands that apply tension to the suture ends.
8.Apply constant force slowly to the “ears” of each throw of the knot.
9.Use the two-hand tie technique to maintain continuous tension on suture ends.
10.During an instrument tie, position the needle holder parallel to the wound.
11.Position the needle holder above the fixed suture end to form the first and second suture throws of a square (1=1) knot.
12.Clamp only the free end of the suture during the instrument tie.
DON’T
6.Exert unequal levels of tension to the suture ends that convert the knot into a slip knot.
7.Maintain the same position of your hands after each additional throw.
8.Apply a constant force rapidly to the “ears” of each throw of the knot.
9.Use the one-hand tie technique to maintain continuous tension of the suture ends.
10.During an instrument tie, position the needle holder perpendicular to the wound.
11.Position the needle holder above the fixed suture end to form the first throw, and then below the fixed suture end to form the second throw of the square knot (1=1).
12.Clamp the suture loop with an instru-
ment because it will crush the suture, reducing its strength.30-32
45
VIII. two-hand tie techniques — square knot (1=1) formation of the first throw
Step 1.
Hold Suture Ends
The suture end exiting from the side of the wound farther from the surgeon is grasped between the tips of the distal phalanges of the left thumb and index finger (tip-to-tip pinch), while the tips of the distal phalanges of the right thumb and index finger grasp the suture end
exiting from the closer side of the wound. The grasped fingers apply constant tension to the suture ends. The security of this tip-to-tip pinch of the suture
ends can be enhanced by grasping the suture ends between the tips of the long fingers, ring fingers, small fingers and the palm of each hand (grip activity).
46