- •Sartorius Cubis Series
- •MSA Models
- •Contents
- •Notes on Using this Manual
- •Safety Precautions
- •Intended Use
- •General View of the Equipment and Equipment Supplied
- •Getting Started
- •Installation Instructions
- •Power Cord Receptacle
- •Anti-theft Locking Device (Accessory)
- •Preparing Below-Balance Weighing
- •Moving the Balance
- •Using the Balance
- •Turning the Balance On/Off
- •Operating Concept: Q-Guide
- •Using the Display and Control Unit
- •Quick Guide: First Weighing
- •User Interface (Touch Screen)
- •Using the Touch Screen
- •Activating/Switching Users
- •System Settings (Menu)
- •Leveling the Balance (Q-Level)
- •Configuring Calibration/Adjustment
- •Timer-controlled Actions
- •Displaying Device Information
- •Alibi Memory
- •Device Parameters
- •Task Management
- •Using Applications with the Factory Settings
- •Creating New Tasks (Configuration)
- •Configuring a Printout
- •Combining Applications into One Task
- •Executing Tasks
- •Weighing
- •Mass Unit Conversion
- •Minimum Sample Quantity SQmin
- •Individual Identifiers
- •Density Determination
- •Statistics
- •Calculation
- •Examples of Calculation Formulas
- •Diameter Determination
- •Diameter Determination for Cylindrical Bodies
- •Air Buoyancy Correction
- •Averaging
- •Formulation
- •Weighing in Percent
- •Timer-controlled Functions
- •Totalizing
- •DKD Measurement Uncertainty
- •Second Tare Memory (Preset Tare)
- •Parts Counting
- •Checkweighing
- •Importing/Exporting Data
- •Calibration and Adjustment
- •Calibration/Adjustment Using Internal Check Weight
- •Calibration/Adjustment Using External Check Weight
- •User Management
- •User Management
- •Creating User Profiles
- •Activating Users
- •Editing User Profiles
- •Interfaces
- •USB Port (PC)
- •PS2 Interface for Barcode Scanner or Keyboard
- •Interfaces (RS-232) 25-pin and 9-pin
- •Configuring Serial Ports
- •Bluetooth® Interface (COM C, Optional)
- •Network Interface (Ethernet)
- •Data Output
- •Data Input
- •Updating the Software
- •Error and Status Messages
- •GPL License
- •Care and Maintenance
- •Packing the Balance for Shipping
- •Disposal
- •Specifications
- •Balance Dimensions
- •Accessories
- •Declarations of Conformity
- •EC Type-Approval Certificate
- •Plates and Markings

Using the Balance
Using the Balance
Turning the Balance On/Off
tMake sure the balance has been installed and put into operation in accordance with the installation instructions.
At Press the on/off key A on the control unit.
y The start screen appears briefly on the display, then the user interface appears.
hOn subsequent starts, the most recently active user profile and task are opened (if at least one user profile and task have been set up).
t If prompted, level the balance (see “Leveling the Balance” for details).
At To put the balance in standby mode or switch it off, press the key A. t Close the draft shield (if your model has one).
Operating Concept: Q-Guide
The Cubis precision and analytical balances are controlled by application software with interactive operator guidance. Once you open a menu or select an application, brief instructions shown on the display will guide you through the menu or application step-by-step. At each step along the way, the display shows only those options that are relevant to your process; this helps prevent unnecessary “detours” and enables you to reach your destination more quickly.
This type of user guidance is mostly intuitive. Although operation of the balance is also mostly intuitive, this manual includes a section with very detailed, step-by-step instructions where you can learn about all of the available options (see “Creating User Profiles” in the chapter “User Management”).
Basic Operational Structure
The most basic functions, weighing and taring, can be carried out as soon as the balance is switched on. The application software is divided into three general areas in which individual settings can be configured:
Preset configurations |
|
Simple weighing |
|||
|
|
|
|
|
|
D TASK |
|
|
H USER |
|
|
|
|
|
|
||
|
Task management (from page 58) |
|
|
User management (from page 129) |
|
|
Select application, start |
|
|
Select user |
|
Configured userby |
Configure application |
|
|
Create user profile |
|
System settings |
(from page 37) |
|
|||
|
Configure task |
|
|
|
|
|
|
|
|
|
|
|
|
|
|
|
|
In Task Management (TASK), task profiles with specific applications, weighing and printout settings can be configured.
User Management (USER) lets you set up user profiles with specific configuration settings and user rights. You can also set up password protection to meet your security requirements. Your balance can also be used for user management.
30 Cubis MSA User Manual

Using the Balance
The System Settings (Menu) contains all basic settings and parameters used to operate the balance that affect the entire balance operation. They can also be used for creating new tasks.
The Wizard
You can choose between two display types in several menus:
The overview lists all parameters with their set options. You can select each individual option to change its setting.
When you activate the wizard in the same menu, the program guides you step-by- step: The individual parameters and their options are displayed in succession.
Using the Display and Control Unit
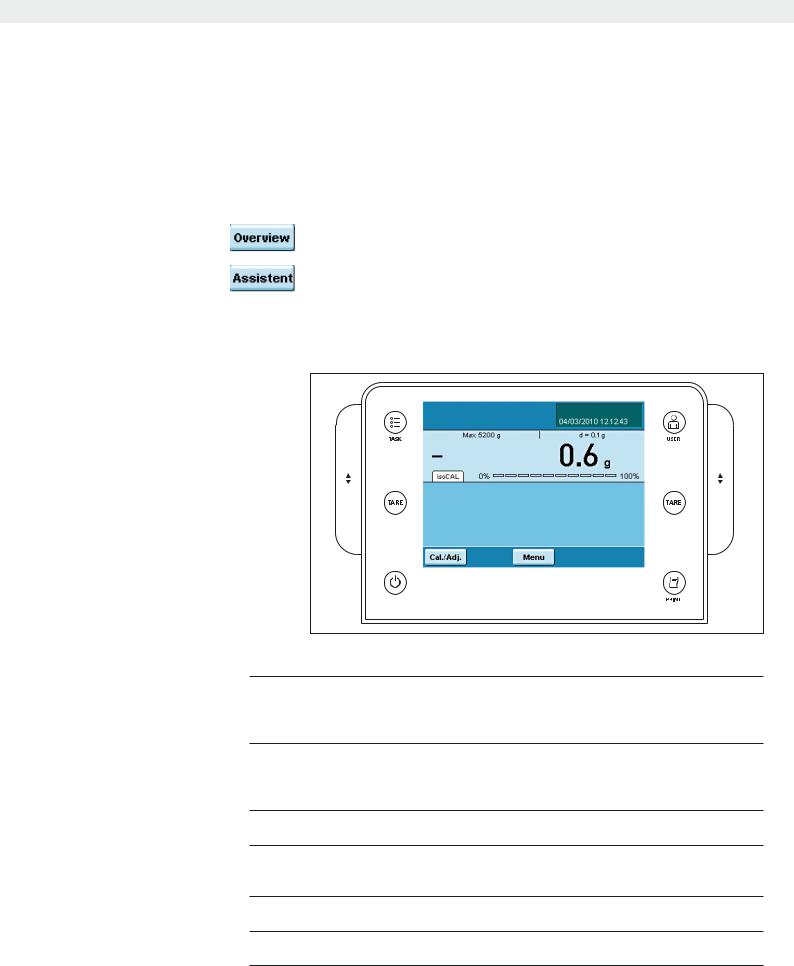
Control keys:
DTASK key: Opens Task Management in which applications can be selected and tasks defined. While working in this menu, you can also use the TASK key to cancel at any time and return to task overview.
HUSER key: Opens User Management in which users can be selected and user settings can be made. While working in this menu, you can also use the USER key to cancel at any time and return to user overview.
J Left and right TARE keys: Used to zero and tare the balance.
PPRINT key: Used to print the currently displayed measurement results or a user-specific print out.
A On/Off key: Used to switch on/off and to standby.
OOperating elements for electronic draft shield (optional)
Cubis MSA User Manual |
31 |
|
|

Using the Balance
Display and Control Unit
The tilt angle of the display and control unit can be set as desired to enable optimal readability for changing working conditions. The color and brightness of the display can also be changed to match the lighting conditions in the room (see “User Management” and “System Settings”).
SD Memory Card for Data Exchange
The display and control unit is equipped with a slot for an SD memory card where you can import and export data (task, user profiles). Handling the memory card is explained in chapter Importing/Exporting Data.
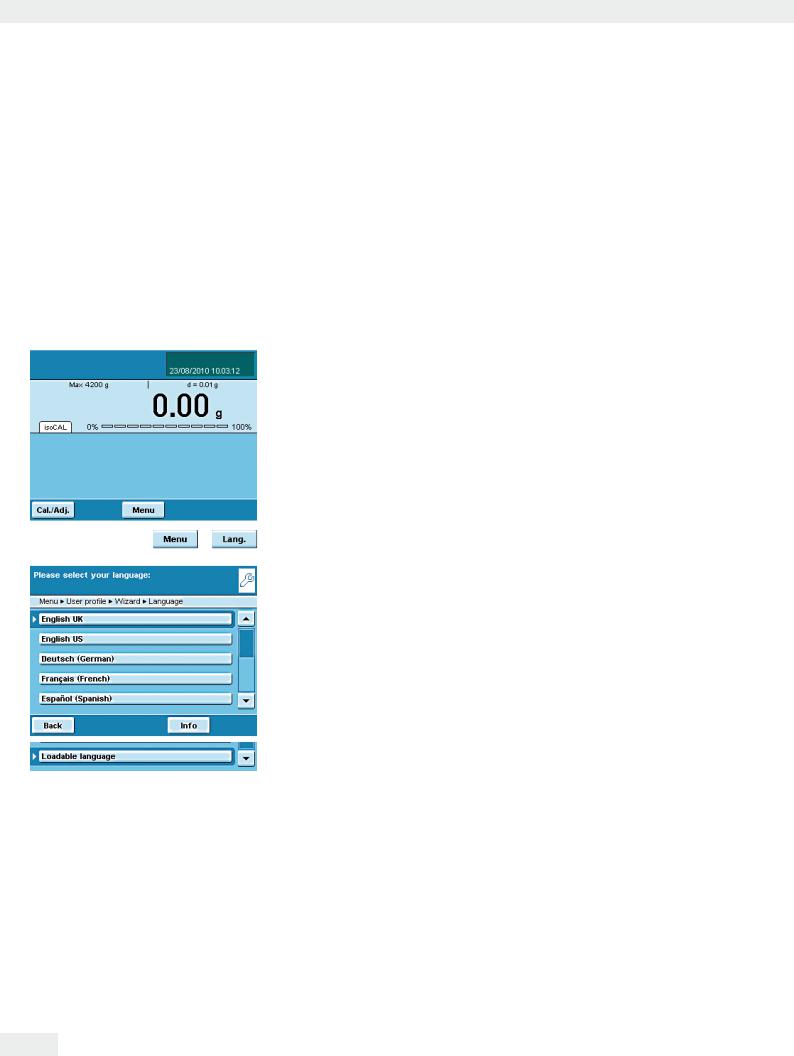
Setting the Language
y The default language for the display is English.
t To change the language, select Menu and then Lang.
tUse the cursor softkeys to select the desired language. y The display changes directly to the selected language.
tIf you would like to select a language that was not included with the equipment supplied but was later downloaded from the Cubis website, you must first import the language files (see chapter “Importing/Exporting Data”).
yTo display the downloaded language, select the “Loadable language” in the language list.
Quick Guide: First Weighing
At Press the operating key Ato turn on the balance. t Close the draft shield (if available).
Jt Press the tare key J to tare the balance.
y The balance is tared and the displayed value is zero.
t If required, open the draft shield and carefully place the sample on to the weighing pan (in a suitable container if required).
t Close the draft shield (if available).
t You can read the measured value as soon as the weight value stops changing and the unit is displayed.
32 Cubis MSA User Manual

Using the Balance
1
2
3
4
5
6
Verified balances feature the following additional displays:
In the line for metrological data: Min Minimum weight
e Verification scale interval
In the value range:
o Calculated values, such as: k Values ) 0 and other values pcs Piece count
User Interface (Touch Screen)
Many operating steps are carried out via the display using the touch screen.
The display varies depending on whether the application software is in operating mode or a menu is currently open (setup mode).
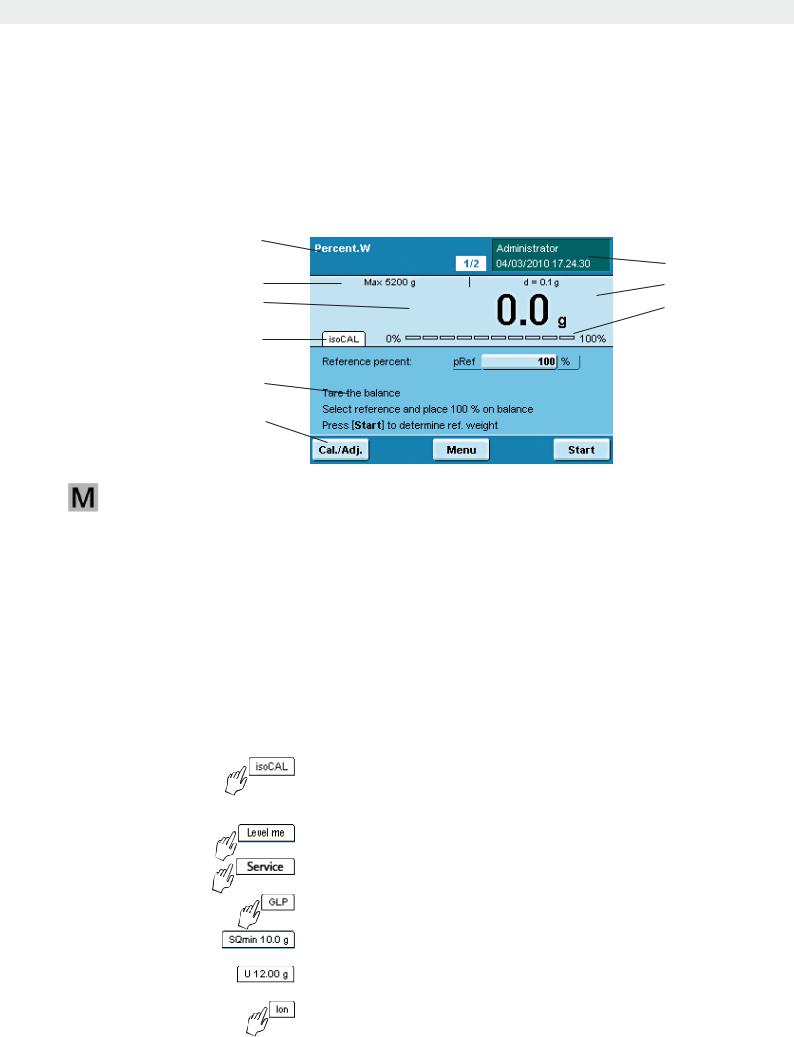
Display in Operating Mode
7
8
9
1Function display: Current task (here: Step 1 of 2) Touching this area displays the description of the task.
2Line for Metrological Data: left: Weighing Capacity (max); right: d = Readability (resolution) of the balance.
3Value range with current measurement value (the numeric value is displayed in black numbers once the weighing system reaches stability; beforehand it is displayed in gray numerals)
4 Field for status and warning messages (see below)
5 Task area with instructions on how to proceed
6Toolbar with currently available buttons
7User field: Displays the current user, date and time Touching this area displays the description of the user.
8For _.CE model balances verified for use as legal measuring instruments: Displays the weights that are not weight values, such as calculated values
9Scaled measurement value display (percentage of used weighing capacity)
Status and Warning Messages
Tabs with the following messages may be shown here:
isoCAL is displayed: isoCAL is active (extended temperature range) isoCAL flashes: Calibration is required
Touch the tab to activate the function.
Level me flashes: Balance is not level, leveling is required
Touch the tab to activate the function.
Service: The date for the next service has arrived.
Touch the tab to find Sartorius Service contact information.
GLP: GLP print is active, the header will be printed.
Touch the tab to print the footer.
SQmin: The SQmin value entered is permanently displayed.
SQmin flashes: the weight value is less than the entered SQmin value.
U or U* or PA: The selected DKD value (measurement uncertainty) is currently displayed.
Ion: Ionizer in progress (only when ionizer available) Touch the tab to deactivate the function.
Cubis MSA User Manual |
33 |
|
|
