
- •Downloads:
- •Update Log:
- •Table of Contents:
- •Prologue: Bare Basics
- •Chapter 1: Key Terminology & Abbreviations
- •7Zip Archive – Supposedly the best file archiver there is, but not used as much, and thus less convenient. Requires 7zip or winRar to use.
- •VisualBoyAdvance – most people’s emulator of choice, almost always referred to as “vba” for short.
- •Chapter 2: Using Nightmare Modules
- •I upload anything that I think might be useful to someone on that site. Just use the menus and search until you find it.
- •Chapter 3: File Management
- •In order to be a successful hacker you need to have a lot of good management.
- •Chapter 4: Pointer Tables
- •Chapter 5: Battle Animation Editor
- •Chapter 6: Character Editor
- •Chapter 7: Class Editor
- •Chapter 8: Item Editor
- •Item icon – obvious
- •Chapter 9: Spell Association Editor
- •Chapter 13: Movement Cost Editor
- •If the value next to a type of terrain is ‘255’ then it is uncrossable because a unit won’t have 255 movement points.
- •Chapter 16: Battle Palette Reference Editor
- •If you want to know how to actually edit battle palettes’ colors, you can find that in a later chapter that I will make.
- •Chapter 17: Arena Class Editor
- •It’s a bit of work, but making cGs is quite rewarding, and it’s easier than some stuff, that’s for sure! Good luck with your cg making!
- •Chapter 20: Lyn’s Ending Editor
- •Chapter 21: Tutorial Editing/Getting Rid of the Tutorial
- •Part 2: Downloading the Programs
- •Part 3: Preparing Your midi
- •If you still have more than 10 tracks, you should find another midi. Sorry but, there are limits in life.
- •Part 4: Applying Blazer’s Beta Music Insertion/Instrument Patch
- •Part 5: Converting Your midi
- •Part 6: Making Your midi Repeat and Transferring it to Your rom
- •If the b1 and bc are next to each other then I can almost guarantee you want to replace it, so hit “replace” and do that with every instance and once you’re finished you’re good to go.
- •Part 7: Track Pointers & Repointing
- •Part 8: Finale- Assembling Your Song & Profit
- •If you don’t have this module, you’ll have to use this outdated way of doing it. Do check to see if you have the latest Nightmare Modules in general, but otherwise… well, sorry I guess. Xp
- •Part 9: Possible Errors & Wrap-up
- •Part 10: Documentation and Stuff
- •Atrius’ Notes:
- •Charon’s Notes:
- •Part 11: The Music Hacking Run-Down (Shorter Version of Tutorial & Walls of Text)
- •Part 12: Credits & Thanks
- •Chapter 25: Music Editing with Zahlman’s Song Editor
- •If you actually do type in help and press ‘enter’ on your keyboard, it’ll give you a list of commands, and tell you some stuff. Here’s the important stuff:
- •It worked! Great! I know how to import a song!
- •Chapter 26: Exporting Music with gba2midi
- •Chapter 27: Battle Background Graphics
- •If it doesn’t, I suggest double-checking all your settings (everything should be compressed) and make sure your width is set to 30 and your height is set to 32.
- •Chapter 28: Music Array Module
- •Chapter 29: Sound Room Editing
- •Chapter 30: Chapter Unit Editing with Nightmare
- •Chapter 31: Death Quotes
- •Chapter 32: Event iDs
- •Chapter 33: Battle Conversations
- •Chapter 34: Triangle Attacks
- •Chapter 35-36: The Animation Modules & Repointing Tutorial
- •It should look like this:
- •Chapter 37: Support Editing
- •Chapter 38: Miscellaneous Nightmare Modules
- •In this chapter I’m going to quickly run through what some other nightmare modules do.
- •Vendor/Armory Editors – edits the contents of vendors and armories.
- •Vulnerary Editor – edits the amount of hp restored by a vulnerary. (Default: 10)
- •Vulnerary Editor – edits the amount of hp restored by a vulnerary.
- •Chapter 40: Text Editing with fEditor Adv
- •Chapter 41: Portrait Formatting & Preparation
- •Chapter 42: Portrait Insertion with fEditor Adv
- •I wouldn’t mess with the palette editor (the colorful boxes).
- •Chapter 43: Locating Palettes
- •Chapter 44: Editing Palettes
- •I don’t exactly have a color I want to use for this title screen background, so I’m just going to show you how to get the rgb of some random color on a portrait.
- •If something didn’t work right, make sure you:
- •Chapter 45: Working with gbage
- •Chapter 46: Chapter Data Editor
- •Vision Distance is for Fog of War (fow). If it’s ‘0’, it’s assumed there is no fog of war.
- •Hold it! (Unless you aren’t hacking fe7!)
- •Chapter 47: Map Creation
- •I’m tired of writing this tutorial. Honestly. So from now on, I’m going to stop making so many wasteful comments like the one I am typing right now.
- •Chapter 48: Map Insertion
- •If you’re looking to make a totally new chapter (instead of being limited to the old game’s exact same scenes with exact same events) then read on, because I’m going to hack events next!
- •Chapter 49: Event Assembler Basics
- •I would just always add end guards since it’s not something you need to worry about too much.
- •Chapter 50: Events – The Layout
- •Including the stlb
- •Chapter 51: Events – The Event Codes
- •Items is just a list of items with a max of 4 starting items. I prefer to use the 3rd method of writing them, with the brackets and all. Each item is separated by a comma.
- •Chapter 52: Event Construction
- •VillageGate: // name of tile data group
- •Chapter 54: Chapter Creation Finishing Touches
- •Chapter 55: Importing Tilesets
- •Part 2: The First Frame
- •Part 1b: Palette Preparing
- •Part 2: Testing the Foundation to Your Animation
- •If all goes well, your guy should be standing, kinda like this.
- •Part 3: Making the Rest of Your Frames
- •Chapter 58: Custom Battle Animations – Scripts
- •I just pulled a Xeld. Had to do that at least once in this tutorial.
- •If you don’t know what a sound sounds like, just test it out with your animation and find out. Experiment with the codes if you need to.
- •Chapter 59: Custom Spell Animations
- •0X85 command count for this spell: 10
- •It’s true! It did work! It’s still very much a work in progress, as you can see, but the point is we got he test frame working. The rest just takes time, patience, and the attitude that you can do it!
- •Chapter 60: Weapon Icons
- •If you did, you are successful. Despite the odd format of the icons, you have spotted them, and that is what is most important, in my honest opinion.
- •I have this show up:
- •Chapter 61: Map Sprites
- •Chapter 62: Proper Betatesting
- •Chapter 63: vba’s Tools
- •Chapter 64: Other vba Options
- •In this chapter I’m going to detail some of vba’s semi-obscure but not totally obscure options. Knowing how to use vba will help you test your game in various ways.
- •Chapter 65: Recording Videos & Sound
- •Chapter 66: Fixing the Desync with VirtualDubMod & Video Rendering
- •Chapter 67: ips Patching & General Patching Information
- •Chapter 68: ups Patching
- •I suggest you read the ips patching tutorial (at least the beginning) if you haven’t done so as I will not be as thorough with this chapter as I was the previous.
- •In an extremely similar manner you can apply patches. Take a look.
- •Chapter 69: jfp Patching
- •Chapter 70: xDelta Patching
- •Chapter 71: Nightmare Module Format
- •It is recommended (for reasons of readability by humans) that a newline
- •Is unused ("null") for editboxes.
- •Chapter 72: Miscellaneous Information Archive
- •Chapter 73: Useful Links & Websites
- •Chapter 74: Bonus – Assembly Hacking
- •Preparations:
- •Part 1: Background Info
- •Part 2: Inserting an Assembly Hack
- •Part 2: Breaking Down Your First asm Hack
- •I digressed a lot, but back to the point:
- •Part 3: Second Example – More Codes, More Fun
- •Read other people’s doc.
- •Part 4: More Examples – “Speed-Analyzing”
- •It’s thumb. Write to offset 0. Start with label “Initial”. Push 5 registers and the last register, then start a loop counter in r2 with starting value 0x00.
- •Ifat *Conditional id* *asm routine pointer*
- •I may have mentioned this before, but finding where to hack routines is difficult. And I’m sure I mentioned that finding space for them is difficult.
- •It’s not super long, but it’s got some new things we need to learn. Let’s get started.
- •Part 5: Finding asm Routines & Basics of Using a Debugger
- •Warning: terms may not be accurate. In fact, they almost definitely aren’t accurate, as you’ve probably figured out by now.
- •I don’t know what the flags do either, but they’re there, right next to the window. That’s g.
- •I hope to hear of your achievements in the near future!
- •Final Chapter: Credits, Thanks, and the Epilogue
Part 4: Applying Blazer’s Beta Music Insertion/Instrument Patch
So, get my epic patch from my website at http://www.feshrine.net/hacking/patches.html
I probably sound narcissistic for calling it epic, but everyone needs to feel some good self-accomplishment. I’m just having some fun… XP
Right, back to hacking,
Here’s the Readme:
README
-------
This is a private patch supplied by Blazer. It is not for use without permission. Credit must be given.
It adds all instruments at offset 0x107d7d0. Data ends at 0x11b6530. The actual instrument map can be referenced by the offset 0x11ae42c when creating songs.
Back-up your ROM before using and be very careful with this. If you have not gotten this patch directly from Fire Blazer than the data will not be repointed properly and it WILL screw up your ROM if used in combination with a MIDI.
Thank you for your time.
As long as you don’t post this tutorial anywhere (you can link people to it, but link them to the WEBSITE, DO NOT REPOST IT SOMEWHERE ELSE), then you’re free to use it. Also give credit if you use it in your hack. Not only because I indirectly helped you with your hack but I’m curious to see if people actually make use of things like these, and curiosity is just so hard to control.
Now, with that said, if you read the README (that’s the point of it), it says some data is inserted at some scary offset. Well, if you happened to have data at that offset, we have a problem—the patch’s data has pointers inside of it. TONS of pointers. The pointers are relative of each other. Unless you want to repoint hundreds of pointers, the data has to go where the patch says it is going. In short, make sure there is nothing at that offset.
So you’ll need to move out any data you have there—go use a hex editor and check to see if there is any data between those offsets. If there is, it WILL be overwritten, beware. Also, if you have a clean ROM, this WILL expand your ROM, meaning you will now have to start using UPS patches if you haven’t already, and if you simply dislike expanding... well too bad. -_-
BEFORE you use NUPS (find it on feshrine.net) to apply that patch, BACK UP YOUR ROM! I make no guarantees that nothing will go wrong and everything works. It’s worked for several people but that doesn’t mean it won’t screw up your ROM. You have been warned.
That being said, go ahead and apply the patch, because you’ll never get anywhere without it.
Part 5: Converting Your midi
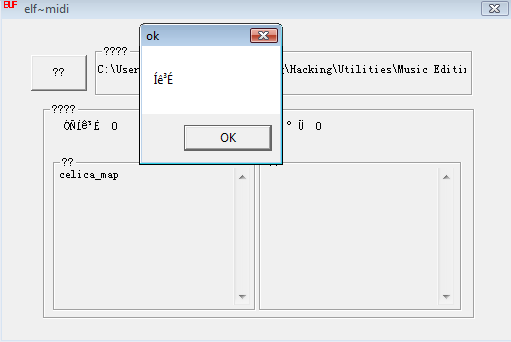
With that done, time to convert your song to GBA format. Crack out MIDI2GBA. Open up that program called “tr.exe”. It has an icon with the text ‘ELF’. Put your MIDI file into the folder called ‘mid’. The ‘mid’ folder is inside of the MIDI2GBA folder. Make sure it is your ONLY and I mean ONLY Midi there. In fact, make sure it is your only file there. Otherwise things can get confusing later on and my methods won’t necessarily work if you try and insert/convert multiple MIDIs at a time.
Once you’re sure it’s in, press the “??” button in tr.exe (the ELF program). A pop-up window will come up and your song will either be on the left or the right. If it’s on the right, the conversion failed. If it’s on the left, it’s a success.
Now if it’s on the right, don’t get all pissed at me. There are some reasons why this might happen.
Errors in the MIDI. Try to repair it using Anvil Studio. In Anvil, go to File-> Repair and hit “No” to any pop-ups, then save and retry.
The following may actually mess it up as well. Don’t try to repair the song and then insert, first try to insert and then repair.
Awkward instruments or something. Perhaps your MIDI file has some instrument that the program “doesn’t like”. I doubt it, but who knows.
Bad tracks, some unsupported type of track.
MIDI file type. Try saving it as MIDI format 1 and midi format 0, although I’m not sure if this makes a difference, maybe it does. It has to be a MIDI by the way—MP3’s and WAV’s are totally different, don’t even try them.
The file name has some weird symbols in it.
You could just be unlucky and your song doesn’t want to work. This often times happens with Felover3, a hacker who seems to fail at a lot of things… Poor dude.
If you can’t get it fixed, I’m sorry, this is a flaw in this method. I can’t help you too much besides saying redo the process or try a different MIDI. To be honest, while writing this tutorial I did one myself, but the MIDI I tried to insert ended up being on the right. In fact, so did the 2nd one. Not until I got to the 3rd one did it work like it should.
Now, time to test out how your song should sound in-game.
Already?! We already get to test?!
YESZ!
In the MIDI2GBA folder is a ROM called song.gba – load said ROM using VBA and then press “Z” (the equivalent of the “A” button in-game), wait a second, and then listen to your song.
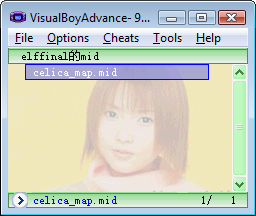
If it’s choppy, then that means conversion had some difficulty. If the sounds are a little different or something, then that’s due to instruments. Conversion isn’t perfect and the GBA hardware has its limitations, thus the song won’t sound perfect. If it sounds pretty good, that’s great let’s continue. If not, try repairing the song, manually fixing it using MIDI editing skills (if you have any), or try another MIDI.
My song, Celica’s Map Theme, sounds great, although not exactly like it should, so I am continuing. My other two choices (Awkward Justice from Tales of the Abyss and Rick Roll by Rick Astley) didn’t work… it was quite unfortunate really, but such is hacking. :P
Now time to get it to Fire Emblem.
Nub approach: can’t we just copy the song from song.gba, the game we just played, into our game?
My approach: Let’s just copy the song from the test game into our game!
Hey, something IS simple! Sorta. Let’s get down to it.