

![]() L
L INQ
INQ
 to
SQL: Language
Integrated Query over SQL Server
to
SQL: Language
Integrated Query over SQL Server
Hands-on Lab
November 2007
For the latest information, please see www.microsoft.com/vstudio
Information in this document is subject to change without notice. The example companies, organizations, products, people, and events depicted herein are fictitious. No association with any real company, organization, product, person or event is intended or should be inferred. Complying with all applicable copyright laws is the responsibility of the user. Without limiting the rights under copyright, no part of this document may be reproduced, stored in or introduced into a retrieval system, or transmitted in any form or by any means (electronic, mechanical, photocopying, recording, or otherwise), or for any purpose, without the express written permission of Microsoft Corporation.
Microsoft may have patents, patent applications, trademarked, copyrights, or other intellectual property rights covering subject matter in this document. Except as expressly provided in any written license agreement from Microsoft, the furnishing of this document does not give you any license to these patents, trademarks, copyrights, or other intellectual property.
© 2007 Microsoft Corporation. All rights reserved.
Microsoft, MS-DOS, MS, Windows, Windows NT, MSDN, Active Directory, BizTalk, SQL Server, SharePoint, Outlook, PowerPoint, FrontPage, Visual Basic, Visual C++, Visual J++, Visual InterDev, Visual SourceSafe, Visual C#, Visual J#, and Visual Studio are either registered trademarks or trademarks of Microsoft Corporation in the U.S.A. and/or other countries.
Other product and company names herein may be the trademarks of their respective owners.
Contents
Lab 1: LINQ TO SQL: Database Language Integrated Queries 1
Lab Objective 1
Exercise 1 – Creating your first LINQ to SQL Application 2
Task 1 – Creating a LINQ Project 2
Task 2 - Adding a reference to the System.Data.Linq assembly 3
Task 3 – Mapping Northwind Customers 3
Task 4 – Querying Database Data 4
Task 5 – Exploring the IDE 6
Exercise 2 – Creating an Object Model 7
Task 1 – Creating the order entity 7
Task 2 – Mapping Relationships 8
Task 3 – Strongly Typing the DataContext Object 10
Exercise 3 Using Code Generation to Create the Object Model 10
Task 1 - Adding a LINQ to SQL Classes file 10
Task 2 – Create your object model 11
Task 3 – Querying your object model 12
Task 4 – Mapping a stored procedure 13
Task 5 – Retrieving new results 14
Exercise 4 – Modifying Database Data 15
Task 1 – Modifying your object model 15
Task 2 – Creating a new Entity 16
Task 3 – Updating an Entity 16
Task 4 – Deleting an Entity 17
Task 5 – Submitting changes 18
Task 6 – Using Transactions 19
Lab 1: linq to sql: Database Language Integrated Queries
This lab shows how to access relational data using LINQ to SQL. You will start by creating an object model for the Northwind database, and then use the object model to access the database using the new C# 3.0 query expressions and LINQ to SQL APIs.
You will next create an object model from an existing database using the LINQ to SQL Designer. This part covers mapping relationships across tables and using Create, Update, and Delete operations. Use of the object model covers the use of transactions, object loading options, stored procedure integration and object identity with LINQ to SQL.
LINQ to SQL is a language-agnostic component of the LINQ Project. This is C# version of the lab but LINQ to SQL can be used just as well with the LINQ-enabled version of the Visual Basic compiler.
The LINQ Project relies on new keywords and syntax introduced with C# 3.0 available in Visual Studio 2008. This gives us the opportunity to use new IDE features like the integrated debugger, IntelliSense™, and instant syntax check.
Lab Objective
Estimated time to complete this lab: 60 minutes
The objective of this lab is to learn how LINQ to SQL can be used for accessing relational data. This covers:
Creation of an object model from the database and customization of mapping between objects and tables; and
Data access tasks often called CRUD operations – an acronym for Create, Retrieve, Update, and Delete operations. These tasks can be performed with a simple API without creating explicit SQL insert/update/delete commands.
Exercise 1 – Creating your first LINQ to SQL application Exercise 2 – Creating an object model from a database Exercise 3 – Using code generation to create the object model Exercise 4 – Modifying database data |
In this exercise, you will learn how to map a class to a database table, and how to retrieve objects from the underlying table using LINQ.
These exercises require the Northwind database. Please follow the instructions in the LINQ to SQL section of the Essence of LINQ paper to get set up with Northwind before proceeding.
Exercise 1 – Creating your first LINQ to SQL Application
In this exercise, you will learn how to map a class to a database table, and how to retrieve objects from the underlying table using LINQ.
Task 1 – Creating a LINQ Project
Click the Start | Programs | Microsoft Visual Studio 2008 | Microsoft Visual Studio 2008 menu command.
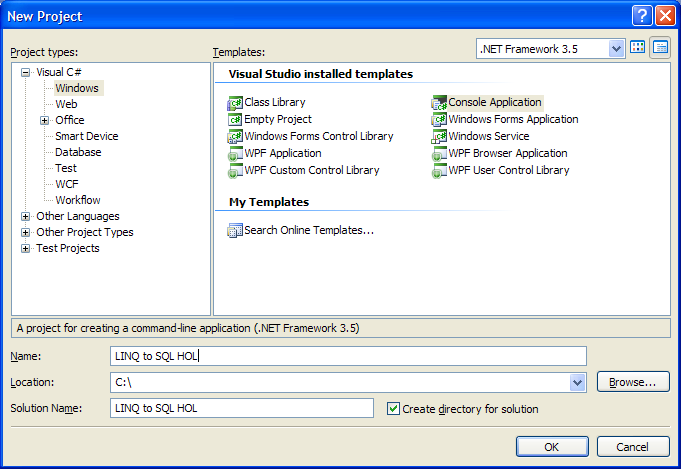
In Microsoft Visual Studio, click the File | New | Project… menu command
In the New Project dialog, in Visual C# | Templates, click Console Application
Provide a name for the new solution by entering “LINQ to SQL HOL” in the Name field
Click OK
Task 2 - Adding a reference to the System.Data.Linq assembly
In Microsoft Visual Studio, click the Project | Add Reference… menu command
In the Add Reference dialog make sure the .NET tab is selected
click System.Data.Linq assembly
Click OK
In Program.cs import the relevant LINQ to SQL namespaces by adding the following lines just before the namespace declaration:
using System.Data.Linq;
using System.Data.Linq.Mapping;
Task 3 – Mapping Northwind Customers
Create an entity class to map to the Customer table by entering the following code in Program.cs (put the Customer class declaration immediately above the Program class declaration):
[Table(Name = "Customers")]
public class Customer
{
[Column(IsPrimaryKey = true)]
public string CustomerID;
}
The Table attribute maps a class to a database table. The Column attribute then maps each field to a table column. In the Customers table, CustomerID is the primary key and it will be used to establish the identity of the mapped object. This is accomplished by setting the IsPrimaryKey parameter to true. An object mapped to the database through a unique key is referred to as an entity. In this example, instances of Customer class are entities.
Add the following code to declare a City property:
[Table(Name = "Customers")]
public class Customer
{
[Column(IsPrimaryKey = true)]
public string CustomerID;
private string _City;
[Column(Storage = "_City")]
public string City
{
get { return this._City; }
set { this._City = value; }
}
}
Fields can be mapped to columns as shown in the previous step, but in most cases properties would be used instead. When declaring public properties, you must specify the corresponding storage field using the Storage parameter of the Column attribute.
Enter the following code within the Main method to create a typed view of the Northwind database and establish a connection between the underlying database and the code-based data structures:
static void Main(string[] args)
{
// Use a standard connection string
DataContext db = new DataContext(@"Data Source=.\sqlexpress;Initial Catalog=Northwind");
// Get a typed table to run queries
Table<Customer> Customers = db.GetTable<Customer>();
}
You need to replace the connection string here with the correct string for your specific connection to Northwind. You will see later that after generating strongly typed classes with the designer, it is not necessary to embed the connection string directly in your code like this.
The Customers table acts as the logical, typed table for queries. It does not physically contain all the rows from the underlying table but acts as a typed proxy for the table .
The next step retrieves data from the database using the DataContext object, the main conduit through which objects are retrieved from the database and changes are submitted.