

2.2 Stages of outgoing call routing management.
а) Port activation. You have to select a free port in table Global -> HW Configuration -> Port -> Global; it will be used for physical connection with E1 trunk. You must also choose a signalization type for interaction (see lab #7).
б) Creation of trunk group. Command Routing > Trunk Group > Global you can enter the data for group into the Trunk Group window. Parameters are divided onto the following tabs (parameters, required for management, are to be set similarly for oncoming exchanges).
1. Common tab:
- Operation Mode – trunk type in group – outgoing, incoming, two-way;
- Priority Operation Mode – priority operation mode for two-way trunks;
- OOSI - trunk mode in group; possible values: In service, Out of service (temporarily)
- Hunting Mode - Method of channel occupying in trunk group (cyclic, FIFO, LIFO etc.)
2. Signalling tab:
- Registering Signaling Type – defines the signaling type which will be used for comm direction;
- DSS1 / QSIG & ISUP & CAS Register Variant – the variant of register signalizations used by trunk group; the number which corresponds to signaling properties is usually set;
- SSN7 Signalling Point – the number of destination point with SS7 signaling if the line is in corresponding mode.
- Line Type – e.g. RCT, TT etc.
- Release Type – connection release method;
3. Features tab – additional service types for the whole trunk group are defined here.
- Barring Class – The restriction group for trunk group – this data sets the restrictions for outgoing communication for trunk group. Restriction groups are managed in Global -> Barring -> Outgoing barring menu.
- IOC Subscriber No Reply – the timeout for handling the additional service “Call handover – IOC” in case of subscriber abandonment;
- CINT Variant – the method of CINT service handling;
4. Lists tab consists of two fields – White List and Black List, which have similar parameters that allow or restrict the following:
- List Operating Mode – presence of trunk group in white/black list;
- Wait for Calling Number – parking of trunk group for receiving the calling subscriber number until all possibilities of this number obtaining are not worked out.
- Check Calling Number Auth. - granting the right to check the calling number;
- Accept if No Calling Number – connection hold continuation on trunk group independently from absence or presence of calling number;
Parameters that are not considered in this methodical guide are rarely used.
The parameters of tabs 1-2 are essential to configure, and of tabs 3-4 – if needed.
5. Insertion of trunks into the group. This has to be done by Routing > Trunk> Global command in Trunk window.
- Trunk – channel number (the open numeration is used for the entire node);
- Module – physical number of module in which the equipment is situated;
- Port – port number which is used for E1 trunk organization;
- Channel – channel number inside the E1 trunk;
- Trunk group - trunk group number into which you need to insert the channel;
- CIC – channel ID which indicates their numeration inside the trunk; it is used in Trunk Group with SS7 signaling.
6. Creation of route. The required data for route description (inserted into the Route window, which is run via the Routing > Route > Global command):
- Route – route number in node;
- Trunk group - trunk group number, into which calls are to be routed;
- Digits requested – quantity of number digits of subscriber B that is required for route occupation;
7. Creation of route occupation variant. You have to choose Routing > Route Seizure Share > Variant command and then manage variants of route occupation quote in Route Seizure Share Variant window (5 routes max for one variant).
8. Creation of a new destination. Using Insert command you can add destinations in window Outgoing Destination from Routing > Destination > Outgoing (the numeration is common for the whole node).
9. Creation of Path criterion. Assign a route and its priority in Path window from Routing > Path.
10. Creation of prefix. Go Routing > Prefix and insert a destination for a prefix.
The principle of this algorithm realization is depicted on fig. 8.2.
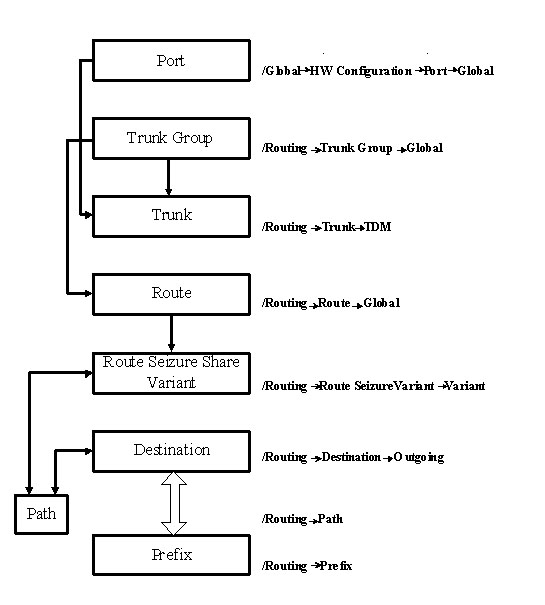
Figure 8.2 – Algorithm of route management in SI2000 DSS
2.3 Routing the calls while the internal connection setup. Each prefix (complete or incomplete subscriber B number) which belongs to the local exchange numeration must have correspondent local destination. There may be several local destinations on the exchange if it has subscriber groups with different quantity of digits in number.
We need to create a local destination for all assigned subscribers with different quantity of digits in number in order to implement a local communication. This can be done via the CMG table from Routing->Destination->Local. Its parameters are:
Number Type – defines the value of Type of Number field from Called Party Number that will be transported to the user terminal in SETUP message. Usually, the “Unknown” is set. This option has no effect if the departmental exchange is connected as a subscriber using the DDI service.
Digits Requested – sets the quantity of digits in subscriber number for the certain subscriber group.
Wait for Answer – here toy can set the “answer” wait timeout for intraswitch or incoming communication which passes this local destination.
Digit Conversion Code – here you can set the pattern for subscriber B number which is to be transported towards subscriber B.