3. Now practice to create your own presentation.
About creating
presentations.
|
 Hide
All
Hide
All
Creating
a presentation in Microsoft PowerPoint involves starting with a
basic design; adding new slides and content; choosing
layouts (layout:
The arrangement of elements, such as title and subtitle text,
lists, pictures, tables, charts, AutoShapes, and movies, on a
chart.);
modifying slide design, if you want, by changing the color
scheme (color
scheme: A set of eight balanced colors that you can apply to
slides, notes pages, or audience handouts. A color scheme
consists of a background color, a color for lines and text, and
six other colors selected to make slides easy to read.)
or applying different design
templates (design
template: A file that contains the styles in a presentation,
including the type and size of bullets and fonts; placeholder
sizes and positions; background design and fill color schemes;
and a slide master and optional title master.)
and creating effects such as animated slide transitions. The
information below focuses on the options available to you when
you start the process.
The
New
Presentation
task
pane (task
pane: A window within an Office application that provides
commonly used commands. Its location and small size allow you
to use these commands while still working on your files.)
in PowerPoint gives you a range of ways with which to start
creating a presentation. These include:
Blank
Start with slides that have minimal design and no color applied
to them.
Existing
presentation Base
your new presentation on one that you have already written and
designed. This command creates a copy of an existing
presentation so you can make the design or content changes you
want for the new presentation.
Design
template Base
your presentation on a PowerPoint template that already has a
design concept, fonts, and color scheme. In addition to the
templates that come with PowerPoint, you can use one you
created yourself.
Templates
with suggested content Use
the AutoContent Wizard to apply a design template that includes
suggestions for a text on your slides. Then you type the text
that you want.
A
template on a Web site Create
a presentation using a template located on a Web site.
A
template on Microsoft.com Choose
from additional PowerPoint templates in the Microsoft Office
Template Gallery. These are arranged according to a type of
presentation.
Content inserted from
other sources
You
can also insert slides from other presentations or a text from
other applications such as Microsoft Word.
|
|
|
Create
a presentation using a blank slide.
Hide
All
On
the Standard
toolbar (toolbar:
A bar with buttons and options that you use to carry out
commands. To display a toolbar, click Customize
on the Tools
menu, and then click the Toolbars
tab.),
click New.
If
you want to keep the default title layout for the first slide,
go to step 3. If you want a different layout for the first
slide, in the Slide
Layout
task pane,
click the layout you want.
On
the slide or on the Outline
tab, type the text you want.
To
insert a new slide, on the toolbar, click New
Slide,
and click the layout you want.
Repeat steps 3 and 4
for each new slide, and add any other design elements or
effects you want.
When
you finish, on the File
menu, click Save,
type a name for your presentation, and then click Save.
You
can also create a blank presentation in the New
Presentation
task pane (File
menu, New
command).
|
|
|
|
Create a new
presentation from an existing one.
|
|
Hide
All
When you follow these
steps, you create a copy of an existing presentation so you can
make design and content changes to it for a new presentation,
without altering the original.
If
the New
Presentation
task pane isn't displayed, on the File
menu, click New.
Under
New
from existing presentation,
click Choose
presentation.
In
the file list, click the presentation you want, and then click
Create
New.
Make
the changes you want to the presentation, and then on the File
menu, click Save
As.
In
the File
name
box, type a name for the new presentation.
Click
Save.
|
|
|
Turn
off fast saves.
First
off, you'll need to do a little setup in PowerPoint. On the
Tools
menu, click Options,
click the Save
tab, and then clear the Allow
fast saves
check box. Doing this forces PowerPoint to remove excess data
from your presentation file each time you save.
After
you've turned off fast saves, save your presentation again
under a new name. On the File
menu, click Save
As,
type a name for the new version of your presentation in the
File
name box,
and then click OK.
In fact, it's a good
idea to save another copy of your presentation before
continuing. Some of the following steps make irreversible
changes to your presentation. You'll want a backup copy of your
slide show.
Watch
out for oversize image files.
In
most cases, images don't need to be much larger than 1024 ×
768 pixels (see What
resolution should I make my images for PowerPoint slide shows?
to learn why). If your images are larger than this, your
PowerPoint files are probably bigger than they need to be.
PowerPoint 2002 and
later can compress images and remove unneeded data:
Right-click
the picture, and then click Format
Picture
on the shortcut menu.
In
the Format
dialog box, click the Picture
tab, and then click Compress.
Under
Apply
to,
do one of the following:
To
compress just the current picture, click Selected
pictures.
To
compress all the pictures in your presentation, click All
pictures in document.
Under
Change
resolution,
do one of the following:
If
your presentation will be used for a screen show, click
Web/Screen.
If
you plan to distribute your presentation as printed pages,
click Print.
Under
Options,
select the Compress
pictures
check box and the Delete
cropped areas of pictures
check box.
Click
OK.
If
prompted, click Apply
in the Compress
Pictures
dialog box.
PowerPoint compresses
the picture or pictures for you automatically.
If you use PowerPoint
2000 or earlier, do the following for each image that you want
to compress:
Click the picture to
select it.
On
the Edit
menu, click Copy.
Again
on the Edit
menu, click Paste
Special.
Do one of the
following:
For
most images, such as photos and scans, click JPG.
For
images with large areas of flat color, or that contain
important text or fine details, click PNG.
Note JPG
files are usually smaller, but JPG's "lossy"
compression can blur thin lines and other fine detail, or leave
"artifacts" (stray odd-colored pixels) around text.
Delete the original
image.
Watch
for embedded objects, pasted or dragged graphics.
If
possible, bring images into PowerPoint by doing the following:
On the Insert
menu, point to Picture,
and then click From
File.
When you copy and paste
(or drag) an image or a graphic that includes an image from
another program into PowerPoint, PowerPoint may create an
embedded OLE object. The OLE object includes a Windows®
Metafile (WMF) picture of the image. PowerPoint normally
compresses images very efficiently, but it can't compress
images in WMFs, so copying and pasting or dragging images into
your files can make your files quite large.
Embedded
objects are easy to shrink. After you no longer need to edit
the image (by double-clicking it), do the following:
Right-click the image, point to Grouping
on the shortcut menu, and then click Ungroup.
Next, immediately right-click the image again, point to
Grouping
on the shortcut menu, and then click Regroup.
Ungrouping throws away the OLE data and leaves just the
picture— in a form that PowerPoint can compress now.
Incidentally,
it's okay to copy and paste images from one slide to another
within PowerPoint. PowerPoint stores only one copy of the image
no matter how many times you use it, so reusing an image can
actually help to keep your file sizes down.
Check the master
slides, too!
When you check your
presentation for oversize images and embedded OLE objects,
don't forget to check the slide, title, notes, and handout
masters as well as the individual slides.
Also check each notes
page in Notes Page view (graphics on the notes pages don't
appear in the Notes pane in Normal view in PowerPoint 2000 and
later).
Beware
the mysterious, unseen element.
On the slide or master
where you suspect there's something that's making the file size
grow:
To
select everything on the slide, click Select
All
on the Edit
menu or press CTRL+A.
Cancel the selection
for elements that you know you want to leave unchanged by
holding down SHIFT while clicking each element.
Press DELETE to remove
all selected elements, whether they are visible or not.
Another approach:
To
zoom out so that you can see the entire slide and the area
surrounding it, on the Standard
toolbar, click the arrow in the Zoom
box, and then click 25%
in the list.
Press TAB repeatedly to
select each element on the slide or master in order.
If something off the
slide or something that you can't identify becomes selected,
delete it, and then save the presentation.
Review those Review
features.
PowerPoint
2002 introduced a new review feature: on the File
menu, point to Send
To,
and then click Mail
Recipient (for Review).
When you choose this option, the PowerPoint file retains all
the original information AND any changes or a new information
that the recipients add. The file grows every time that it's
changed in any way, even if the change is deleting material or
whole slides.
Who
ever originally sends the presentation in this way becomes the
Sender; only the Sender can accept or reject changes that have
been made to the file. After the Sender does this and then
saves the presentation, the file goes back to a reasonable
size.
If you're the Sender,
here's how you can review and merge changes:
Open the presentation.
Click
Yes
when you are asked if you want to merge changes.
Apply the changes that
you want to retain.
Click
End
Review
on the Reviewing
toolbar.
Save the presentation.
Be sure Outlook
hasn't activated Review feature
Outlook
might automatically turn on the review feature even when you
send the presentation by using other e-mail options. To
prevent Outlook from automatically activating this feature:
Open Outlook.
On
the Tools
menu, click Options.
Click
the Preferences
tab, and then click E-mail
Options.
Click
Advanced
E-mail Options.
Under
When
sending a message,
clear the Add
properties to attachments to enable Reply with Changes
check box, and then click OK.
About
adding a text to a slide
|
|
|
|
|
Hide
All
There
are four types of text you can add to a slide: a placeholder
text (placeholders:
Boxes with dotted or hatch-marked borders that are part of most
slide layouts. These boxes hold title and body text or objects
such as charts, tables, and pictures.);
a text in an AutoShape (AutoShapes:
A group of ready-made shapes that includes basic shapes, such
as rectangles and circles, plus a variety of lines and
connectors, block arrows, flowchart symbols, stars and banners,
and callouts.);
a text in a text
box (text
box: A movable, resizable container for a text or graphics. Use
text boxes to position several blocks of the text on a page or
to give the text a different orientation from other text in the
document.);
and WordArt
text (WordArt:
Text objects you create with ready-made effects to which you
can apply additional formatting options.).
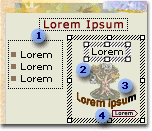
Text in placeholders
Text box used as caption
WordArt text
Text in an arrow
AutoShape
The
text you type into placeholders, such as titles and bulleted
lists, can be edited on the slide or on the Outline
tab, and it can be exported from the Outline
tab to Microsoft Word. Text in an object (object:
A table, chart, graphic, equation, or other form of
information. Objects created in one application, for example
spreadsheets, and linked or embedded in another application are
OLE objects.),
such as a text box or AutoShape, and WordArt text do not appear
on the Outline
tab and must be edited on the slide.
Placeholders
Slide
layouts contain text and object placeholders in a variety of
combinations. In the text placeholders, type titles, subtitles,
and body text onto your slides. You can resize and move
placeholders and format them with borders (border:
The visible line around the edge of an object. For example, the
four lines of a rectangle that comprise its border.)
and colors.
 Text
AutoFit
Text
AutoFit
By default, Microsoft
PowerPoint resizes text as you type so that it fits into a
placeholder. For example, if you type a bulleted list and put
in more text than will fit in the placeholder, PowerPoint
reduces the font size and line spacing until all the text fits
(with 8 points being the minimum font size). For title text, if
a few words bump to a second line, the text is reduced by one
font size so that it fits on a single line.
Text
AutoFit will also reduce the text to fit inside a placeholder
that you make smaller, and it will enlarge the text again if
you then make the placeholder larger.
You
can turn text AutoFit on and off. When it is on, you can adjust
how it functions within a given placeholder by using the
AutoFit
Options
button, which appears near your text the first time it is
resized. The button, when it is clicked, displays a menu giving
you options for dealing with the overspilling text. You can
stop resizing text for the current placeholder while still
keeping your global AutoFit setting on. You can also display
the AutoCorrect dialog box and turn off the AutoFit settings
altogether, so no text will resize automatically. For a
single-column slide layout, when text spills out of a
placeholder, you also get these options: to split the text
between two slides, to create a new blank slide with the same
slide title, or to create a two-column layout on the original
slide. You get these options whether AutoFit is on or not.
The
text AutoFit setting for body text also applies to notes you
type into the notes
pane (notes
pane: The pane in normal view in which you type notes that you
want to accompany a slide.).
AutoShapes.
AutoShapes
such as callout balloons and block arrows lend themselves to
text messages. When you type a text into an AutoShape, the text
is attached to the shape and moves or rotates with the shape.
Text
boxes.
Use
text boxes to place a text anywhere on a slide, such as outside
a text placeholder. For example, you can add a caption to a
picture (picture:
A file (such as a metafile) that you can ungroup and manipulate
as two or more objects, or a file that stays as a single object
(such as bitmaps))
by creating a text box and positioning it near the picture.
Also, a text box is handy if you want to add a text to an
AutoShape, but you don't want the text to attach to the shape.
A text box can have a border, fill, shadow, or
three-dimensional (3-D) effect, and you can change its shape.
WordArt.
Use WordArt for fancy
text effects. WordArt can stretch, skew, curve, and rotate your
text or make it 3-D or vertical.
|
|
|
|
|
About
inserting a text into your presentation.
|
|
Hide
All
You
can insert a text created in other programs into the Outline
tab and get automatic formatting into titles and a body text.
Documents in Microsoft Word (.doc) format, Macintosh
and
a plain text (.txt) can be used in this way. A document in
HTML format
(HTML: The standard markup language used for documents on the
World Wide Web. HTML uses tags to indicate how Web browsers
should display page elements such as a text and graphics and
how to respond to user actions.)
can be inserted into your presentation, retaining its heading
structure and appearing within a text box.
Rather than copying and
pasting, you can use menu commands in Microsoft PowerPoint to
insert text or base a presentation on another document's
outline.
Text
in Word or rich-text format.
When
you insert a Word or Rich Text Format document, PowerPoint
creates an outline structure based on heading styles in the
document. A Heading 1 in your source document becomes a slide
title in PowerPoint, a Heading 2 becomes the first level of a
body text on the slide, a Heading 3 the second level of the
text on the slide, and so on. If the original document contains
no heading styles, PowerPoint creates an outline based on
paragraphs. For example, in a .doc or .rtf file, for several
lines of a text styled as Normal and broken by paragraphs,
PowerPoint turns each paragraph into a slide title.
You can insert text from
a Word document while you're working in PowerPoint; or from
Word, you can create an outline and "send it" to
PowerPoint to start a new presentation based on it.
Text
in HTML.
When
you insert an HTML outline into your presentation, you retain
the original heading structure; however, all the text from the
file appears within a text box on the slide. You can edit this
on the slide but not on the Outline
tab. To create several slides based on .htm files, insert a
file for each slide you want the text on.
When you send an outline
file, in .htm format, from Word to PowerPoint, the headings and
subheadings are retained and the outline is structured in the
same way as a .doc or .rtf file.
Plain
text.
When
you insert a text from a plain text document, tabs at the
beginning of paragraphs define the outline structure. So, a
text with no tab becomes a slide title; a text with one tab
indent becomes a first-level body text on your slide; a text
with two indents becomes a second-level body text, and so on.
Since plain text is not styled, the text you insert inherits
the styles of your current presentation.
|
|
|
|
Show or hide a
text formatting.
For
a text on the Outline
tab or in the notes pane, you can show or hide a text
formatting.
To
show or hide the text formatting, on the Standard
toolbar,
click Show
Formatting.
Note Show
Formatting
is off by default.
|
|
|
|
|
Turn AutoFormat
options on or off.
|
AutoFormat options
include automatic changes that Microsoft PowerPoint makes to
the look of your text, such as changing fraction characters to
a fraction symbol or formatting Internet paths as hyperlinks.
On
the Tools
menu, click AutoCorrect
Options,
and then click the AutoFormat
As You Type
tab.
Select or clear any of
the automatic formatting options you want to turn on or off.
|
|
|
Change a text color.
|
Hide
All
Do one of the following:
Change
a text color in a placeholder, AutoShape, or a text box
Select the text you
want to change.
On
the Drawing
toolbar, click the arrow next to Font
Color.
Do one of the
following:
To
change the text color back to its default, click Automatic.
To
change a color in the color scheme, click one of the eight
colors below Automatic.
To
change a color that isn't in the color scheme, click More
Colors.
Click the color you want on the Standard
tab, or click the Custom
tab to mix your own color, and then click OK.
Change
text a color in WordArt
Click
the WordArt object
to select it.
On
the WordArt
toolbar, click Format
WordArt.
In
the Format
WordArt
dialog box, on the Colors
and Lines
tab, under Fill,
click the Color
box.
Do one of the
following:
Click a color in the
palette that's displayed.
Click
More
Colors
to choose from a greater color range.
Click
Fill
Effects
to choose a gradient, textured, or patterned fill or to
insert
a picture .
Note If
the WordArt has a border, select options under Line
to change the border color and its weight and style.
|
|
|
Select the text you want to
change.
On
the Formatting
toolbar, do one of the following:
To
make text larger or smaller, click Increase
Font Size or
Decrease
Font Size
 .
.
To
set a font size by number, in the Font
Size
box
 ,
click the size you want.
,
click the size you want.
Select the text you want to
change.
On
the Formatting
toolbar, click Bold
 ,
Italic
,
Italic
 ,
or Underline
,
or Underline
 .
.
When this setting is on and
you type characters for various versions of a smiley face or an
arrow, Microsoft PowerPoint automatically formats the characters as a
symbol.
On
the Tools
menu, click AutoCorrect
Options,
and then click the AutoFormat
As You Type
tab.
Select
the Smiley
faces and arrows with special symbols
check box.
I
can't move an object.
Select
the object (such as a text box, AutoShape or piece of clip art by
clicking its border, and when the pointer becomes a four-headed
arrow, drag the object.
The
object might have been created on the
slide
master (slide
master: The slide that stores information about the design template
applied, including font styles, placeholder sizes and positions,
background design, and color schemes.).
To move an object on the slide master, point to Master
on the View
menu, and then click Slide
Master.
On the slide master, click the object to select it, and then drag
it.
I
want to change the formatting for a line of text, but the whole
paragraph changes.
When you drag to select the
line of text, if your pointer drops slightly below the current line,
the line below will also be selected. Move the pointer back up,
while still dragging, to undo the unwanted selection.
Some
formatting changes such as line spacing, alignment, bullets, and
tabs- affect the entire paragraph and can't be applied to a
single line.
Be sure to select only the
text you want to change. If you select an entire paragraph, the
changes you make affect all text in the paragraph
How
can I keep my text from resizing as I type?
Turn
off text AutoFit (this is on by default). When resizing is turned
off, Microsoft PowerPoint will not reduce your font size and line
spacing to fit spillover text into a placeholder.
On
the Tools
menu, click AutoCorrect
Options.
Click
the AutoFormat
As You Type
tab.
Under
Apply
as you type,
do any of the following:
To
turn off AutoFit for title text, clear the AutoFit
title text to placeholder
check box.
To
turn off AutoFit for body text, clear the AutoFit
body text to placeholder
check box.
I
want to select only a few characters, but whole words get
automatically selected.
When
the "select whole words" setting is on, Microsoft
PowerPoint automatically selects a whole word, and the space after
it, as you drag to select. To turn off this setting, on the Tools
menu, click Options,
click the Edit
tab, and then clear the When
selecting, automatically select entire word
check box. Then, drag to select the characters.
Some
slide text does not appear on the Outline
tab.
Some
types of a text don't appear and aren't editable on the Outline
tab. They include: a text added with the Text
Box
tool
 ,
a text attached to an AutoShape
text, and a text in embedded
objects.
,
a text attached to an AutoShape
text, and a text in embedded
objects.
If
you click Expand
All
 ,
on the Formatting
toolbar, only slide titles appear on the Outline
tab. To see all of the text, click Expand
All
again.
,
on the Formatting
toolbar, only slide titles appear on the Outline
tab. To see all of the text, click Expand
All
again.
I
formatted my text, but the formatting is not showing.
To
see formatted text on the Outline
tab or in the notes pane, click Show
Formatting
 on
the Standard
toolbar.
on
the Standard
toolbar.
To
see colors that you apply, on the View
menu, click Notes
Page.
To
see how the text will print, on the Standard
toolbar, click Print
Preview ,
and in the Print
What
list, click Notes
Pages.
,
and in the Print
What
list, click Notes
Pages.
I
don't want those buttons to appear after an automatic correction.
To
turn off the AutoCorrect
Options
button, on the Tools
menu, click AutoCorrect
Options.
On the AutoCorrect
tab, clear the Show
AutoCorrect Options buttons
check box.
You
can easily insert a check mark symbol in your Office
documents. The
most common symbols include:


The following are some
ways that you can insert a check mark symbol, depending on
which Office program you are using.
Insert
the check mark symbol by using the Symbols
command on the Insert
menu.
Insert the check mark
symbol by using the Windows Character Map tool.
Type the keyboard
shortcut for the symbol, and then change the symbol to the
correct font type.
Use the Office
AutoCorrect feature to translate the text of your choice into
your chosen symbol.
Tip Want
even more check mark graphics? Go to Clip
Art and Media on Microsoft Office Online.
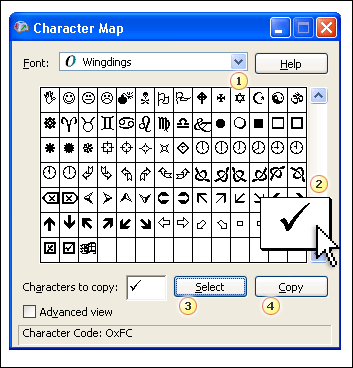
Insert
a symbol by using the Symbol command.
Note This
feature requires Excel, FrontPage, OneNote, Outlook,
PowerPoint, Publisher, Word, or Visio.
On
the Insert
menu, click Symbol.
Note In
Outlook, use the Insert
menu in the message window.
In
the Symbol
dialog box, on the Symbols
tab, in the Font
box, click Wingdings.
Scroll
to the bottom of the list, where you will find several common
check mark symbols. Double-click
the symbol that you want.
Insert
a symbol by using the Windows Character Map tool.
Note This
feature requires Excel, FrontPage, OneNote, Outlook,
PowerPoint, Project, Publisher, Word, or Visio.
Do one of the
following:
For
Microsoft Windows XP, click Start,
point to All
Programs,
point to Accessories,
point to System
Tools,
and then click Character
Map.
For
Microsoft Windows 2000, click Start,
point to Programs,
point to Accessories,
point to System
Tools,
and then click Character
Map.
Note If
Character Map is not available, see Windows Help for
information about how to install a Windows component.
In
the Character
Map
dialog box, in the Font
box, click Wingdings.
Scroll to the bottom of
the list, where you will find several common check mark
symbols.
 Click
the down arrow, and then click Wingdings.
Click
the down arrow, and then click Wingdings.
 When
you click a cell in the symbol grid, a larger version appears
for your review.
When
you click a cell in the symbol grid, a larger version appears
for your review.
 To
add the current symbol to the Characters
to copy
box, click Select.
To
add the current symbol to the Characters
to copy
box, click Select.
 To
place the symbol in the Characters
to copy
box on the Windows clipboard, click Copy.
To
place the symbol in the Characters
to copy
box on the Windows clipboard, click Copy.
Click
the check mark symbol that you want, click Select,
and then click Copy.
Switch to your
document, and then place the insertion point where you want to
paste the check mark symbol.
Click
Paste.
Note If
the symbol looks different from the one that you selected,
select the symbol and then apply the same font that you
selected in Character Map.
Insert
a symbol by using its character code.
Note This
feature requires Excel, FrontPage, InfoPath, OneNote, Outlook,
PowerPoint, Project, Publisher, Word, or Visio.
You
can also use the character code of the symbol as a keyboard
shortcut. For example, to insert the check mark symbol, press
and hold ALT while typing 0252
on the numeric keypad.
Note You
must use the numeric keypad and not the keyboard to type the
numbers. Make sure that the NUM LOCK key is on if your keyboard
requires it to type numbers on the numeric keypad.
Symbol
|
Character Code
|
|
ALT+0251
|
|
ALT+0252
|
|
ALT+0253
|
|
ALT+0254
|
Insert
a symbol by using AutoCorrect.
Note This
feature requires Word 2002 or later. You can also use Outlook
2002 or later while using Word as your e-mail editor. When
using Outlook, the Word version must match the Outlook version.
AutoCorrect requires
that you first define the AutoCorrect text and symbol.
In
Word, or in an Outlook message window, on the Insert
menu, click Symbol,
and then click the Symbols
tab.
In
the Font
box, click Wingdings,
and then scroll to the bottom of the list.
Select
the symbol that you want, and then click AutoCorrect.
The
symbol will automatically appear in the With
box.
In
the Replace
box, type a word or phrase that you want to associate with the
check mark symbol— for example, type check1.
Click
Add.
Click
OK.
In
your documents, when you want to use the check mark symbol
that you have just defined, type the replace word that you
used in step 4.
Insert a new blank
slide.
|
|
|
To insert a new blank
slide, do either of the following:
On
the Formatting
toolbar, click New
Slide
 .
.
With
the insertion point in the Outline
or Slides
tab, press Enter.
In
the Slide
Layout task
pane,
click the layout you want.
Tips
You
can also insert a new slide from the Slide
Layout
task pane: point to a layout, click the arrow, and then click
Insert
New Slide.
If
you want to keep the Slide
Layout
task pane from displaying each time you click New
Slide
,
clear the Show
when inserting new slides
check box at the bottom of the pane.
|
|
|
Do one of the following:
On
the Outline
tab in normal view, select one or more slide icons
 ,
and then drag the selection to a new location.
,
and then drag the selection to a new location.
On
the Slides
tab in normal view, select one or more slide thumbnails, and then
drag the selection to a new location.
In slide sorter view, select
one or more slide thumbnails, and then drag the thumbnails to a new
location.
To select multiple slides in a
row, press SHIFT before clicking the slide icon or thumbnail.
Tip
When selecting slide
thumbnails, after you make the selection, right-click and drag the
thumbnails to the new location. A shortcut menu appears after you
drag, giving you the option of moving or copying the slides.
On
the Outline
tab in a normal view, position the insertion point where you want to
split the text (for example, at the end of a bulleted paragraph),
and then press ENTER.
On
the Formatting
toolbar, click Decrease
Indent
 until
a new slide icon and number appear (the split text will appear below
that, as body text), and then type the title for the new slide.
until
a new slide icon and number appear (the split text will appear below
that, as body text), and then type the title for the new slide.
Tip
There's
another way to split a text between two slides. While you're typing
into a text placeholder on
a slide, in a single-column layout, if the amount of the text is more
than the placeholder can contain, the AutoFit
Options button
 appears
to the left of the text. When you click it, it displays options that
include splitting the text onto two slides or creating a blank second
slide with the same slide title, on which you can type an additional
text.
appears
to the left of the text. When you click it, it displays options that
include splitting the text onto two slides or creating a blank second
slide with the same slide title, on which you can type an additional
text.
Duplicated slides are
inserted directly below the slides you have selected.
On
the Outline
tab or Slides
tab in normal view, select the slides you want to duplicate. (If
you want to select slides in order, press SHIFT as you click; for
slides not in order, press CTRL as you click.)
On
the Insert
menu, click Duplicate
Slide.
Tip
Duplicated slides within a presentation
You can also duplicate slides
by pressing CTRL+SHIFT+D.
Delete
a slide.
On
the Outline
tab or Slides
tab in a normal view, select the slides you want to delete. (If you
want to select slides in order, press SHIFT as you click; for slides
not in order, press CTRL as you click.)
On
the Edit
menu, click Delete
Slide.
Tip
You can also press DELETE to
delete slides.
Hide a slide.
On
the Slides
tab in a normal view (view:
A way of displaying the contents of a presentation and providing the
user with the means to interact with it.),
select the slide you want to hide.
On
the Slide
Show
menu, click Hide
Slide.
The
hidden slide icon
 appears
with the slide number inside, next to the slide you have hidden.
appears
with the slide number inside, next to the slide you have hidden.
Note The
slide remains in your file, even though it is hidden when you run the
presentation.
Show a hidden slide.
Do one of the following:
Reset
a hidden slide to be viewed in a slide show
On
the Slides
tab in a normal view,
select the hidden slide you want to make visible again.
The
hidden slide icon
appears
with the slide number inside, next to hidden slides in the Slides
tab.
On
the Slide
Show
menu, click Hide
Slide.
View
a hidden slide during a slide show
Right-click
any slide during a slide show, point to Go
to Slide.
Numbers in parentheses
indicate hidden slides.
2.
Click the slide you want to view.
By Shellie Tucker
Here's a Power User column
for teachers. Want to involve your students more in a presentation?
Set up "triggers" for them to click as they go through the
show. Triggers (related to animations) let you add surprise to your
slides while inviting your viewer to take part and have fun.
About
running a presentation on two monitors
Using
Microsoft Office PowerPoint 2003 and Microsoft Windows 2000 with
Service Pack 3 (or later) or Microsoft Windows XP, you can run your
presentation from one monitor and let the audience view it on another
monitor. This allows you to keep other programs running that the
audience won't see, plus you have access to presenter view, which
offers a variety of tools for making it easier to present.
Presenter view
Use
any of the following commands to navigate from one slide to the next
while you're giving a slide show or reviewing a presentation in slide
show view.
Go to the next slide
Go to a specific slide
Type the slide number, and
then press ENTER.
Right-click,
point to Go
to Slide
on the shortcut menu, and then click the slide you want.
See previously viewed slide
Right-click,
and on the shortcut menu, click Last
Viewed.
Always
show the pointer during a slide show
Note By
default, the arrow is set at Automatic,
which means it's hidden automatically after 3 seconds of inactivity.
The arrow appears again when you move the mouse. To keep the arrow
displayed all the time, right-click, point to Pointer
Options,
point to Arrow
Options,
and then click Visible.
Hide
the pointer during a slide show
Note If
you choose the Automatic
option, the pointer is hidden after three seconds of no movement. The
pointer appears again when you move the mouse.
Tip
After
you hide the pointer, it remains hidden until you choose one of the
other commands on the Pointer
Options
submenu (submenu:
A menu that appears when a user points to a command on a higher-level
menu.)
or you exit the presentation.
Print
multiple slides on one handout page
Setting
handout options
In PowerPoint, you can set
handout options for printing in either of the following ways:
Through
the Print
dialog box (File
menu, Print
command)
In
print preview (Print
Preview
button on the Standard
toolbar)
Some
advantages of print preview are that you see how the layout you
choose looks, and you can add or change a header and a footer text in
this view.
Example layouts
Choose from six different
layout options for handouts according to the number of slides you
want per page; choose 1, 2, 3, 4, 6, or 9.
 One-slide-per-page
layout with a horizontal orientation and headers and footers, which
are optional. Note that headers and footers on handouts are separate
from those you add to the slide itself.
One-slide-per-page
layout with a horizontal orientation and headers and footers, which
are optional. Note that headers and footers on handouts are separate
from those you add to the slide itself.
 Three-slides-per-page
layout. This option has a vertical orientation and comes with blank
lines for audience notes. In the example, the headers and footers are
centered. You can position, size, and format headers and footers on
the handout master.
Three-slides-per-page
layout. This option has a vertical orientation and comes with blank
lines for audience notes. In the example, the headers and footers are
centered. You can position, size, and format headers and footers on
the handout master.
 A
handout with six slides per page, oriented horizontally. For four or
more slides per page, choose between a horizontal (read across) or
vertical (read down) order.
A
handout with six slides per page, oriented horizontally. For four or
more slides per page, choose between a horizontal (read across) or
vertical (read down) order.
Print handouts from print
preview
Open the presentation that
you want to print.
On
the Standard
toolbar, click Print
Preview.
In
the Print
What
box on the toolbar, click one of the handout options.
To
choose the page orientation, click the Portrait
or Landscape
button.
To
select color or black and white, click the arrow on the Options
button, point to Color/Grayscale,
and then select one of the three color options.
Color
or Color
(On Black and White Printer)
If you print to a color printer, this option prints the handouts in
color. If you print to a black and white printer, this option
prints with all colors shown in grayscale.
Grayscale
Prints the handout in grayscale with some colors, such as
background fill, shown in white to heighten legibility. (Sometimes,
this looks the same as Pure
Black and White.)
Pure
Black and White
Prints the handout with no gray fills.
To
add or change a header and footer text, click the arrow on the
Options
button, and then click Header
and Footer.
When
printing handouts with four or more slides per page, click the arrow
on the Options
button, point to Printing
Order,
and select either Horizontal
or Vertical.
Click
Print,
select any additional options in the Print
dialog box, and click OK.
More
options in the Print dialog box
In the Print
dialog box, you can make other printing selections as well as review
or alter what you've selected in print preview. Some options included
here but not in print preview are:
Print
range
If you only want to print the current handout page, you can select
Current
slide.
(Note, though, that this prints your page as page 1, regardless of
its order in the full handout. To avoid this, turn off page
numbering in the Header
and Footer
dialog box before you print the handout page.)
Change the look or
position of headers and footers
If
you want headers and footers on a handout to be sized or positioned
differently, or you want to change the font, make the change on the
handout master. Header and footer changes you make to the handout
master carry over to a printed outline.
In
print preview, in the Print
What
box, select the type of handout you want, then click the Close
button.
In
normal view, on the View
menu, point to Master,
then click Handout
Master.
Do any of the following:
To move a header or footer
placeholder, point to it, and when the pointer becomes a
four-headed arrow, drag the placeholder to a new position.
To resize a header or footer
placeholder, select it, point to a sizing handle, and when the
pointer becomes a two-headed arrow, drag the handle.
To
change a header or footer font, select the placeholder, and then on
the Format
menu, click Font,
and select options in the Font
dialog box.
To
add or change a fill color or border for a placeholder, select the
placeholder, and then on the Format
menu, click Placeholder,
click the Colors
and Lines
tab, and select options under Fill
and Line.
To
see how the changes look on the handout with your header and footer
text, click the Print
Preview
button on the Standard
toolbar. If you just want to close the handout master, on the
Handout
Master View
toolbar, click Close
Master View.
Note If
you delete a placeholder on the handout master, you can reapply the
placeholder in handout master view. On the Format
menu, click Handout
Master Layout,
select the check box for the placeholder you want, and click OK.
Alternative layouts
If you want a layout type that
PowerPoint doesn't include, create more handouts in Word.
For
example, if you want to print three slides per page but do not want
lines for audience notes, send the handout to Word and choose the
Blank
lines next to slides
option, then delete the lines in Word. Or, for another notes option
in Word, select Blank
lines below slides,
which includes blank lines for audience notes with only one slide per
page, in a vertical format.
Animate
Your PowerPoint 2002 Web Presentation
This article explains how to
use animation effects to best advantage in a Web presentation, and
then shows you how to publish it to the Web.
Planning ahead
If you know you'll want to
deliver your presentation primarily as a Web presentation, you can
design it with that in mind. If you have decided to publish an
animated presentation that you have already created, you need to
change some of the animation effects to ensure that the slides will
play smoothly and as expected in the Web format. Keep in mind not
only the animations you want to use (or have used), but also the
browser type and version you are delivering for. PowerPoint 2002
animated effects only work with Microsoft Internet Explorer 5 or
later; no custom animation or animation schemes will work with
Netscape or earlier versions of Internet Explorer.
Choosing the right
animations
Some
animation effects (on the Slide
Show
menu, click Custom
Animation
or Animation
Schemes)
work nicely in the Web page environment, such as Fade in, Faded Zoom,
Blink, Flashbulb, and most motion paths, including custom motion
paths. When you apply a motion path effect, however, be sure that by
the end of the sequence, the animated text or object is still on the
slide (unless you want an exit effect). The following animation shows
how a motion path can end up hiding part of the text or object in a
presentation.
These
types of animation effects are not recommended for use in Web
presentations because they either will not animate at all or the
effect may not behave as expected:
Any effects that scale text
or objects in only one direction (for instance vertical, but not
horizontal), such as Stretch, Swivel, Compress, Grow/Shrink, Spin,
or Glide.
Any effects that rotate text,
such as Flip, Spinner, Swish, Teeter, and Wave.
Effects applied to charts.
These effects will play as if they were applied to the chart as a
whole (no parts will be animated).
Dim after effects. These
effects will not work for images (or video); if a Dim after effect
is applied to an object, the fill colors will dim but the outline
color will not dim.
Be sure to experiment with the
different animation effects to find combinations that work best for
your presentation when it is viewed as a Web page. For more
information about creating presentations and adding animations, see
Microsoft PowerPoint Help.
Timing is everything
Your audience members may not
be familiar with PowerPoint, but you can arrange the timing of the
animation sequences so that they don't have to click the slide area
to make the next item appear. Simply set the animations to play
automatically.
To
do this, in the Custom
Animation
task pane, apply the With
Previous
start option to the first animation on a slide. This will start the
animation as soon as the slide appears in the browser window. Then
apply the After
Previous
start option for all other animations on the slide. Alternatively,
you can apply the default On
Click
option for each animation effect and then set timings for each slide
(on the Slide
Show
menu, click Rehearse
Timings).
When the slide is being timed, click through the animations on the
slide and then click the Next
button (the blue arrow) on the Rehearsal
toolbar. Your viewers will still be able to use the Web presentation
navigation pane to click from slide to slide, but all animations on a
slide will play automatically. Note that when someone returns to a
slide after having viewed only part of it, the animation sequences
automatically start from the beginning.
Note If
your audience does not have Office XP installed, they may need to
install the Office Animation Run-time Add-in to view the animated Web
presentation.
Tips for adding sound and
video
Consider the following when
deciding whether to add sound, video, or embedded objects to a Web
presentation.
Sound
only plays for a single slide; it doesn't continue playing when you
jump to another slide.
If
you position a video clip such that the movie icon is partially or
completely behind a shape or object, the video will play behind that
shape or object.
Linked or embedded objects
will not play.
Publish your animated
presentation
When you publish a
presentation to the Web, you save a copy of a Web page or Web archive
to a specified location, such as a Web server or other available
computer. By publishing the presentation instead of merely saving it
as a Web page or Web archive, you maintain the original version of
the presentation in the .ppt file format, and all the necessary
supporting files (including graphics, fonts, and backgrounds) are
added to the shared location for you.
Open the presentation or Web
page you want to publish to the Web.
On
the File
menu, click Save
as Web Page.
In
the File
name
box, type a name for the Web page.
In
the Save
as type
box, do one of the following:
To
save as a Web page and create an associated folder that contains
supporting files, such as bullets, background textures, and
graphics, select Web
Page.
This works fine for saving to a Web server when you don't plan to
move the presentation.
To
save as a Web archive with all supporting information, such as
graphics and other files, contained in a single file, select Web
Archive.
This works well when you know you'll have to move the presentation
or if you want to email it.
In the folder list, select a
location for the presentation.
Click
Publish,
and then do the following:
Under
Browser
support,
select Microsoft
Internet Explorer 4.0 or later.
To
ensure that animations play when the presentation is browsed, click
Web
Options,
select Show
slide animation while browsing,
and then click OK.
To
immediately see how your published Web presentation looks in your
browser after you have published it, select the Open
published Web page in browser
check box.
Click
Publish.
Now you can send the link, or
the Web archive file itself, to your audience members.
Create
and distribute a self-running Power Point presentation.
Self-running presentations are
a great way to communicate information without having to have someone
available to run a slide show presentation. For example, you might
want to set up a presentation to run unattended in a booth or kiosk
at a trade show or convention, or send a CD with a self-running slide
show to a client.
You can make most controls
unavailable so that users can't make changes to the presentation. A
self-running presentation restarts when it has finished and also when
it has been idle on a manually advanced slide for longer than five
minutes.

