

C# Bible - Jeff Ferguson, Brian Patterson, Jason Beres
.pdfWellKnownObjectMode.SingleCall);
Figure 36-3 demonstrates the difference between the host application outputs after running the client application several times.
Figure 36-3: Host application running in SingleCall vs. Singleton mode
As you can see, the Singleton mode does not destroy the object after the method goes out of scope, whereas the SingleCall mode needs to re-create the object each time the ReturnName() method is called.
Summary
This chapter has given you a solid understanding of the remoting framework in .NET. Using remoting, you can activate objects across process boundaries, application domains, and machine boundaries. If you are going to implement remoting, there are a few more advanced topics in the SDK that would be worth looking at before you begin:
•Creating customer formatters: You can create customer formatters if the TCP and HTTP formatters do not satisfy your data marshaling needs. Search for Sinks and Sink Chains in the Framework SDK.
•Asynchronous remoting: Remoting is another .NET technology with built-in asynchronous capabilities. Search for Asynchronous Remoting in the Framework SDK to learn how to use delegates and events with remoting.
There are many good reasons to investigate remoting, but before you dive in, make sure you look at the capabilities of XML Web services and ASP.NET to accomplish cross-process communication. You may save yourself some time and effort creating the host applications and modifying the way your clients instantiate objects.
Chapter 37: C# and .NET Security
In This Chapter
One of the most important things to remember when moving to C# and the .NET Framework is security. You must ensure that when building n-tiered applications, security is a top priority because the chances for a security breech in a distributed application are much greater than in a standalone application. It is for this reason that the .NET Framework was built with security
in mind, which is reflected in every aspect of the framework. The .NET Framework is capable of remote execution, dynamic downloading of new components, and even dynamic execution. With this type of environment, if a programmer has the task of creating the security model, it could easily take longer to code than the actual program itself.
When building applications, the security model used is typically based on the user level or the group level. The application will either perform certain functions or it will not. The .NET Framework provides developers with a means to define role-based security, which operates in a similar fashion to user-level and group-level security. Role-based security is abstracted into principals and identities, while also providing code-level security, which is generally referred to as code-access security or evidence-based security.
When a user launches an application that employs code-access security, he or she may indeed have access to a resource (a network drive for example), but if the code contained within the application is not trusted, the program is not be able to access that network drive. This type of security is based on mobile code. You may not want to use a mobile application and let that application access all of the resources you have entrusted to you. Role-based security prevents malicious programmers from writing applications that can run as you and perform any number of actions on your local computer or across your corporate network.
The security contained within the .NET Framework sits on top of the security already contained within your operating system (OS). This second level of security is much more extensible than OS security. Both types of security, OS and .NET Framework, can complement each other.
This chapter touches on several security-related issues, such as using Windows roles to determine permissions. You then learn to demand and deny permissions within code while performing Registry operations. Finally you learn to use attribute-based permissions to define the rights your code has at runtime.
Understanding Code Security
Code-access security determines whether an assembly is allowed to run based on several pieces of evidence, such as the URL from which the assembly came and who authored the control. When you install the .NET Framework, default permissions are configured, which greatly reduces the chances that an untrustworthy control from the Internet or a local intranet can run on your machine. You may have encountered this if you have attempted to run any applications or use any controls from a network drive that require special security privileges. These special security privileges include writing to a disk file, reading or writing to and from the Registry, as well as network-related operations. You generally receive a security exception similar to the following when you attempt to do this if you don't change the security policy to allow this type of behavior:
Unhandled Exception: System.Security.SecurityException: Request for the permissi
on of type System.Security.Permissions.FileIOPermission
...
The state of the failed permission was:
<IPermission class="System.Security.Permissions.FileIOPermission, mscorlib, Vers
ion=1.0.3300.0, Culture=neutral, PublicKeyToken=b77a5c561934e089"
version="1"
Read="Z:\test.dat"
Write="Z:\test.dat"/>
Code-access security works only on verifiable code. During the just-in-time (JIT) compilation, the Microsoft Interpreted Language (MSIL) is examined to ensure type safety. Type-safe code has access to only those memory locations to which it has rights. Actions, such as pointer operations, are prohibited, so functions can only be entered and exited from predefined entry and exit points. This isn't a foolproof method; bugs can still occur. However, it does ensure that a malicious piece of code cannot forcefully generate an error in your application and then exploit some bug in the operating system, thus gaining access to the stack. Under these types of circumstances, when a piece of malicious code has forcefully generated an error, the code that generated an error can only access the memory locations that JIT has determined it has access to.
Understanding code security policy
Code-access security enables a platform to assign a level of security to an application or assembly. Because this is accomplished with evidence collected from the component in question, code-access security is also referred to as evidence-based security. The evidence collected from the code could be the location on the Internet from which the code was downloaded, a digital signature located within the code, or code the author actually wrote.
Code security policies define several code groups, each of which has a set of permissions. When an application has been executed, it is then analyzed for evidence. Given the evidence within the code, the code is placed into a code group, thus inheriting the permissions of that group. These security policies can be set at the enterprise, machine, user, or application domain level, thus providing a strong degree of control over what runs and with what access. You may have enabled your code to have unrestricted rights, but your network administrator can define some enterprise security policies that supercede yours.
Understanding code permissions
The CLR, when granting security permissions, grants only permissions to code on the operations it is allowed to perform. The CLR uses objects called permissions to implement this type of security on managed code. The main uses for permissions are as follows:
•Code may request the permissions it is intending to use or might possibly need. The
.NET Framework has the task of determining whether these requests are valid. Security requests are honored only if evidence collected from the code allows it to do so. Code never receives more permissions than the current security allows. Code can, on the other hand, receive less permission than that specified upon request.
•The CLR grants permissions to the code based on several factors: the code's identity (such as the URL it was obtained from, who wrote the code, and so on); the permissions that you request; and the amount the code can be trusted, as defined by the various security policies.
•Code can make a demand to have a certain permission. If a demand is made with the code, all code that runs within the scope of the application must also have access to the permission for the permission to be granted.

Code can be granted three kinds of permissions, each of which has a specific purpose:
•Code access permissions represent access to a protected resource or the authority to perform a protected operation.
•Identity permissions indicate that the code has credentials that support a particular kind of identity, such as code can have an "Administrator" identity and therefore run with all the permissions that an administrator would have.
•Role-based security permissions provide a mechanism for discovering whether a user (or the agent acting on the user's behalf) has a particular identity or is a member of a specified role. PrincipalPermission is the only role-based security permission.
The runtime provides built-in permission classes in several namespaces and supplies support for designing and implementing custom permission classes.
Understanding User Security
Many security systems in use today implement something called user security. These types of security systems require information from users seeking access. For example, they need to know who he person is, and what the user has access to. User security plays an important role in computer systems because when you run an application on your computer, the application generally takes on the identity of the person running it. Therefore, if you run an application, that application has all the rights and permissions on your local machine and across the enterprise network that you would have.
Unlike Windows services, which enables you to configure who the application runs as, a typical Windows-driven application has never really given us this type of control before. This fact has fueled many viruses and Trojan horses that computer users and businesses have to deal with on a day-to-day basis. By enabling you to determine what kind of permissions applications have on your machine, you greatly reduce the chance of an attack by a malicious piece of code. Operations, such as reading the Registry, overwriting system files, or looping through your personal address book, would not be possible. You can quickly test the whether the applications you execute run as the user who ran them by trying the program shown in Listing 37-1.
Listing 37-1: Environment Variables for Simple Security Tasks
using System;
namespace SimpleSecurity
{
class Class1
{
[STAThread]
static void Main(string[] args)
{
Console.WriteLine("I am currently running as:"); Console.WriteLine("User : {0}",Environment.UserName); Console.WriteLine("Domain : {0}",Environment.UserDomainName);
}
}
}
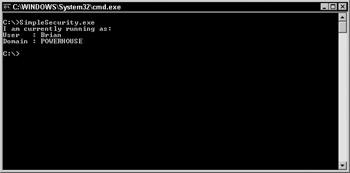
When you run this program, you should see the name you used to log onto Windows, as well as the name of your domain, as shown in Figure 37-1.
Figure 37-1: The Environment class can be used for simple security tasks.
If you aren't logged into a network domain, you simply see the name of your computer system as the domain name. The simplest type of security you could probably implement at that point would be to have your code compare the username and domain name to something valid, and if all is well, continue on with your program. That's adequate until you move your application to another machine, and then it quits working because you have strongly typed names in your code. The following section reviews this type of security along with other simplistic types.
Understanding .NET and Role-Based Security
Role-based security is based on the PrincipalPermission class. You can use PrincipalPermission to determine whether the current user has a certain name (such as John Doe) or whether that user belongs to a particular group. This class is the only role-based security permission supplied by the .NET Framework class library.
After you define Identity and Principal objects, you can perform security checks against them in one of the following ways:
•Using imperative security checks
•Using declarative security checks
•Directly accessing the Principal object
When using managed code, you can use imperative or declarative security checks to determine whether a particular principal object is a member of a known role, has a known identity, or represents a known identity acting in a role. To perform the security check using imperative or declarative security, a demand for the PrincipalPermission object must be made. During the security check, the common language runtime examines the caller's principal object to determine whether its identity and role match those represented by the PrincipalPermission being demanded. If the principal object does not match, a SecurityException is thrown. When this happens, only the principal object of the current thread is checked. The PrincipalPermission class does not walk the stack as it does with code access permissions, as this would cause serious security concerns.
Additionally, you can access the values of the principal object directly and perform checks without a PrincipalPermission object. In this case, you simply read the values of the current thread's Principal or use the IsInRole method to perform authorization.
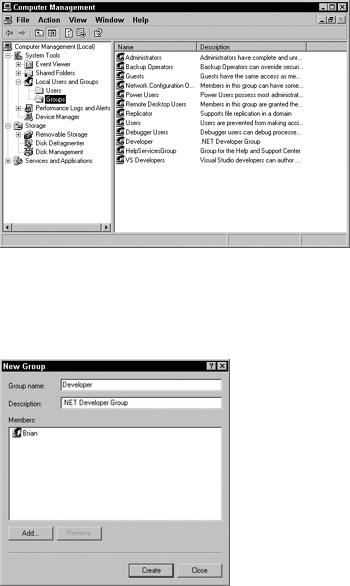

4.After you create this group, click the Add button and add your user account to the group. For this example, ensure that you are not in the Administrator group. If you are an administrator, you may want to test the following application with an alternate Windows account.
Now that you have your new group in place, you are going to delve into the WindowsPrincipal and WindowsIdentity class. When used together, these two classes can determine whether the current Windows user belongs to specific groups. Examine the sample application shown in Listing 37-2.
Listing 37-2: WindowsPrincipal Enables You to Check for Role Membership
using System;
using System.Security.Principal;
class Class1
{
static void Main()
{
WindowsIdentity wi = WindowsIdentity.GetCurrent(); WindowsPrincipal wp = new WindowsPrincipal(wi);
// This checks for local administrator rights if you in a Domain if (wp.IsInRole(WindowsBuiltInRole.Administrator)) Console.WriteLine("Your are an Administrator!");
else
Console.WriteLine("You are not an Administrator.");
if (wp.IsInRole("POWERHOUSE\\Developer")) Console.WriteLine("You are in the Developer group!");
else
Console.WriteLine("You are not in the Developer group.");
}
}
This code creates a new WindowsIdentity object (based on the identity of the current user) with the GetCurrent method. The WindowsPrincipal object uses this identity object as a parameter in its constructor so that you can retrieve certain information about the person or object. It then calls the IsInRole method of the WindowsPrincipal class to determine whether the user belongs to the Administrator group. The IsInRole method has three overloaded variations of which you use two. The first one takes a WindowsBuiltInRole enumeration. When checking for any groups that are built into Windows, you should use this enumeration. Depending on whether you are an administrator, you see one of two messages.
The code then checks to see whether the current user belongs to your new Developer group, using variation number two of the IsInRole method. This variation simply takes a string parameter specifying the computer or domain name followed by the group name.
In the preceding code, substitute the word POWERHOUSE with the name of your domain or computer. Those of you who belong to both the Administrator group and the Developer group might notice that this sample application shows you present in only the Administrator group, as shown in Figure 37-4.

Figure 37-4: Belonging to the Administrator group can confuse IsInRole.
This mix-up occurs because if you are an administrator, you are inherently part of all groups and have access to everything. Therefore, when checking for roles in your own applications, it is wise to check for both the specific group and all other groups that have more power than the group you are checking (for example, Administrator, Power Users, and so on).
Understanding principals
Each thread in a .NET application is associated with a CLR principal. The principal contains an identity representing the user ID that is running that thread. By using a static property called Thread.CurrentPrincipal, you can return the current principal associated with the thread.
Principal objects implement the IPrincipal interface. The IPrincipal interface contains only one method and one property. The Identity property returns the current identity object, and the IsInRole method is used to determine whether a user belongs to a specific role/security group.
Currently, two principal classes are contained with the .NET framework: WindowsPrincipal and GenericPrincipal. The GenericPrincipal class is used when you need to implement your own principal. The WindowsPrincipal class represents a Windows user and his or her associated roles/groups.
An Identity object implements the IIdentity interface. The IIdentity interface has just three properties:
•Name is the string associated with the current identity. This is given to the Common Language Runtime by the operating system of the authentication provider. NTLM (Windows NT Challenge/Response), which authenticates Windows NT logins, is an example of an authentication provider.
•IsAuthenticated is a Boolean value indicating whether the user was authenticated or not.
•AuthenticationType is a string that indicates which type of authentication was used. Some of the possible authentication types include Basic, Forms, Kerberos, NTLM, and Passport.
Understanding Code Access Permissions
Before any .NET application is executed, it must pass a series of security checks that result in the application being granted access to perform certain operations. The permissions that are

granted to your code can also be requested in code, or denied by code. All of these permissions are determined by a security policy that the .NET Framework relies on very heavily. These security policies contain permissions to resources, as shown in Table 37-1.
Table 37-1: Common Code Access Permissions
Resource |
|
Permission |
|
Description |
|
|
|
|
|
DNS |
|
DNSPermission |
|
Access to the Domain Name Service. |
|
|
|
||
Environment Variables |
|
EnvironmentPermission |
|
Access to environment variables within |
|
|
|
|
the system. |
|
|
|
|
|
Event Log |
|
EventLogPermission |
|
Access to the event log. This includes |
|
|
|
|
existing event logs and the creating of new |
|
|
|
|
event logs. |
|
|
|
|
|
File Operations |
|
FileIOPermission |
|
Access to perform file operations such as |
|
|
|
|
reading from or writing to a file. |
|
|
|
|
|
Registry |
|
RegistryPermission |
|
Access to the Windows Registry. |
|
|
|
|
|
User Interface |
|
UIPermission |
|
Access to user interface functionality. |
|
|
|
|
|
Web |
|
WebPermission |
|
Access to make or accept connection on a |
|
|
|
|
Web address. |
When you run an application, the right to any of the aforementioned permissions is based solely on whether the code has the right to the permission. It has nothing to do with which user is running the actual code. Therefore, these permissions are referred to as code-access security.
Creating a simple permission code request
In this section, you examine just how easy it is to request permission, with code, to perform a specific action. In this example, you attempt to read a key from the Registry, which indicates to whom the current operating system is registered.
When using the RegistryPermission class, you need to specify just which kind of access to the Registry you require (read, write, and so on) and what specific key you want to access. Generally, if you only need read access to a particular key in the Registry, you should only request read permission. This ensures that you don't accidentally overwrite any Registry information and that subsequent, possibly malicious, code cannot change the information. In addition, you should always wrap your permissions requests with some sort of structured error handler. If the request for permission is denied by the Common Language Runtime, a SecurityException is thrown. If you attempt this request within a try/catch block, you won't have any issues because your error is gracefully handled. Although you may know you have this type of permission on your development machine, you can't foresee security policies that might block this access on other machines or networks.
After you create a permission request, you simply call the Demand() method of the RegistryPermission class. If Demand() executes without generating an exception, your permission request was granted. Listing 37-3 contains the sample application.
Listing 37-3: Demand Permission with a Structured Error Handler

using System;
using Microsoft.Win32;
using System.Security.Permissions;
class Class1
{
static void Main(string[] args)
{
try
{
RegistryPermission regPermission = new RegistryPermission(RegistryPermissionAccess.AllAccess,"HKEY_LOCAL_MACHINE\\ SOFTWARE\\Microsoft\\Windows NT\\CurrentVersion");
regPermission.Demand();
}
catch (Exception e)
{
Console.WriteLine(e.Message);
return;
}
RegistryKey myRegKey=Registry.LocalMachine; myRegKey=myRegKey.OpenSubKey ("SOFTWARE\\Microsoft\\Windows
NT\\CurrentVersion"); try
{
Object oValue=myRegKey.GetValue("RegisteredOwner"); Console.WriteLine("OS Registered Owner: {0}",oValue.ToString());
}
catch (NullReferenceException)
{
}
}
}
Keep in mind that even if the .NET security policy allows this code to execute, the security policy of the underlying operating system must also allow it to execute.
After you have demanded permissions to the appropriate Registry key, you simply read the RegistredOwner key and display the information in your console window.
Denying permissions
As with the Demand method covered earlier, you can also call the Deny() method, which removes permissions for an operation. Typically, it's a good idea to remove any permission that you know you will not need before the fact. You can request the permissions as the code requires. You use the Deny() method in circumstances when you have completed an operation and know that no further operations are required.
Denying permissions serves several purposes. For example, if you are using third-party libraries, you want to ensure that after you manipulate the Registry, no other code is allowed to do so. Denying a permission is a way of accomplishing this.