

Indirect Method:
The indirect relining procedure consists of the functional impression and static impression.
In the functional impression procedure, the denture flanges and the tissue surface are reduced by 1-2mm with stops at the canine and the molar regions.
Border molding is done with low fusing impression compound.
Tissue conditioning material is used for recording the impression. Patient is instructed to close in occlusion with light pressure and he is allowed to wear the denture for 24 hours. The denture with the tissue conditioning material is used to pour a cast followed by flasking and packing as in for laboratory procedure in conventional complete dentures.
In the static impression procedure, the denture is kept out of the mouth for 24 hours. The denture flanges and the tissue surface are reduced by 1-2mm with stops at the canine and the molar regions. Border molding is done using low fusing stick compound followed by zinc oxide eugenol or rubber base impression in occlusion.
The cast is poured and denture is flasked and packed in the usual manner. The denture is inserted after minor occlusal corrections.
Static impression is more advantageous compared to the functional impression because of the following reasons: impression is better controlled using selective pressure technique.
Impression is not affected by the occlusion of remaining teeth.
Rebasing procedure
The borders of the denture and the tissue surface is reduced by 1-2mm. Border molding and final impression is made with zinc oxide eugenol or rubber base impression material as for relining procedure and the impression is poured in dental stone. The cast with the denture is mounted on the articulator. Plaster index is made of the opposing member of the articulator. The denture is separated from the cast. The base is trimmed away from teeth and the string of the teeth is maintained intact. The intact string of teeth is placed back in the index and the articulator is closed. Wax up is done on the mounted cast to incorporate the string of teeth placed in the opposing index. The cast with the wax up is flasked, dewaxed and acrylic is cured in place of wax. Finishing and polishing of denture is done and inserted in to patien ts mouth after occlusal correction.
Repairing Fracture of Complete Dentures
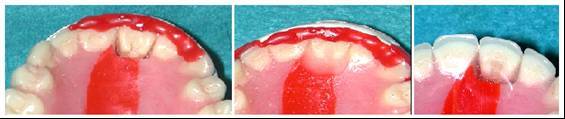
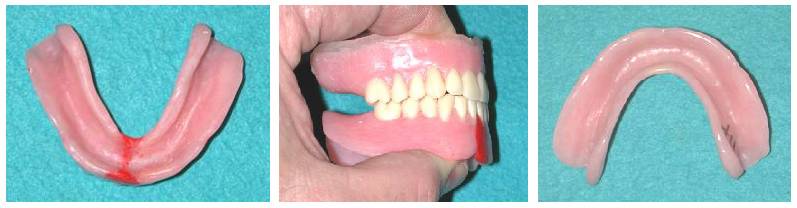
The midline fracture of the maxillary complete denture is the fracture most commonly seen in dentures. This is largely because as the ridges resorb and remodel, the palatal bone does not. This leads to a “high-centering” of the denture, where the denture contacts primarily in the hard palate and secondarily contacts the residual ridge. This results in a constant rocking effect which accelerates bone loss and causes a steady loss of stability of the denture, in time leading to a stress fracture of the denture base.
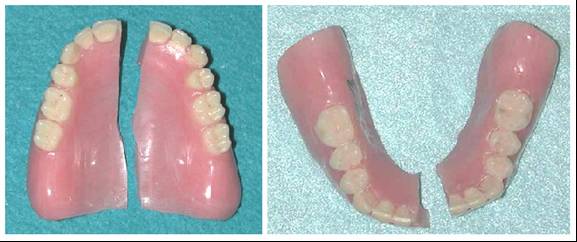
The second most common fracture of a complete denture is the mandibular fracture. This usually is the result of an accidental drop, although it can occur during function. When function is the case, it usually involves a thin denture base, as is common in an immediate complete denture and invariably is associated with a poor fit with the ridge. Often, patients will resort to not wearing the lower complete denture due to the lack of support that is common with lower complete dentures. They may place it in a drawer or on a shelf and allow the denture base to dry out, becoming a distorted example of its former shape. This not only makes it fit even less well, it also makes it more brittle and prone to fracture. Soaking it in water will not return it to its original state, either.
When a patient shows up with a denture that has fractured, the first thing the dentist should do is determine whether the denture is truly the patient’s own denture. Always fit the pieces of the denture together with sticky wax and place it against the opposing denture or a cast of the opposing teeth to ensure that the denture is correct for the patient. It may be a mate to a second set of dentures that a patient has but never wears. The patient may have worn out, lost, or broken the mate to the one he is wearing and hope that the one he provides to the dentist can be adapted to fit his current denture. It is also not uncommon for a patient to present with someone else’s denture, either innocently believing it is their own or as an elaborate scheme to get an new denture without paying for it.
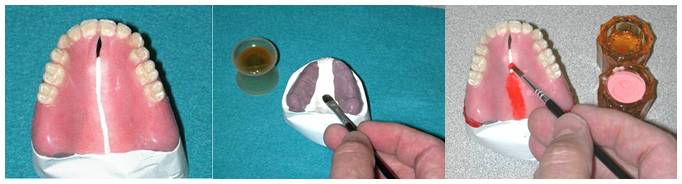
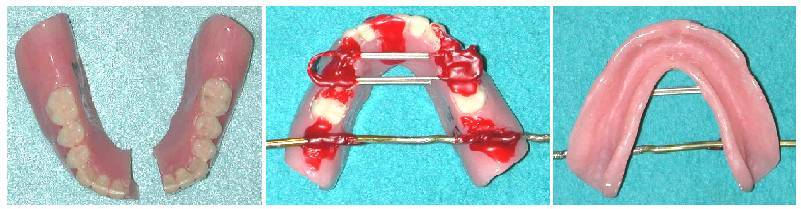
When a midline fracture of a maxillary complete denture occurs, the cause must be determined. As with any fracture, this must be corrected if the repair is to be successful. First, the pieces are assembled and tried against a cast of the opposing dentition. The parts of the fractured denture are aligned and splinted into position using long shank dental burs, coat hanger wires, plastic sticks, or large paper clips. These are “tacked” to the teeth with sticky wax. Wooden sticks or toothpicks are not recommended for this use as these can absorb water and warp.
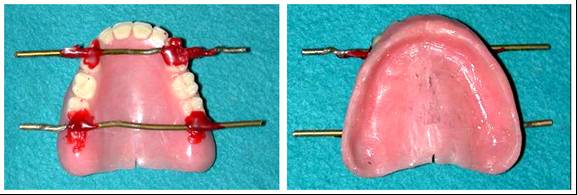
All undesirable undercuts that are more than 10mm from the fracture site are blocked out with wet tissue paper, putty, or wet pumice. About 2mm of the denture flange borders are left uncovered and a base of quick-set plaster or stone is poured. The easiest method of blocking out the ridge area away from the fracture site is to use polyvinylsiloxane putty. The fast set plaster will not bond with this material and will need to have some sort of mechanical retention provided. Pieces of paper clip cut and bent into a loop will do nicely. They must be placed into the putty before it sets, and the loop section needs to extend into the area that will be filled by the plaster. A generous area (about 8-10 mm) close to the fracture site is left free of putty coverage.
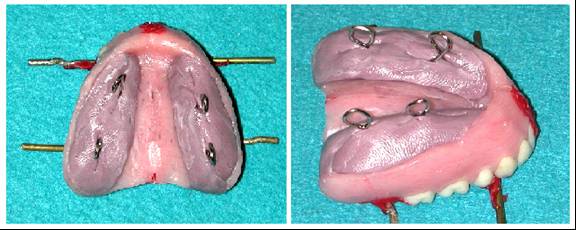
After the plaster has set, the bracing rods and sticky wax are carefully removed. All denture pieces from are removed from the stone matrix. They and the matrix are cleaned, and re-assembled on the cast to ensure that they can be accurately positioned.
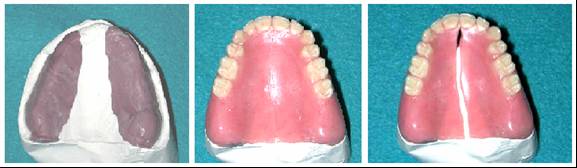
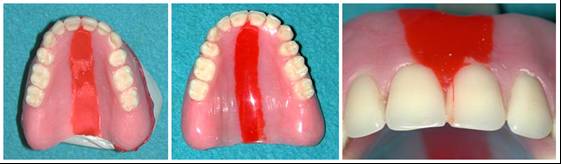
The approximating surfaces are beveled so that there is a 3 mm gap on the polished surface and a 2mm gap on the cast side. This allows visual access to see that the acrylic is filling the entire area. The pieces are replaced in position on the cast and checked for accuracy. Remove enough acrylic from the polished surface side of the denture to allow a gap of 8-10 mm. This process is called “rabbeting” and provides an increased surface area that affords a stronger joint between the old and new acrylic. The “rabbeting” thins the proximal surfaces of the dentures about half way through the polished side and adds about 3 mm more width to the gap on each piece, totaling about 8mm on the polished surface side between the pieces. Any small pieces are left out, and replaced entirely with repair acrylic.
Separating medium is painted on the cast at least 10 mm to either side of the fracture line. The parts are “tacked” with sticky wax into position on the cast base. The “brush-bead” method is used to overfill the repair area with repair acrylic. In the lab exercise, red DuralayR resin will be used so that the juncture can be easily seen. If this were done on a patient’s denture, a repair acrylic matching the denture’s original acrylic would be chosen.
The entire assembly is placed in warm water in a pressure pot and allowed to cure for about 10 minutes at 20 pounds/square inch pressure. After the acrylic has set for ten minutes, the repaired denture is removed from the stone matrix and finished with successively finer abrasives until a high shine is achieved. The tissue side is checked for irregularities and these are repaired or smoothed. An inspection of the denture should show a smooth line at the junction of the denture base acrylic and the repair acrylic. In the case of the denture used in this example, the repair acrylic has permeated the crack in the denture tooth. This tooth will be replaced in a subsequent procedure.
Occasionally, teeth are knocked off a complete denture by a traumatic blow, or because the denture tooth was not bonded adequately to the base. In the above case, tooth #9 was fractured when the denture base fractured. In any case involving a broken tooth on a broken denture, the denture base is repaired first, and then the tooth replacement is done to preserve the relationship of the denture base pieces.
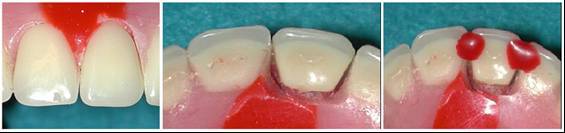
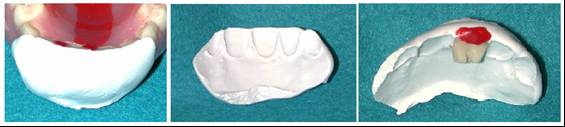
To replace a broken tooth, a notch is cut into the denture base acrylic palatal to the tooth. A replacement tooth is placed in the area to be repaired and luted in place with sticky wax on the lingual (palatal) surface. The labial margin of the tooth is not disturbed. The surfaces of the tooth and parts of the denture that will be covered by the matrix are lightly lubricated. A plaster matrix is made on the labial or buccal side of the tooth being replaced. This should cover an area of about two teeth on either side of the missing tooth.
The tooth is replaced back into the prepared area and should fit perfectly into the undisturbed labial area. Diatoric interlocks can be cut into the tooth to provide additional mechanical retention. The replacement tooth is luted back into place in the matrix and “tacked” in place to both proximal areas with sticky wax. If three teeth are missing, the teeth adjacent to solid teeth are repaired first, and then the one in the middle is repaired.
The prepared areas of the denture are over-filled with autopolymerizing repair resin. The denture and cast are immersed in warm water (115oF) in a pressure pot for 10 minutes. After the resin is totally cured, the denture is removed from the cast, all excess acrylic is removed and it is polished to a high shine. Care must be taken to not polish the plastic tooth.
If several teeth have fractured out, the denture areas palatal to or lingual to the de-bonded or fractured teeth are reduced. Again, the labial or buccal areas of the denture are not reduced, if possible. Teeth of the same shade, shape, and size as the original teeth are carefully selected and. fixed in place with sticky wax and checked against a cast of the opposing dentition or the opposing denture to ensure they do not interfere with the occlusion. TriadR (uncured), clay, or PlayDoughR can be used to help hold the teeth in place.

A matrix of quick setting plaster (best) or polyvinylsiloxane putty (CitreconR, ReprosilR, etc.) is made. It is removed from the denture after it sets, the teeth are cleaned, cut a diatoric is cut in the lingual of each tooth, and they are attached them to the plaster matrix with sticky wax in such a way that they do not interfere with the placement of the matrix back on the denture. If a putty matrix is used, extreme care must be taken to not flex the matrix or the sticky wax will break and the teeth will come loose.
Resin is applied by the brush-bead method and to slightly overfill the prepared area. The repair cast and uncured denture resin are placed in a pressure pot that is half-filled with warm water (115oF) for 10 minutes to cure. The brush is cleaned by dipping it in monomer and drying it thoroughly on a paper towel to remove any residual acrylic which would harden and ruin the brush.
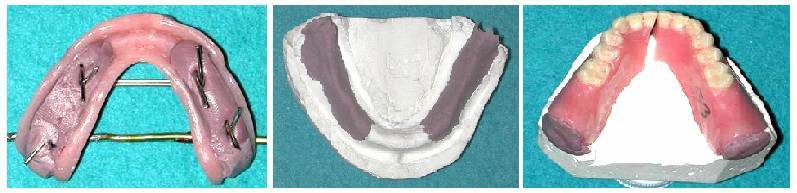
The following pictures will demonstrate how to successfully repair a fracture of a mandibular compete denture. This is the procedure you will complete in the lab exercise. Red DuralayR resin will be used so that the juncture can be easily seen. If this were done on a patient’s denture, a repair acrylic matching the denture’s original acrylic would be chosen. First, the broken pieces are approximated and fixed in position with a non-absorbing splinting material (Wire, plastic, etc.) Sticky wax is used to lute these braces to the denture base. The tissue surface must be checked to make sure that the pieces are in close contact and that there is no wax or other debris on that surface.
Polyvinylsiloxane putty (Reprosil®) is used to block out the area away from the fracture site. About 10 mm. of the surface is left uncovered on the tissue side kept bare of any putty. Pieces of paper clip are pressed into the putty while it is soft to provide retention of the putty to the plaster base of the repair cast. A mounting plaster base is poured to complete the repair cast. The splinting material and all the sticky wax from the denture surface and the repair cast are removed. The denture pieces are removed from the cast and the area under the fracture site is inspected for any defects. The denture pieces are replaced on the cast and examined to ensure that they fit precisely back into place.
Approximately 1.5 mm. of acrylic is removed from the proximal surfaces of the fracture line on the polished surface and 1 mm on the tissue side, forming a gap of 2 mm. on the tissue surface and 3 mm. on the polished surface. The pieces are placed back on the cast and these dimensions are verified. It is necessary that this amount of gap be present to allow enough visual and working access so the repair acrylic can be placed and fill the entire repair site. Enough acrylic is removed from the polished surface side of the denture to allow a gap of 8-10 mm. This process is called “rabbeting” and provides an increased surface area that affords a stronger joint between the old and new acrylic.
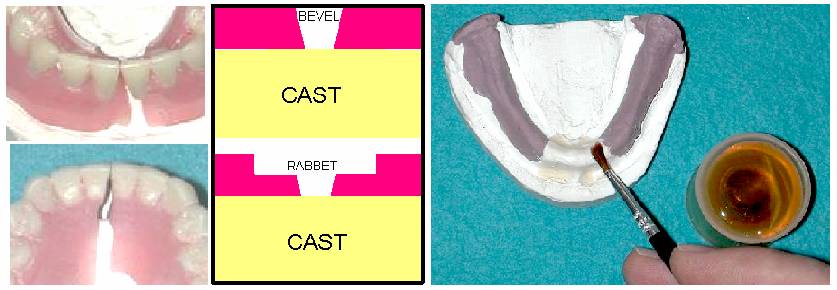
ALCOTE, a tin-foil substitute, is painted on the area under the site to be repaired. The denture parts are replaced and luted in place with sticky wax. Rabbeting and beveling noticeably increase the amount of visual and working access provided.
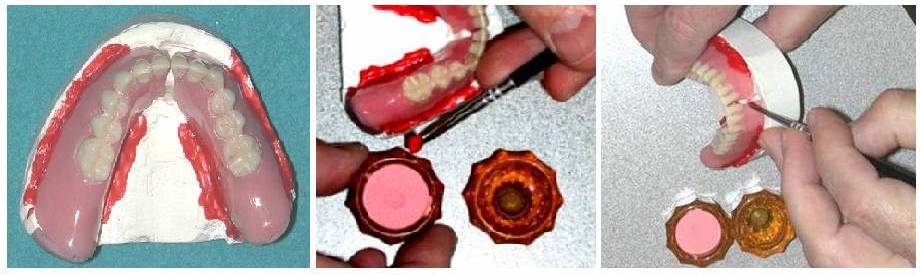
The method to be used to apply repair acrylic to the denture in this exercise is called the “brush-bead” method. Dappen dishes containing monomer and polymer are arranged close to the denture. The brush is first “wetted” in the liquid monomer. Then it is dipped in the polymer powder. This will cause a small bead to form on the wetted end of the brush. These beads are placed in the repair site to make the repair. The edges of each fragment are wetted with monomer. A brush is moistened in monomer and dipped in polymer. The wet polymer is brush-beaded onto the repair site. Additional acrylic is added until the entire site is slightly over-filled.
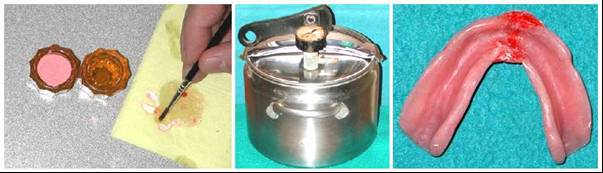
Extra acrylic is added to overbuild the repair site area to assure that there is sufficient thickness of high quality acrylic. Moisture from the water bath can cause a rough surface to form. The repaired denture is removed from the repair cast and the tissue side is inspected to verify that it has been repaired. The repair cast and denture in are placed in a water bath to cure. The brush is dipped in monomer and dried thoroughly on a paper towel to remove any residual acrylic to prevent ruining the brush. If this step is forgotten, the acrylic will harden and the brush will be ruined.
The denture is removed from the cast and checked to make sure that the acrylic is of good quality and covering all the desired areas. The dentures are fit together to ensure that they occlude properly. If the occlusion is off, then the repair is not accurate. This is a very good reason to make sure that the dentures are inspected to ensure that they fit together before making the repair cast. The patient may be giving you a mismatched set. After ensuring that the dentures fit together properly, the excess acrylic is removed with a denture bur and abrasives and polishing agents are used to polish the repaired area, taking care to not over-polish the area or the teeth. An unused, clean polishing wheel must be used for each abrasive. If a repair is done properly with the correct acrylic it is almost impossible to tell where the denture has been repaired. One has to look closely to discern the repair site because the repair acrylic blends together so precisely with the original acrylic. This is how a repair should look!
Fractures occur on dentures most frequently when the residual ridge resorbs to the point where the denture is unstable. The resultant rocking of the denture causes stress to build up in the denture base as well as increasing the resorption rate of the supporting bone. These stresses are released in the form of a fracture, and most frequently these appear first as a midline fracture of the maxillary denture.
Occasionally, teeth are knocked off a denture by a traumatic blow, or because the denture tooth was not bonded adequately to the base. This can occur with plastic teeth as well as porcelain teeth, and fractures through the teeth themselves can occur in both porcelain and acrylic teeth, although more often in porcelain teeth.
In any case involving a broken denture or debonded tooth, the parts are reassembled by hand, held together temporarily with a sticky wax, and stone is poured into the base to make a cast so that the fracture can be repaired with an autopolymerizing resin. When the repair is complete, the cause of the fracture should be explored and eliminated if possible. Most frequently, the fractured denture needs a new liner to compensate for the resorption of the residual ridge, thus eliminating the most common cause of the fracture.