


10 |
CHAPTER 1. FROM ZERO TO DEPLOY |
class User < ActiveRecord::Base
.
.
.
has_secure_password end
These dots represent omitted code and should not be copied literally.
1.2 Up and running
Even for experienced Rails developers, installing Ruby, Rails, and all the associated supporting software can be an exercise in frustration. Compounding the problem is the multiplicity of environments: different operating systems, version numbers, preferences in text editor and integrated development environment (IDE), etc. Users who already have a development environment installed on their local machine are welcome to use their preferred setup, but (as mentioned in Box 1.1) new users are encouraged to sidestep such installation and configuration issues by using a cloud integrated development environment. The cloud IDE runs inside an ordinary web browser and hence works the same across different platforms, which is especially useful for operating systems (such as Windows) on which Rails development has historically been difficult. If, despite the challenges involved, you would still prefer to complete the Ruby on Rails Tutorial using a local development environment, I recommend following the instructions at InstallRails.com.5
1.2.1 Development environment
Considering various idiosyncratic customizations, there are probably as many development environments as there are Rails programmers. To avoid this complexity, the Ruby on Rails Tutorial standardizes on the excellent cloud development environment Cloud9. In particular, for this third edition I am pleased to
5Even then, Windows users should be warned that the Rails installer recommended by InstallRails is often out of date, and is likely to be incompatible with the present tutorial.

1.2. UP AND RUNNING |
11 |
partner with Cloud9 to offer a development environment specifically tailored to the needs of this tutorial. The resulting Rails Tutorial Cloud9 workspace comes pre-configured with most of the software needed for professional-grade Rails development, including Ruby, RubyGems, Git. (Indeed, the only big piece of software we’ll install separately is Rails itself, and this is intentional (Section 1.2.2).) The cloud IDE also includes the three essential components needed to develop web applications: a text editor, a filesystem navigator, and a command-line terminal (Figure 1.1). Among other features, the cloud IDE text editor supports the “Find in Files” global search that I consider essential to navigating any large Ruby or Rails project.6 Finally, even if you decide not to use the cloud IDE exclusively in real life (and I certainly recommend learning other tools as well), it provides an excellent introduction to the general capabilities of text editors and other development tools.
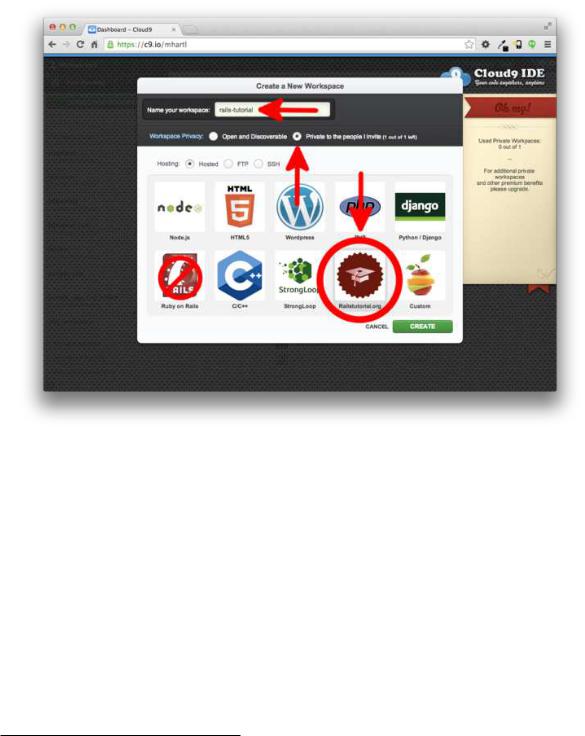
Here are the steps for getting started with the cloud development environment:
1.Sign up for a free account at Cloud97
2.Click on “Go to your Dashboard”
3.Select “Create New Workspace”
4.As shown in Figure 1.2, create a workspace called “rails-tutorial” (not “rails_tutorial”), set it to “Private to the people I invite”, and select the icon for the Rails Tutorial (not the icon for Ruby on Rails)
5.Click “Create”
6.After Cloud9 has finished provisioning the workspace, select it and click “Start editing”
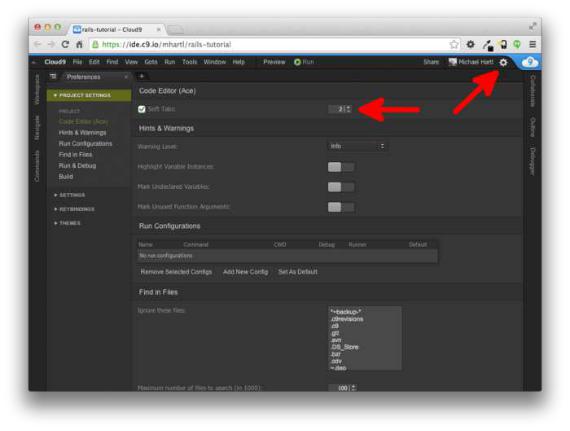
Because using two spaces for indentation is a near-universal convention in Ruby, I also recommend changing the editor to use two spaces instead of the default four. As shown in Figure 1.3, you can do this by clicking the gear
6For example, to find the definition of a function called foo, you can do a global search for “def foo”. 7https://c9.io/web/sign-up/free

12 |
CHAPTER 1. FROM ZERO TO DEPLOY |
Figure 1.1: The anatomy of the cloud IDE.
1.2. UP AND RUNNING |
13 |
Figure 1.2: Creating a new workspace at Cloud9.
icon in the upper right and then selecting “Code Editor (Ace)” to edit the “Soft Tabs” setting. (Note that this takes effect immediately; you don’t need to click a “Save” button.)
1.2.2 Installing Rails
The development environment from Section 1.2.1 includes all the software we need to get started except for Rails itself.8 To install Rails, we’ll use the gem command provided by the RubyGems package manager, which involves typing
8At present, Cloud9 includes an older version of Rails that is incompatible with the present tutorial, which is one reason why it’s so important to install it ourselves.
14 |
CHAPTER 1. FROM ZERO TO DEPLOY |
Figure 1.3: Setting Cloud9 to use two spaces for indentation.