
- •Table of contents
- •Read This First
- •Precautions
- •It’s so Simple! Make Prints Right at Home Like a Pro
- •Unbounded Possibilities with Entertaining Software
- •Enjoy Using CANON iMAGE GATEWAY to Take Advantage of the Internet
- •System Requirements
- •Installing the Software and USB Driver
- •Downloading Images to the Computer
- •Printing Images
- •The ZoomBrowser EX Windows
- •ZoomBrowser EX Features
- •Editing Movies
- •Merging Panoramic Images - PhotoStitch
- •Enjoy Customizing Your Camera with the My Camera Settings
- •Installing the Software
- •Downloading Images to the Computer
- •Printing Images
- •The ImageBrowser Windows
- •ImageBrowser Features
- •Editing Movies
- •Merging Panoramic Images - PhotoStitch
- •Enjoy Customizing Your Camera with the My Camera Settings
- •Appendices
- •Uninstalling the Software
- •Memory Card Folder Structure
- •Troubleshooting
- •Downloading Images without Installing the Software
- •Index
Using the Software on the Windows Platform – The Basics 21
Printing Images
There are three methods for using ZoomBrowser EX to print images: [Photo Print], [Index Print] and [Print Using Other Software]. This section explains how to use the [Photo Print] option.
• Movies cannot be printed, but with Windows Vista and Windows XP you can print stills after they have been extracted from movies and saved to files.
•To use the Index Print option, click [Print & Email] in the Main Window, followed by [Index Print].
Photo Print
Prints one image on each page.
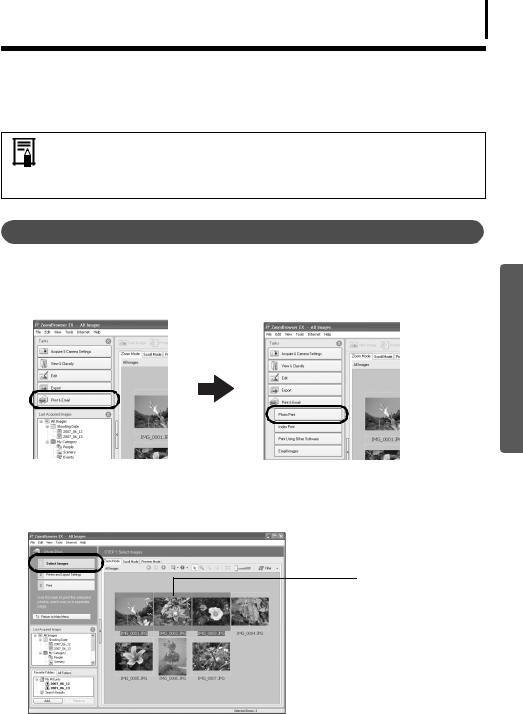
1 Click [Print & Email] in ZoomBrowser EX's Main Window, followed by [Photo Print].
Windows
2 After confirming that [1. Select Images] is selected, select images.
You can select multiple images by holding the [Ctrl] key down while clicking on successive images.
The background of selected images changes to blue.
Using the Software on the Windows Platform – The Basics
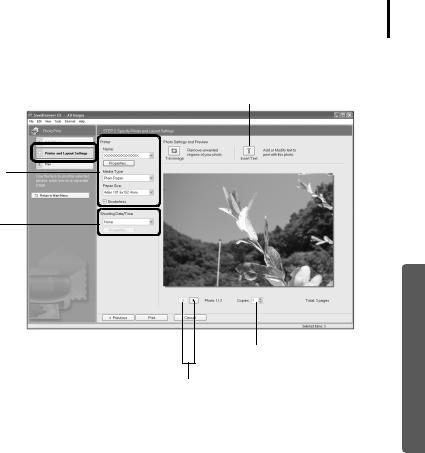
3 Click [2. Printer and Layout Settings] and adjust the categories as you feel necessary.
Text can be inserted here to print with this photo.
Selects the printer and the paper size etc.
Selects a printing method for the shooting date/time information.
Sets the number of print copies.
This button switches between images if multiple images were selected.
4 Click [3. Print].
Printing will start.
This chapter explained the ZoomBrowser EX basics.
Once you have mastered them, try the advanced techniques.
• Using the Software on the Windows Platform – Advanced Techniques (p. 23).
22
Windows
23
Using the Software on the Windows Platform – Advanced Techniques
This chapter explains various ZoomBrowser EX features.
Proceed to this chapter once you have mastered the basic ZoomBrowser EX procedures in the
Using the Software on the Windows Platform – The Basics chapter.
The ZoomBrowser EX Windows
This section describes the principal ZoomBrowser EX windows: the Main Window, Viewer Window and Properties Window.
Main Window
This window is for displaying and organizing images downloaded to the computer.
|
|
Task Buttons (p. 24) |
Function Buttons (p. 26) |
|||||||||
|
|
|
|
|
|
|
|
|
|
|
|
Display Mode |
|
|
|
|
|
|
|
|
|
|
|
|
|
|
|
|
|
|
|
|
|
|
|
|
|
|
|
|
|
|
|
|
|
|
|
|
|
||
|
|
|
|
|
|
|
|
|
|
|
|
(p. 25) |
|
|
|
|
|
|
|
|
|
|
|
|
Display Control |
|
|
|
|
|
|
|
|
|
|
|
|
|
|
|
|
|
|
|
|
|
|
|
|
|
Panel (p. 26) |
|
|
|
|
|
|
|
|
|
|
|
|
Browser Area |
|
|
|
|
|
|
|
|
|
|
|
|
|
|
|
|
|
|
|
|
|
|
|
|
|
|
|
|
|
|
|
|
|
|
|
|
|
||
|
|
|
|
|
|
|
|
|
|
|
|
(p. 24) |
|
|
|
|
|
|
|
|
|
|
|
|
Switches between |
|
|
|
|
|
|
|
|
|
|
|
|
|
|
|
|
|
|
|
|
|
|
|
|
||
|
|
|
|
|
|
|
|
|
|
|
|
showing and |
|
Folders Area (p. 24) |
|
|
|
|
|
||||||
|
|
|
|
|
|
|
hiding the Task |
|||||
|
|
|
|
|
|
|
|
|
|
|
|
|
|
|
|
|
|
|
|
|
|
|
|
|
Buttons and Last |
|
|
|
|
|
|
|
|
|
|
|
|
Acquired Images |
Last Acquired Images (p. 24) |
|
|
|
|
|
|
section and the |
|||||
|
|
|
|
|
|
Folders Area. |
||||||
|
|
|
|
|
|
|
|
|
|
|
|
|
Windows
Using the Software on the Windows Platform – Advanced Techniques
Task Buttons
•ZoomBrowser EX's tasks are arranged here like an index.
•Click a Task button to carry out the desired task.
These features are described in ZoomBrowser EX Features (p. 29)
Folders Area
•Use this area to select folders. The selected folders and the images within the selected folders display in the Browser Area.
If you select a network drive in advance with Windows Explorer, you can display network folders, but you cannot add, change or delete those folders in the Browser Area.
•If you selected Favorite Folders, only the folders registered in advance as Favorite Folders will display. You are recommended to register a folder that you use frequently as one of the Favorite Folders. If you selected All Folders, all the folders will display.
Methods for Registering a Favorite Folder
•If [Favorite Folders] is displayed: click [Add] and select a folder.
•If [All Folders] is displayed: select a folder and click [Add to Favorites].
•To delete a folder in the Favorite Folders area, select a folder and click the [Delete] button.
Last Acquired Images
• You can check images grouped according to the shooting date or My Category.
Browser Area
•The folders and the images within the folders selected in the Last Acquired Images section or Folders Area display here.
•You can sort the image order in the Browser Area by file name, shooting date or other characteristics by selecting [View] and [Sort by].
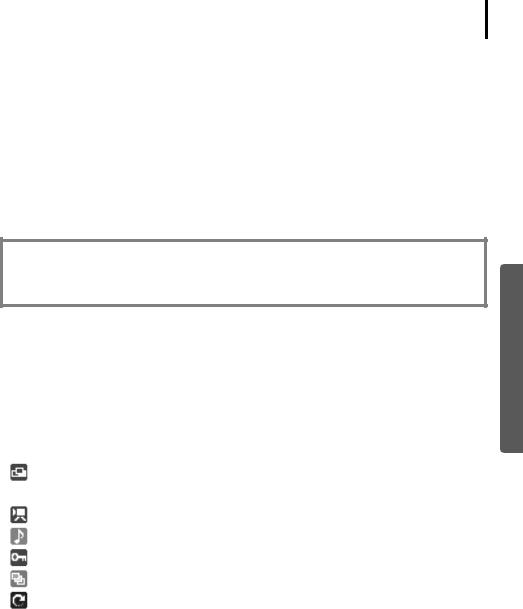
•The following icons will display around images according to their attributes.
Images shot with the camera's Stitch Assist mode
 RAW images
Movies
Images with sound memo attachments
Protected images
Images shot with the camera's AEB function
Rotated Images (In display only)
24
Windows
Using the Software on the Windows Platform – Advanced Techniques 25
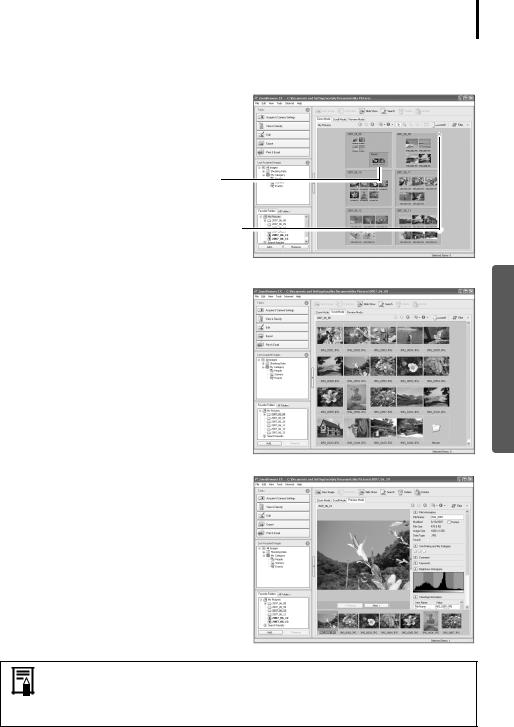
Display Mode
•Selects the display style for the Browser Area.
Zoom Mode
Displays all the images in a folder as thumbnail images. This mode is convenient for searching for images since many can be displayed at once.
If additional folders are nested within a folder, their images are displayed as thumbnails as well.
If you move the mouse cursor over a folder,  will display on the upper right. Clicking here displays that folder zoomed in.
Scroll Mode
The images within the selected folder and subfolders will display. If you set the display folder depth (level) to [1] or greater, the thumbnails of the images in the folder will also display. You can change the folder depth in the [Tools] menu under the [Preferences] option.
Preview Mode
This mode displays the image at a larger size as well as the image information.
Windows
In zoom mode or scroll mode, positioning the mouse pointer over a thumbnail causes the image to appear at a higher magnification in a Mouse Over window. You can also set the Mouse Over window to not show in the  (Show Information) menu.
Using the Software on the Windows Platform – Advanced Techniques 26
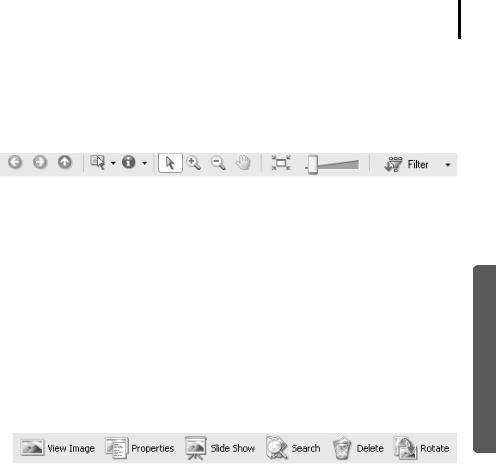
Display Control Panel
• This panel adjusts the display settings for the Browser Area.
Selection Menu |
Fit to Window |
|
Display Size |
||||||||
Click this to select/deselect all |
Changes the thumbnail size to Changes the size of the |
||||||||||
images in the Browser Area. |
fit them into the window. |
|
thumbnail in the Browser Area. |
||||||||
|
|
|
|
|
|
|
|
|
|
||
|
|
|
|
|
|
|
|
|
|
|
|
|
|
|
|
|
|
|
|
|
|
|
|
|
|
|
|
Filter Tool Menu |
|
|
|||||
|
|
|
|
|
|
|
|
|
|||
|
|
|
|
|
|
|
|
|
|||
Show/Hide Image Information Menu |
|
|
|
|
|||||||
|
|
|
|
||||||||
Select here to show/hide such image |
|
|
Displays only images that |
||||||||
information as the file name or |
|
|
|
|
correspond to the specific |
||||||
shooting date or rating beneath the |
|
|
conditions. |
||||||||
thumbnail. |
|
|
|
|
|
|
|
|
|
||
|
|
|
Select Button |
|
|
|
|
|
|||
|
|
|
Use this to select images |
|
|
|
|
|
|||
|
|
|
in Zoom mode. |
|
|
|
|
|
|||
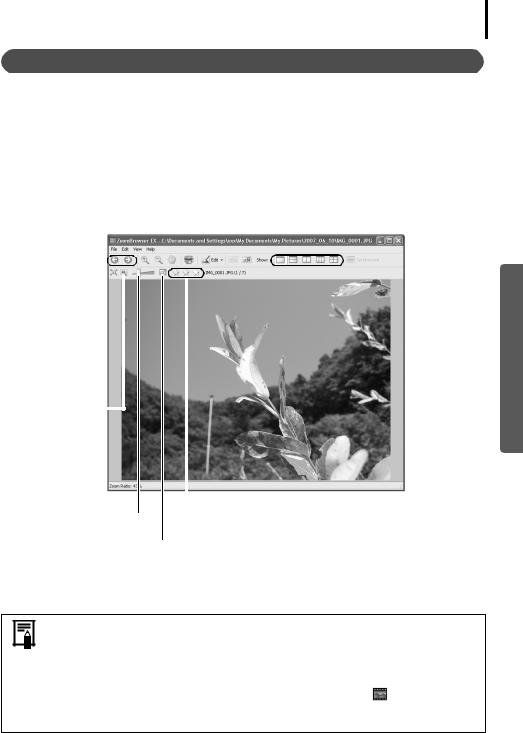
Function Buttons
• These buttons are available for executing various functions.
View Image Button |
Slide Show Button |
Rotate Button |
||||||||
Displays the selected image |
Starts a slide show of the |
Rotates the selected |
||||||||
or movie in the Viewer |
selected images. |
image. |
||||||||
Window. |
|
|
|
|
|
|
|
|
||
|
|
|
|
|
|
|
|
|||
|
|
|
|
|
|
|
|
|
|
|
|
|
|
|
|
|
|
|
|
|
|
|
|
|
|
|
|
|
|
|
|
|
|
|
|
|
|
|
|
|
|
|
|
|
|
|
|
|
|
|
|
|
|
|
|
|
|
|
|
|
|
|
|
|
|
Windows
Properties Button |
Search Button |
Delete Button |
Displays information about |
Searches for images |
Deletes selected |
the selected image in the |
using such criteria as the |
images or folders. |
Properties Window. |
Star Rating, |
|
|
modification date, |
|
|
shooting date, |
|
|
comments or keywords. |
|
Using the Software on the Windows Platform – Advanced Techniques 27
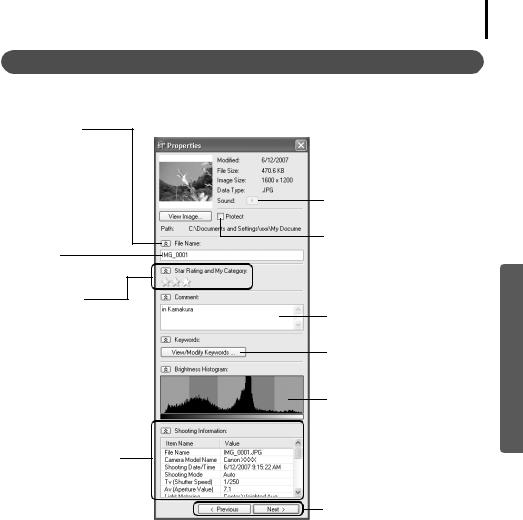
Viewer Window
Double-click an image in the Browser Area to display it in the Viewer Window.
Edit Menu |
|
|
|
|
|
|
|
|
|
|
|
|
|
|
||
You can edit, eliminating red eyes, |
|
|
|
|
|
|
|
|||||||||
adjusting colors and brightness, |
|
|
|
|
|
|
|
|||||||||
cropping and inputting titles. You can |
|
|
Shooting |
|
|
|
||||||||||
also use it to start up other programs |
|
|
|
Synchronize Button |
||||||||||||
|
|
|||||||||||||||
for editing. |
|
|
Information |
|
||||||||||||
|
|
|
Synchronizes the |
|||||||||||||
|
|
|
|
|
|
|
|
|
|
|
|
Display Button |
|
|||
|
|
|
|
|
|
|
|
|
|
|
|
|
display settings when |
|||
Print Button |
|
|
|
|
|
|
|
|
|
Displays image |
|
|||||
|
|
|
|
|
|
|
|
|
multiple images are |
|||||||
Prints the displayed image. |
|
|
|
shooting |
|
|||||||||||
|
|
|
|
displayed. |
||||||||||||
|
|
|
|
|
|
|
|
|
|
|
|
information. |
|
|||
|
|
|
|
|
|
|
|
|
|
|
|
|
|
|
||
|
|
|
|
|
|
|
|
|
|
|
|
|
|
|
|
Number of |
|
|
|
|
|
|
|
|
|
|
|
|
|
|
|
|
|
|
|
|
|
|
|
|
|
|
|
|
|
|
|
|
|
|
Image Selector |
|
|
|
|
|
|
|
|
||||||||
Button |
|
|
|
|
|
|
|
|
|
|
Displays |
|||||
|
|
|
|
|
|
|
|
Button |
||||||||
Switches between |
|
|
|
|
|
|
|
|
|
|
||||||
|
|
|
|
|
|
|
|
Displays |
||||||||
images. |
|
|
|
|
|
|
|
|
|
|
||||||
|
|
|
|
|
|
|
|
multiple |
||||||||
|
|
|
|
|
|
|
|
|
|
|
|
|
|
|
|
|
Sets the image |
|
|
|
|
|
|
|
|
|
images at |
||||||
|
|
|
|
|
|
|
|
|
||||||||
display size to the |
|
|
|
|
|
|
|
once. This is |
||||||||
size in the Viewer |
|
|
|
|
|
|
|
handy for |
||||||||
Window. |
|
|
|
|
|
|
|
comparing |
||||||||
|
|
|
|
|
|
|
|
|
|
|
|
|
|
|
|
images. |
Displays images in |
|
|
|
|
|
|
|
|
|
|||||||
|
|
|
|
|
|
|
|
|
||||||||
the Viewer |
|
|
|
|
|
|
|
|||||||||
Window at their |
|
|
|
|
|
|
|
|||||||||
actual size. |
|
|
|
|
|
|
|
|||||||||
|
|
|
|
|
|
|
|
|
|
|
|
|
|
|
|
|
Zoom |
|
Star Rating |
|
||
Changes the image |
Sets the Star Rating for an image. |
|
zoom setting. |
|
|
|
|
Full Screen Button |
|
|
Displays the image in the full screen mode. Click the |
|
|
image or press any key on the keyboard to restore the |
|
|
normal display mode. |
Windows
•RAW Image is Displayed
The [Display Original Image] button displays beneath the image. Clicking this button displays the converted image in the Viewer Window.
•Movie is Displayed
Buttons will appear beneath the movie, allowing it to be played or the sound adjusted. With Windows Vista or Windows XP, the (Capture Still Frame) button will display beside the Star Ratings. Clicking this button extracts still images from movies.
Using the Software on the Windows Platform – Advanced Techniques 28
Properties Window
The Properties Window displays when you select an image in the Browser Area and click the Properties button. The Properties Window does not display in the Preview Mode.
Shows or hides categories.
File Name
The file name can be changed.
Star Rating and My Category
Sets the rating for an image. An icon will display if a My Category is set.
Shooting Information
Displays detailed information, such as the shutter speed and exposure compensation setting. The camera model will determine what information is displayed.
Plays a sound memo attached to an image.
Protect
Prevents an image from being overwritten or deleted.
Comment
You can type a comment here.
Keywords
Sets the keywords used in searches.
Brightness Histogram
A graph of the highlights and shadows distribution in an image.
Image Selector Buttons
If multiple images are selected with the Properties Window displayed, you can switch between the images for which the information is displayed.
Windows
