- •Table of contents
- •Read This First
- •Precautions
- •It’s so Simple! Make Prints Right at Home Like a Pro
- •Unbounded Possibilities with Entertaining Software
- •Enjoy Using CANON iMAGE GATEWAY to Take Advantage of the Internet
- •System Requirements
- •Installing the Software and USB Driver
- •Downloading Images to the Computer
- •Printing Images
- •The ZoomBrowser EX Windows
- •ZoomBrowser EX Features
- •Editing Movies
- •Merging Panoramic Images - PhotoStitch
- •Enjoy Customizing Your Camera with the My Camera Settings
- •Installing the Software
- •Downloading Images to the Computer
- •Printing Images
- •The ImageBrowser Windows
- •ImageBrowser Features
- •Editing Movies
- •Merging Panoramic Images - PhotoStitch
- •Enjoy Customizing Your Camera with the My Camera Settings
- •Appendices
- •Uninstalling the Software
- •Memory Card Folder Structure
- •Troubleshooting
- •Downloading Images without Installing the Software
- •Index

Appendices
This chapter explains how to uninstall the programs.
Read the Troubleshooting section in this chapter if you experience a problem using the programs.
Uninstalling the Software
The procedures for uninstalling the software are only required when you wish to delete the programs from your computer or when reinstallation is required to fix corrupted files.
Authorization as a computer Administrator is required to uninstall software.
Uninstalling the Software (Windows)
This explanation uses ZoomBrowser EX to demonstrate how to uninstall a program. You can remove other programs with the same procedures.
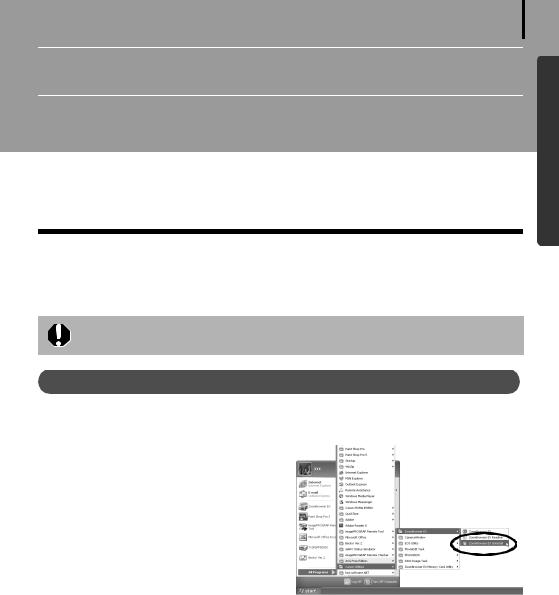
1 Click the Windows [Start] menu and select [All Programs] or [Programs], followed by [Canon Utilities], [ZoomBrowser EX] and [ZoomBrowser EX Uninstall].
The uninstall utility will start and remove
ZoomBrowser EX.
66
Windows/Macintosh

Appendices 67
Uninstalling the USB Driver (Windows)
It is essential to note that you will not be able to download images if you uninstall the USB driver.
Windows Vista, Windows XP
You do not need to uninstall the USB driver.
Windows 2000
Uninstall the USB Driver using the following procedures.
1 |
After connecting the supplied interface cable to the computer’s USB port and the |
|
|
camera’s DIGITAL terminal, turn on the camera power, set it to playback mode and |
|
|
prepare it to communicate with the computer. |
|
|
For interface cable connection instructions, see the Camera User Guide. |
|
2 |
Click [Cancel] to close the Events Dialog if it appears. |
|
|
If CameraWindow appears, click [Operate Images on Camera] followed by |
in the View |
|
Window. |
|
3 |
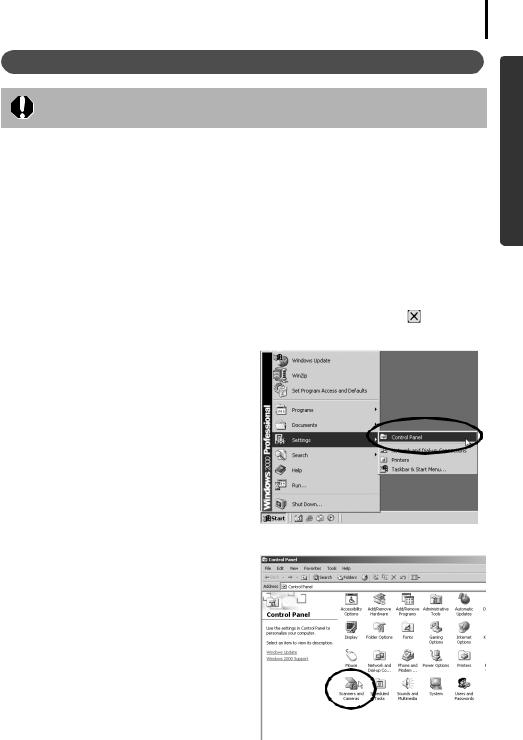
Click the [Start] menu and select |
|
|
[Settings], followed by [Control Panel]. |
|
4 Double-click the [Scanners and
Cameras] icon.
Windows/Macintosh

Appendices 68
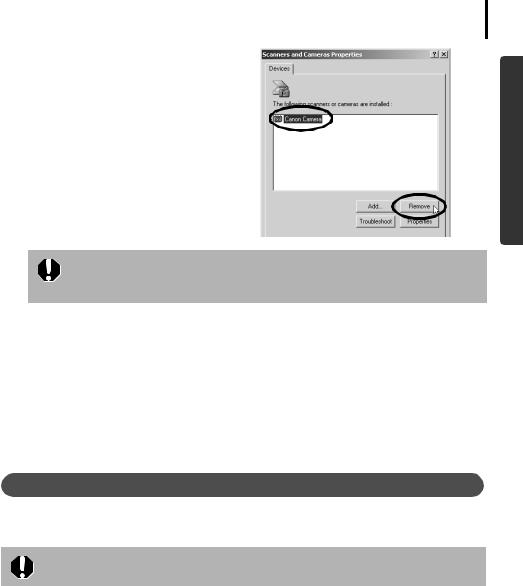
5 Select your camera model name or [Canon Camera] in the [Scanners and Cameras Properties] dialog, and click [Remove].
Windows/Macintosh
If your camera model name does not appear here, see the Camera not detected, Events dialog won’t display or images will not download to the computer (p. 71) of the Troubleshooting section.
6 Click the Windows [Start] menu and select [Programs], followed by [Canon Utilities], [Camera TWAIN Driver x.x] and [Uninstall TWAIN Driver]. A version number appears in place of the “x.x”.
The uninstall process will start.
To connect the camera to the computer and download after this point, use the following procedures.
1.Reinstall the driver.
2.Connect the camera to the computer with the interface cable.
Uninstalling the Software (Macintosh)
Uninstall the programs by dragging the application’s folder (the folder in which it was installed) into the Trash, and then empty the Trash.
Please be careful not to accidentally delete any folders with downloaded images that may be contained within the application folder.

Appendices 69
Memory Card Folder Structure
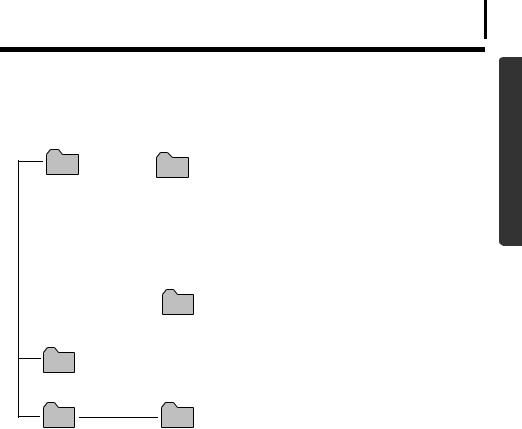
The images on a memory card are placed in subfolders of the [DCIM] folder labeled [xxxCANON], where the “xxx” represents a number in the range 100 - 999.
|
|
|
|
|
|
|
|
|
|
IMG_xxxx.JPG (JPEG images) |
|
|
|
|
|
|
|
|
|||
|
|
|
|
|
|
|
|
|
|
_MG_xxxx.JPG (JPEG images recorded in the |
|
|
|
|
|
|
|
|
|
|
|
DCIM |
|
xxxCANON |
|
|
|
|
Adobe RGB color space) |
|||
|
|
|
|
|
IMG_xxxx.CR2 (RAW images) |
|||||
|
|
|
|
|
|
|||||
|
|
|
|
|
|
|||||
|
|
|
|
|
|
|
|
|
|
_MG_xxxx.CR2 (RAW images recorded in the |
|
|
|
|
|
|
|
|
|
|
|
|
|
|
|
|
|
|
|
|
|
Adobe RGB color space) |
|
|
|
|
|
|
|
|
|
|
STx_xxxx.JPG** (Stitch Assist mode images) |
|
|
|
|
|
|
|
|
|
|
|
|
|
|
|
|
|
|
|
|
|
MVI_xxxx.AVI (Movies) |
|
|
|
|
|
|
|
|
|
|
|
|
|
|
|
|
|
|
|
|
|
MVI_xxxx.THM* |
|
|
|
|
|
|
|
|
|
|
|
|
|
|
|
|
|
|
|
|
|
SND_xxxx.WAV (Sound annotation) |
|
|
|
|
|
|
|
|
|
||
|
|
|
|
|
|
The folder that holds the settings files for |
||||
|
|
CANONMSC |
images in the DCIM folder. |
|||||||
|
|
|
|
|
|
|
||||
|
The folder created when DPOF settings are set. |
|||||||||
|
It holds the DPOF settings files. |
|||||||||
MISC |
|
|
|
|
|
|
|
|
|
|
SDR_xxxx.WAV (Files recorded with Sound Recorder)
SNDR |
xxxCANON |
•*Files with the THM extension are the thumbnail image files for the camera’s index replay mode.
•The “xxxx” in file names represent four-digit numbers.
•**Each successive file shot in Stitch Assist mode is assigned a letter starting from “A,” which is inserted as the third digit in the name. i.e. [STA_0001.JPG], [STB_0002.JPG],
[STC_0003.JPG]...
•All folders except the “xxxCANON” folders contain image settings files. Do not open or delete them.
•Depending on the camera, some data types cannot be recorded.
Windows/Macintosh
