

|
|
|
|
|
69 |
|
|
|
|
|
|
|
|
|
|
Printing on wide size paper (you |
|
|
|
|
|
can check the composition at a 16:9 |
|
|
|
(Widescreen) |
3264 x 1832 |
aspect ratio. Areas that will not be |
|
|
|
|
|
recorded appear on the LCD |
|
|
|
|
|
monitor as a black border.) |
|
 : Approximate number of recording pixels. (M is short for megapixels.) * Paper sizes vary according to region.
z See Memory Cards and Estimated Capacities (p. 211). z See Image Data Sizes (Estimated) (p. 213).
 Changing the Compression (Still Images)
Available Shooting Modes |
|
|
p. 220 |
|
|
|
|
1 Select a compression setting.
1.Press the  button.
2.Use the  or
or  button to select
  and the
  or
or  button to change the option.
3.Press the  button.
Approximate Values for Compression Settings
Compression |
Purpose |
|
Superfine |
High Quality |
Shoot higher quality images |
Fine |
|
Shoot normal quality images |
Normal |
Normal |
Shoot more images |
zSee Memory Cards and Estimated Capacities (p. 211).
zSee Image Data Sizes (Estimated) (p. 213).
Functions Shooting Used Commonly
70
 Setting the Image Stabilizer Function
Available Shooting Modes |
|
|
p. 220 |
|
|
|
|
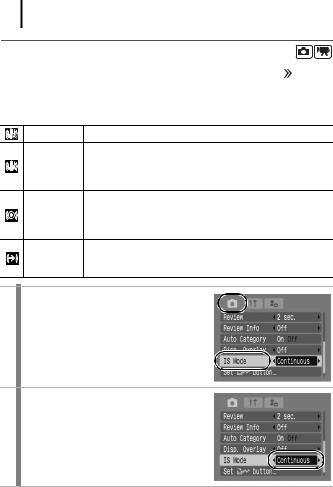
The Image Stabilizer function allows you to minimize the camera shake effect (blurred images) when you shoot distant subjects that have been magnified or when you shoot in dark conditions without a flash.
Off –
You can check the effect of the IS mode on image blur
Continuous on the LCD monitor since the IS mode runs continually. This makes it easier to compose images and focus on
subjects.
IS mode is only activated when the shutter button is
Shoot Only pressed, so subjects will be captured with reduced blur even if their movements on the LCD monitor are not
smooth.
This option only stabilizes the effect of up and down Panning camera motions on the image. This option is
recommended for shooting objects moving horizontally.
1 Select [IS Mode].
1.Press the  button.
2.In the  menu, use the
  or
or  button to select [IS Mode].
2 Accept the setting.
1.Use the  or
or  button to select an image stabilizer option.
2.Press the  button.
71
zCamera shake may not be fully corrected when shooting with slow shutter speeds, such as with evening shots. Use a tripod to shoot.
zIf camera shake is too strong, it may not be fully corrected.
zHold the camera horizontally while [Panning] (stabilization does not work when the camera is held vertically).
zWhen the IS mode is set to [Shoot Only] or [Panning], if you switch to shooting movies, the mode setting will change to [Continuous].

 Adjusting the ISO Speed
Available Shooting Modes |
|
|
p. 220 |
|
|
|
|
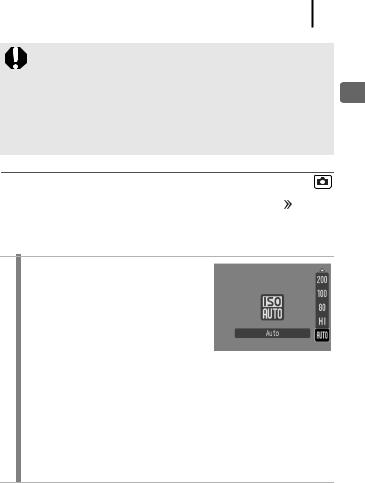
Raise the ISO speed to use a fast shutter speed when you wish to reduce the effects of camera shake or avoid blurry subjects, or to turn the flash off when shooting in a dark area.
1 Press the  button.
1.Use the  or
or  button to change the ISO speed.
•You can advance to the next option each time you press the button.
•Selecting  (Auto) or
  (High ISO Auto) sets the ISO speed to an
optimum sensitivity for the light level when shooting. As the sensitivity is automatically raised in dark places, the camera will select a faster shutter speed and reduce the chances of camera shake.
•Select  to give priority to image quality.
•Selecting  will set the ISO speed to an optimum sensitivity to detect movements. Depending on the scene being shot, the
sensitivity will be set higher* than for  , and subject blurring will be reduced.
*Noise may increase in the captured image compared to  .
.
Functions Shooting Used Commonly
72
z The camera automatically applies noise reduction processing when you shoot at a high ISO speed.
zIf the camera is set at  or
or  , the ISO speed automatically set by the camera will be displayed when pressing the shutter button halfway or in playback information.