

99

 Adjusting the Exposure Compensation
Available Shooting Modes  p. 201
Adjust the exposure compensation to a positive value to avoid making the subject too dark when it is backlit or shot against a bright background. Adjust the exposure compensation to a negative value to avoid making the subject too bright in night shots or when shot against a dark background.
1  Turn on the LCD monitor.
2 Press the  button to display the exposure compensation bar.
3 Configure the setting.
1.Use the  or
or  button to adjust the exposure compensation.
2.Press the  button.
•Depending on the shooting mode, pressing the  button will switch between the setting items as follows:

 mode/Exposure compensation
Shutter speed/Exposure compensation
Aperture value/Exposure compensation
To Cancel the Exposure Compensation:
Follow step 3 to restore the compensation value to [0].
Functions Shooting Advanced

100
 Switching between Metering Modes
Available Shooting Modes  p. 201
|
|
|
|
Appropriate for standard shooting conditions, |
|
|
|
|
including backlit scenes. The camera divides |
|
|
|
|
images into several zones for metering. It |
|
|
|
Evaluative |
evaluates complex lighting conditions, such as |
|
|
|
||
|
|
|
the position of the subject, the brightness, the |
|
|
|
|
|
|
|
|
|
|
direct light, and the backlighting, and adjusts the |
|
|
|
|
settings to the correct exposure for the main |
|
|
|
|
subject. |
|
|
|
Center Weighted |
Averages the light metered from the entire |
|
|
|
frame, but gives greater weight to the subject |
|
|
|
|
Avg. |
|
|
|
|
matter at the center. |
|
|
|
|
|
|
|
|
|
|
Use when there is a large variance in brightness |
|
|
|
Spot |
between the subject and the surroundings. Sets |
|
|
|
the exposure to suit the subject at the center of |
|
|
|
|
|
|
|
|
|
|
the composition. |
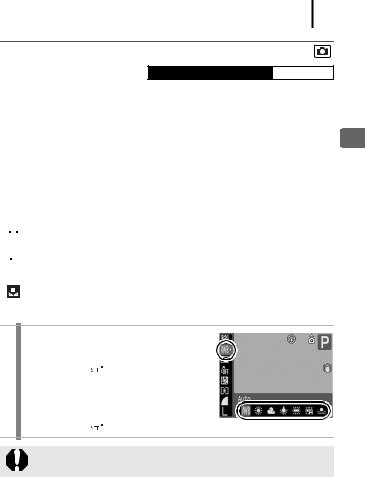
1 Change the metering mode.
1.Press the  button.
2.Use the  or
or  button to select
and the  or
or  button to change the option.
3. Press the  button.
101
 Adjusting the Tone (White Balance)
Available Shooting Modes  p. 201
Normally, the  (Auto) white balance setting selects an optimal white balance. When the
 setting cannot produce natural looking colors, change the white balance using a setting appropriate for the light source.
|
|
|
Auto |
Settings are automatically set by the camera. |
|
|
|
|
|
|
|
|
Day Light |
For recording outdoors on a bright day. |
|
|
|||
|
|
|
|
|
|
|
|
Cloudy |
For recording under overcast, shady or twilight skies. |
|
|
|||
|
|
|
|
|
|
|
|
Tungsten |
For recording under tungsten and bulb-type 3- |
|
|
|
||
|
|
|
wavelength fluorescent lighting. |
|
|
|
|
|
|
|
|
|
|
|
|
|
|
Fluorescent |
For recording under warm-white, cool-white or |
|
|
|
||
|
|
|
warm-white (3-wavelength) fluorescent lighting. |
|
|
|
|||
|
|
|
|
|
|
|
|
Fluorescent H |
For recording under daylight fluorescent, or daylight |
|
|
|||
|
|
|
|
fluorescent-type 3-wavelength fluorescent lighting. |
|
|
|
|
For recording with the optimal white balance data |
|
|
|
Custom |
memorized in the camera from a white-colored |
|
|
|
|
object, such as white paper or cloth. |
1 Select a white balance setting.
1.Press the  button.
2.Use the  or
or  button to select
  and the
  or
or  button to change the option.
3.Press the  button.
The white balance setting cannot be adjusted when  or
or  is selected for My Colors.
Functions Shooting Advanced
102
Using the Custom White Balance
Take a custom white balance  (Custom) reading for the following situations that are difficult for the
  (Auto) setting to detect correctly.
•Shooting subjects of monotone color (such as sky, sea or forest)
•Shooting with a particular source of light (such as a mercury-vapor lamp)
•Shooting close-ups (Macro)
1 Select  .
.
1.Press the  button.
2.Use the  or
or  button to select
 and use the
  or
or  button to select
  .
.
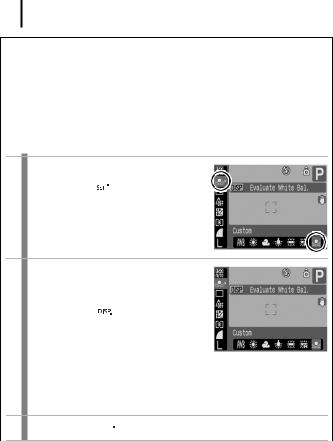
2 Aim the camera at a piece of white paper or cloth and press the  button.
•Ensure that the LCD monitor is completely filled with the white image. Please note, however, that
the center frame will not display when the digital zoom is used or when  is displayed.
•You can also use the viewfinder to take a custom white balance reading.
3 Press the  button.
103
zYou are recommended to set the shooting mode to  and the exposure compensation setting to [±0] before setting a custom white balance. The correct white balance may not be obtained when the exposure setting is incorrect (image appears completely black or white).
zShoot with the same settings as when reading the white balance data. If the settings differ, the optimal white balance may not be set. In particular, the following should not be changed.
-ISO speed
-Flash:
Setting the flash to  or
or  is recommended. If the flash fires when reading the white balance data with the
flash set to  , make sure that you also use the flash when you shoot.
zThe white balance data is retained even after the camera power is turned off.
Functions Shooting Advanced