

84
Advanced Shooting Functions
 Continuous Shooting
Available Shooting Modes  p. 201
In this mode, the camera shoots continuously while the shutter button is held down.
If you use the recommended memory card*, you can shoot continuously (smooth continuous shooting) at a set shooting interval until the memory card is full (p. 192).
*Recommended Memory Card:
Super high-speed SDC-512MSH memory card (sold separately) to which low-level formatting (p. 141) is conducted immediately before shooting.
• Except  (Large/Super Fine) mode.
• This reflects standard shooting criteria established by Canon. Actual results may vary according to the subject and shooting conditions.
• Even if continuous shooting suddenly stops, the memory card may not be full.
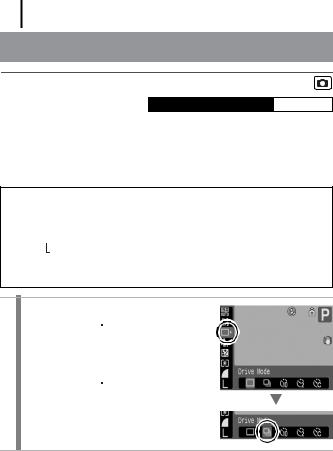
1 Select  .
.
1. Press the  button.
2.Use the  or
or  button to select
  (Drive Mode) and the
  or
or  to select
  .
.
3.Press the  button.

85
2 Shoot.
•The camera will continue to record successive images while the shutter button is held down.
Recording will cease when the shutter button is released.
To Cancel Continuous Shooting:
Follow Step 1 to select  .
.
z The interval between shots lengthens when the built-in memory of the camera fills.
zIf the flash is used, the interval between shots lengthens because the flash must charge.
Functions Shooting Advanced
86
 Setting the Flash
Available Shooting Modes  p. 201
You can make detailed flash settings to fit the shooting conditions.
Flash Settings
Flash Mode |
In the |
|
or |
|
|
shooting |
– |
|
|
|
|
|
modes, you can control the |
|
|
|
|
|
|||||
|
flash output. |
|
|
|
|
|
|
||||
Flash Exp. |
Flash exposure compensation |
In |
|
and |
|
|
|||||
|
|
||||||||||
Comp |
can be adjusted in the range of |
shooting modes, set |
|||||||||
|
–2 to +2 stops in 1/3-stop |
[Flash Mode] to [Auto] in |
|||||||||
|
increments. You can combine |
advance. |
|||||||||
|
the flash exposure |
|
|
|
|
|
|
||||
|
compensation with the |
|
|
|
|
|
|||||
|
camera’s exposure |
|
|
|
|
|
|||||
|
compensation function for |
|
|
|
|
|
|||||
|
balanced exposure of the |
|
|
|
|
|
|||||
|
background when shooting with |
|
|
|
|
|
|||||
|
a flash. |
|
|
|
|
|
|
|
|
|
|
Flash Output |
The flash output can be |
In |
|
and |
|
|
|||||
|
|
||||||||||
|
controlled in three steps, up to |
shooting modes, please |
|||||||||
|
FULL, when shooting. |
set [Flash Mode] to |
|||||||||
|
|
|
|
|
|
|
[Manual] in advance. |
||||
Red-Eye Corr. |
Automatically searches for and |
– |
|
|
|
|
|||||
|
corrects red eyes in the image |
|
|
|
|
|
|||||
|
when the flash fires. |
|
|
|
|
|
|||||
Red-Eye |
This feature reduces the effect |
When set to [On], the |
|||||||||
Lamp |
of light reflecting back from the |
red-eye reduction lamp |
|||||||||
|
eyes and making them appear |
lights orange before the |
|||||||||
|
red. |
|
|
|
|
flash fires. |
|||||
Safety FE |
The camera automatically |
In |
|
and |
|
|
|||||
|
|
||||||||||
|
changes the shutter speed or |
shooting modes, set |
|||||||||
|
aperture value when the flash |
[Flash Mode] to [Auto] in |
|||||||||
|
fires to avoid overexposing and |
advance. |
|||||||||
|
blowing out the highlights in the |
|
|
|
|
|
|||||
|
scene. |
|
|
|
|
|
|
|
|
|
|

87
About Red-Eye Correction
zWhen [Red-Eye Corr.] is set to [On], only the corrected image is recorded to the memory card.
zIf the area around the eyes is red, for example from using red eye shadow, that area may also be corrected. If this happens, set [Red-Eye Corr.] to [Off].
zRed eyes may not be automatically detected or may not be fully corrected on some images. In either case, you can
correct images with [Red-Eye Correction] in the 

 menu (p. 122).
Displaying and setting [Flash Settings]
1 Select [Flash Settings].
1.Press the  button.
2.In the  menu, use the
  or
or 
button to select [Flash Settings]. |
|
|
3. Press the |
button. |
|
|
|
|
2 Make settings. |
Example in Av mode |
|
1. Use the  or
or  to select the option.
2. Use the  or
or  button to make the setting.
3. Press the  button.
3 Press the  button.
z[Flash Settings] can also be displayed by pressing the
 button, followed by the MENU button.
zYou can also set [Flash Exp. Comp] and [Flash Output] in the FUNC. menu (p. 49).
Functions Shooting Advanced

88
Checking the Focus and Peoples’
Expressions
Available Shooting Modes  p. 201
You can zoom the display of the AF frame to check focus when shooting or right after taking a shot.
Zooming the AF Frame and Shooting
When [AF Frame] is set to [Face Detect] or [Center], the AF frame area can be zoomed to check focus while shooting. When you want to capture people’s expressions, set [AF Frame] to [Face Detect]. When you want to check the focus while shooting in macro mode, set [AF Frame] to [Center].
1 Select [AF-Point Zoom].
1. Press the  button.
2. In the  menu, use the
  or
or  button to select [AF-Point Zoom].
2 Make settings.
1. Use the  or
or  button to select [On].
2. Press the  button.
89
3 Press the shutter button halfway.
•Pressing the shutter button halfway zooms a section of the display according to the following AF Frame mode settings (p. 92).
- [Face Detect] : the face detected as the main subject will appear zoomed.
- [Center] : the center of the image will appear zoomed in the LCD monitor.
4 Press the shutter button fully to shoot.
The AF frame cannot be zoomed under the following circumstances:
-When [AF Frame] is set to [Face Detect] and a face is not detected, or when the face is extremely large in relation to the overall composition.
-When the camera cannot focus.
-When the digital zoom is in use.
-When the LCD monitor is off.
-When a TV is being used as the display.
Functions Shooting Advanced
90
Checking Focus Right After Shooting (Focus Check)
Allows you to check the focus of an image taken. It is also easy to check peoples’ expressions and look for closed eyes when shooting because a frame the size of the face displays when AF frame mode is set to [Face Detect] (p. 92).
You are recommended to set [Review] to [Hold] in the  menu in advance.
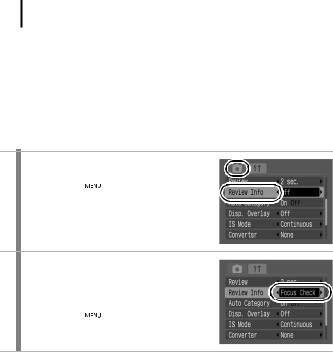
1 Select [Review Info].
1.Press the  button.
2.In the  menu, use the
  or
or  button to select [Review Info].
2 Make settings.
1. Use the  or
or  button to select [Focus Check].
2. Press the  button.
91
3 Shoot.
• The recorded image will be displayed.
|
|
|
|
|
• Frames are displayed as follows. |
Orange frame contents |
|||
|
|
|||
|
|
|
|
|
|
Frame color |
|
Content |
|
|
|
|
||
|
Orange |
Displays the area of the image shown at the bottom |
||
|
|
right. |
|
|
|
White |
Displays at the focal point (AF frame). |
||
|
|
|
|
|
•The orange frame can be shown at a different magnification, moved or switched to a different frame (p. 113).
To Cancel the Focus Check:
Press the shutter button halfway.
z Pressing the  button while the image is displayed will erase the image (p. 19).
zYou can check the focus even during playback mode (p. 112).
Functions Shooting Advanced