- •Table of Contents
- •Please Read
- •Getting Started
- •Preparations
- •Shooting Still Images
- •Viewing Still Images
- •Erasing
- •Printing
- •Embedding the Date in the Image Data
- •Shooting Movies
- •Viewing Movies
- •Downloading Images to a Computer
- •System Map
- •Learning More
- •Components Guide
- •Indicators
- •Basic Operations
- •Menus and Settings
- •Information Displayed on the LCD Monitor and Menus
- •Using the LCD Monitor
- •Commonly Used Shooting Functions
- •Using the Optical Zoom
- •Using the Flash
- •Shooting Close-ups (Macro)
- •Using the Self-Timer
- •Changing the Compression (Still Images)
- •Setting the Image Stabilizer Function
- •Adjusting the ISO Speed
- •Shooting Using the Mode Dial
- •Mode Dial
- •Shooting Modes for Specific Scenes
- •Program AE
- •Setting the Shutter Speed
- •Setting the Aperture
- •Movie Shooting
- •Advanced Shooting Functions
- •Continuous Shooting
- •Setting the Flash
- •Selecting an AF Frame Mode
- •Selecting a Subject to Focus On (Face Select and Track)
- •Adjusting the Exposure Compensation
- •Switching between Metering Modes
- •Adjusting the Tone (White Balance)
- •Shooting in a My Colors Mode
- •Setting the Display Overlays
- •Registering Settings to the Button
- •Playback/Erasing
- •Viewing Magnified Images
- •Check the Focus and Facial Expressions of Subjects (Focus Check Display)
- •Jumping to Images
- •Organizing Images by Category (My Category)
- •Viewing Movies
- •Rotating Images in the Display
- •Playback with Transition Effects
- •Automated Playback (Slide Shows)
- •Red-Eye Correction Function
- •Changing the Recording Pixel (Resize)
- •Attaching Sound Memos to Images
- •Protecting Images
- •Erasing All Images
- •Print Settings/Transfer Settings
- •Setting the DPOF Print Settings
- •Setting the DPOF Transfer Settings
- •Configuring the Camera
- •Power Saving Function
- •Formatting Memory Cards
- •Resetting the File Number
- •Creating an Image Destination (Folder)
- •Setting the Auto Rotate Function
- •Resetting Settings to Their Default Values
- •Connecting to a TV
- •Shooting/Playback Using a TV
- •Troubleshooting
- •List of Messages
- •Appendix
- •Safety Precautions
- •Preventing Malfunctions
- •Using the Power Kits (Sold Separately)
- •Using the Lenses (Sold Separately)
- •Using an Externally Mounted Flash (Sold Separately)
- •Replacing the Date Battery
- •Camera Care and Maintenance
- •Specifications
- •Index
- •Functions Available in Each Shooting Mode

80


 Movie Shooting
Available Shooting Modes  p. 201
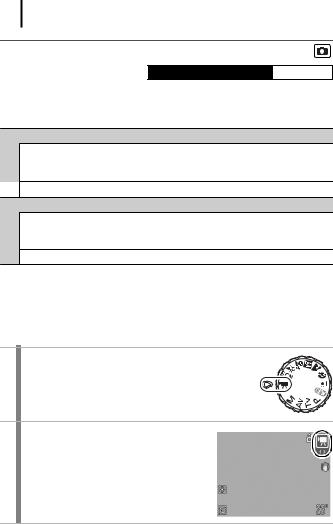
The following movie modes are available.
The recording time will differ according to the memory card used (p. 193).
 Standard
You can select the recording pixels and record until the memory card is full*1.
The digital zoom can be used while shooting in this mode (p. 56).
 • Maximum Size: 4 GB/movie*2
 Compact
Since there are few recording pixels and also the data size is small, this mode is convenient for sending movies as e-mail attachments or when the memory card capacity is low.
• Maximum Clip Length: 3 minutes
*1 When a super high-speed memory card is used, such as the recommended SDC512MSH.
*2 Even if the file size has not reached 4 GB, the recording is stopped when the recording time reaches one hour. Depending on memory card capacity and data write speed, recording may stop before the file size reaches 4 GB or the recording time reaches one hour.
1 Set the mode dial to 

 .
.
2 Select a movie mode.
1.Use the  or
or  button to select a movie mode.

81
3 Shoot.
•Pressing the shutter button halfway automatically sets the exposure, focus and white balance settings.
•Pressing the shutter button fully starts recording video and
sound simultaneously.
• During shooting, the recording time and [zRec] appear on the |
Shooting |
|
LCD monitor. |
||
|
||
• Pressing the shutter button fully again stops recording. |
|
|
Recording will stop automatically under the following |
|
|
circumstances. |
Using |
|
- When the maximum recording time or maximum recording |
||
|
||
capacity is reached |
the |
|
- When the built-in memory or memory card becomes full |
||
|
||
|
Mode |
|
|
||
z You are recommended to use a memory card that has been |
||
|
||
formatted in your camera to shoot movies (p. 141). The card |
Dial |
|
supplied with the camera may be used without further |
||
formatting. |
|
|
z Be careful of the following while recording. |
|
|
- Try not to touch the microphone (p. 40). |
|
|
- Do not press any buttons other than the shutter button. |
|
|
The sound that buttons make will be recorded in the movie. |
|
|
- The camera will automatically adjust the exposure and |
|
|
white balance to suit the shooting conditions during a |
|
|
recording. Please note, however, that the sounds made by |
|
|
the camera while automatically adjusting the exposure |
|
|
may also be recorded. |
|
|
z The focus and optical zoom settings remain fixed for |
|
|
subsequent frames at the values selected for the first frame. |
|
|
|
|

82
z Adjust the zoom setting before shooting. The combined digital and optical zoom factor will display on the LCD monitor. When the zoom factor displays in blue, the image will deteriorate.
zYou can use digital zoom during the movie shooting in  mode only.
zQuickTime is required to play back movies (Data type: AVI/ Compression method: Motion JPEG) on a computer (Windows 2000 only).

83
Changing Movie Recording Pixels/Frame Rates
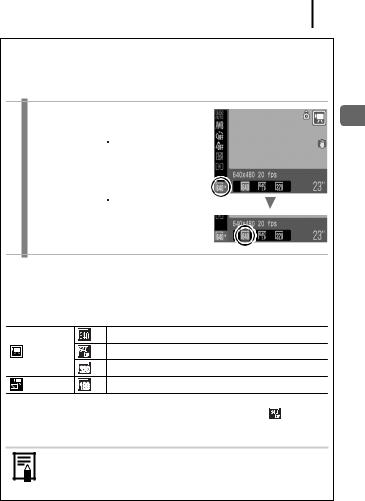
You can change the recording pixels and frame rate when the movie mode is set to  (Standard). The frame rate can be set depending on the recording pixels.
1 Select the recording pixels.
1.Press the  button.
2.Use the  or
or  button to select
 and the
  or
or  button to change the recording pixels.
3. Press the  button.
Movie Recording Pixels and Frame Rates
Frame rates indicate the number of frames recorded or played back each second. The higher the frame rate, the smoother the appearance of motion.
|
*1 |
640 |
× 480 recording pixels, 20 frames/sec. |
Standard |
*2 |
640 |
× 480 recording pixels, 20 frames/sec. LP |
|
|
320 |
× 240 recording pixels, 30 frames/sec. |
Compact |
|
160 |
× 120 recording pixels, 15 frames/sec. |
*1 |
Default setting. |
|
*2 |
When priority is on movie length rather than image quality, select |
. You can |
shoot for twice as long in this mode compared to a file of the same size shot in the other modes.
zSee Memory Cards and Estimated Capacities (p. 193).
zSee Image Data Sizes (Estimated) (p. 193)
Dial Mode the Using Shooting
