
- •Table of Contents
- •Please Read
- •Getting Started
- •Preparations
- •Shooting Still Images
- •Viewing Still Images
- •Erasing
- •Printing
- •Embedding the Date in the Image Data
- •Shooting Movies
- •Viewing Movies
- •Downloading Images to a Computer
- •System Map
- •Learning More
- •Components Guide
- •Indicators
- •Basic Operations
- •Menus and Settings
- •Information Displayed on the LCD Monitor and Menus
- •Using the LCD Monitor
- •Commonly Used Shooting Functions
- •Using the Optical Zoom
- •Using the Flash
- •Shooting Close-ups (Macro)
- •Using the Self-Timer
- •Changing the Compression (Still Images)
- •Setting the Image Stabilizer Function
- •Adjusting the ISO Speed
- •Shooting Using the Mode Dial
- •Mode Dial
- •Shooting Modes for Specific Scenes
- •Program AE
- •Setting the Shutter Speed
- •Setting the Aperture
- •Movie Shooting
- •Advanced Shooting Functions
- •Continuous Shooting
- •Setting the Flash
- •Selecting an AF Frame Mode
- •Selecting a Subject to Focus On (Face Select and Track)
- •Adjusting the Exposure Compensation
- •Switching between Metering Modes
- •Adjusting the Tone (White Balance)
- •Shooting in a My Colors Mode
- •Setting the Display Overlays
- •Registering Settings to the Button
- •Playback/Erasing
- •Viewing Magnified Images
- •Check the Focus and Facial Expressions of Subjects (Focus Check Display)
- •Jumping to Images
- •Organizing Images by Category (My Category)
- •Viewing Movies
- •Rotating Images in the Display
- •Playback with Transition Effects
- •Automated Playback (Slide Shows)
- •Red-Eye Correction Function
- •Changing the Recording Pixel (Resize)
- •Attaching Sound Memos to Images
- •Protecting Images
- •Erasing All Images
- •Print Settings/Transfer Settings
- •Setting the DPOF Print Settings
- •Setting the DPOF Transfer Settings
- •Configuring the Camera
- •Power Saving Function
- •Formatting Memory Cards
- •Resetting the File Number
- •Creating an Image Destination (Folder)
- •Setting the Auto Rotate Function
- •Resetting Settings to Their Default Values
- •Connecting to a TV
- •Shooting/Playback Using a TV
- •Troubleshooting
- •List of Messages
- •Appendix
- •Safety Precautions
- •Preventing Malfunctions
- •Using the Power Kits (Sold Separately)
- •Using the Lenses (Sold Separately)
- •Using an Externally Mounted Flash (Sold Separately)
- •Replacing the Date Battery
- •Camera Care and Maintenance
- •Specifications
- •Index
- •Functions Available in Each Shooting Mode
60

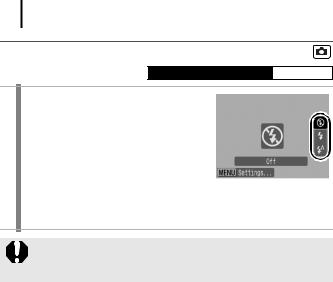
 Using the Flash
Available Shooting Modes  p. 201
1 Press the  button.
1. Use the  or
or  button to select the flash settings.
 : [Off]
  : [On]
 : [Auto]
•You can configure detailed settings for the flash when you press the MENU button while this screen is displayed (p. 86).
You are recommended to shoot with the camera attached to a tripod or other device if the camera shake warning icon (  ) appears.
61

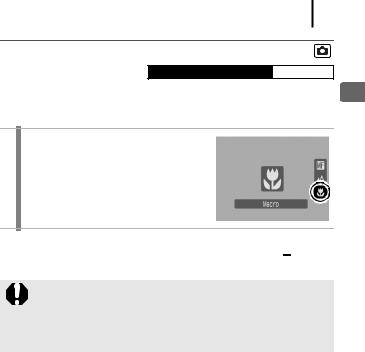
 Shooting Close-ups (Macro)
Available Shooting Modes  p. 201
Use this mode to shoot close-ups of flowers or small items. The image area at the minimum shooting distance from the end of the lens to the subject (5 cm) (2.0 in.) is 59 × 44 mm (2.3 × 1.7 in.).
1 Press the  button.
1.Use the  or
or  button to select
 .
.
To Cancel the Macro Mode:
Press the  button and use the
  or
or  button to select
  (Normal).
zUse the LCD monitor to compose close-ups in macro mode since images composed with the viewfinder may be off center.
zUsing the flash in macro mode may cause image edges to darken.
Functions Shooting Used Commonly
62
 Using the Self-Timer
Available Shooting Modes  p. 201
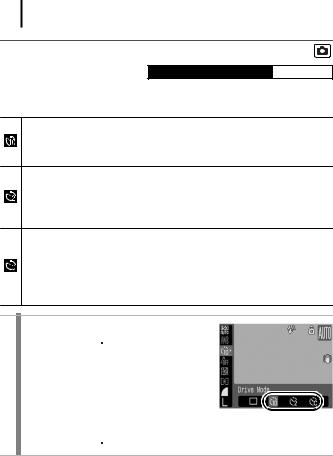
You can set the time delay and the numbers of shots you wish to take in advance.
10 sec. Self-Timer: The shutter releases 10 seconds after the shutter button is pressed.
• 2 seconds before the shutter releases, the self-timer sound beeps quickly and the lamp will speed up.
2 sec. Self-Timer: The shutter releases 2 seconds after the shutter button is pressed.
• The self-timer sound beeps quickly and the self-timer lamp blinks when the shutter button is pressed and the shutter releases 2 seconds later.
Custom Timer: You can change the delay time (0 – 10, 15, 20, 30 sec.) and number of shots (1 – 10).
• When a delay time of over 2 seconds is set for the [Delay] option, the self-timer sound beeps quickly 2 seconds before the shutter releases. If multiple shots have been specified for the [Shots] option, the sound will play for the first shot only.
1 Select the self-timer mode.
1.Press the  button.
2.Use the  or
or  button to select
  (Drive Mode) and the
  or
or  button to change the self-timer mode.
•When  is selected, pressing the DISP. button will allow you to set the delay and number shots (p. 63).
3.Press the  button.
63
2 Shoot.
•When you press the shutter button fully, the self-timer lamp will blink.*
*When [Red-Eye Lamp] is set to [On] in [Flash Settings] in the Rec. menu, the self-timer lamp will light 2 seconds before the flash fires (p. 86).
To Cancel the Self-Timer:
Follow Step 1 to select  .
.
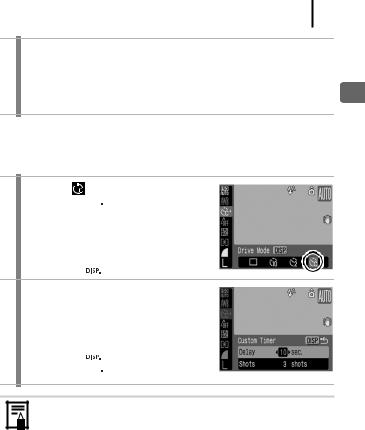
Changing the Delay Time and Number of Shots ( )
)
1 Select  .
.
1.Press the  button.
2.Use the  or
or  button to select
(Drive Mode) and the  or
or  button to select
  .
.
3. Press the  button.
2 Make settings.
1.Use the  or
or  button to select [Delay] or [Shots] and the
  or
or  button to change the settings.
2.Press the  button.
3.Press the  button.
If the [Shots] option is set to 2 or more shots, the following occurs.
-The exposure and white balance are locked at the settings selected for the first shot.
-If the flash is used, the interval between shots lengthens.
-The interval between shots may lengthen when the built-in memory of the camera fills.
-Shooting will automatically cease if the memory card becomes full.
Functions Shooting Used Commonly
64
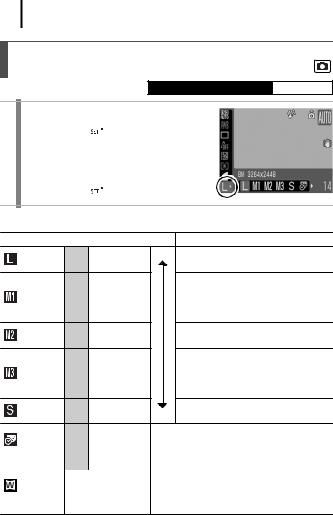
Changing the Recording Pixels
(Still Images)
Available Shooting Modes  p. 201
1 Select the recording pixels.
1.Press the  button.
2.Use the  or
or  button to select
  and the
  or
or  button to change the recording pixels.
3. Press the  button.
Approximate Values for Recording Pixels
Recording Pixels |
|
|
Purpose* |
||||
Large |
8M |
3264 |
× 2448 |
High |
Printing to about A3-size |
||
|
|
|
|
|
297 |
× 420 mm (11.7 × 16.5 in.) |
|
|
|
|
|
|
Printing to about A4-size |
||
Medium 1 |
5M |
2592 |
× 1944 |
|
210 |
× 297 mm (8.3 × 11.7 in.) |
|
|
Printing to about Letter-size |
||||||
|
|
|
|
|
|||
|
|
|
|
|
216 |
× 279 mm (8.5 × 11 in.) |
|
Medium 2 |
3M |
2048 |
× 1536 |
|
Printing to about A5-size |
||
|
148 |
× 210 mm (6 × 8.3 in.) |
|||||
|
|
|
|
|
|||
|
|
|
|
|
Printing postcard-size prints |
||
Medium 3 |
2M |
1600 |
× 1200 |
|
148 |
× 100 mm (6 × 4 in.) |
|
|
Printing L-size prints |
||||||
|
|
|
|
|
|||
|
|
|
|
|
119 |
× 89 mm (4.7 × 3.5 in.) |
|
Small |
0.3M |
640 |
× 480 |
Low |
Sending images as e-mail |
||
attachments or shoot more images. |
|||||||
|
|
|
|
||||
|
|
Printing date-stamped images (p. 22), in |
|
|
2M 1600 × 1200 |
L-size or postcard-size (you can check |
|
Date Stamp |
the print area at a 3:2 aspect ratio as |
||
|
|
you shoot). |
|
|
|
Printing on wide size paper (you can check |
|
|
3264 × 1832 |
the composition at a 16:9 aspect ratio. |
|
Widescreen |
Areas that will not be recorded appear on |
||
|
|||
|
|
the LCD monitor as a black border.) |
 : Approximate recording pixel numbers are shown. (M is short for megapixels.) * Paper sizes vary according to region.
