- •Table of Contents
- •Please Read
- •Getting Started
- •Preparations
- •Viewing Still Images
- •Erasing
- •Printing
- •Embedding the Date in the Image Data
- •Viewing Movies
- •Downloading Images to a Computer
- •System Map
- •Learning More
- •Components Guide
- •Indicator
- •Basic Operations
- •Menus and Settings
- •Information Displayed on the LCD Monitor and Menus
- •Using the LCD Monitor
- •Commonly Used Shooting Functions
- •Shooting with the Optical Zoom
- •Using the Digital Zoom/Digital Tele-Converter
- •Using the Flash
- •Using the Self-Timer
- •Various Shooting Methods
- •Shooting Modes for Specific Scenes
- •Shooting in Manual Mode
- •Continuous Shooting
- •Setting the Flash
- •Movie Shooting
- •Selecting an AF Frame Mode
- •Selecting the Face to Focus On (Face Select and Track)
- •Adjusting the ISO Speed
- •Adjusting the Exposure Compensation
- •Switching between Metering Modes
- •Adjusting the Tone (White Balance)
- •Shooting in a My Colors Mode
- •Setting the Display Overlays
- •Registering Settings to the Print/ Share Button
- •Playback/Erasing
- •Viewing Magnified Images
- •Organizing Images by Category (My Category)
- •Jumping to Images
- •Viewing Movies
- •Rotating Images in the Display
- •Playback with Transition Effects
- •Automated Playback (Slide Show)
- •Red-Eye Correction Function
- •Resizing Images
- •Attaching Sound Memos to Images
- •Protecting Images
- •Erasing All Images
- •Print Settings/Transfer Settings
- •Setting the DPOF Print Settings
- •Setting the DPOF Transfer Settings
- •Configuring the Camera
- •Setting the Power Saving Function
- •Formatting Memory Cards
- •Resetting the File Number
- •Creating an Image Destination (Folder)
- •Setting the Auto Rotate Function
- •Resetting Settings to Their Default Values
- •Connecting to a TV
- •Shooting/Playback Using a TV
- •Troubleshooting
- •List of Messages
- •Appendix
- •Safety Precautions
- •Handling Precautions
- •Using the Power Kits (Sold Separately)
- •Using an Externally Mounted Flash (Sold Separately)
- •Replacing the Date Battery
- •Camera Care and Maintenance
- •Specifications
- •Index
- •Functions Available in Each Shooting Mode

Getting Started
16 Viewing Still Images
Viewing Still Images
a
Mode Dial
b
 /
/  Buttons
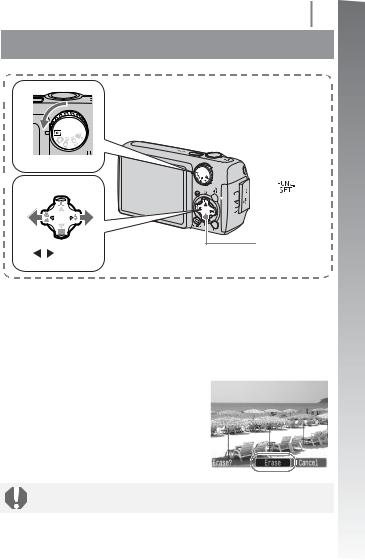
a Set the mode dial to  (Playback).
bUse the W or X button to display the image you wish to view.
•Use the  button to move to the previous image and the
  button to move to the next image.
•The images advance more quickly if you keep the button pressed continuously, but they will appear coarse.
z Setting [Resume] to either [Last seen]* or [Last shot] in the 
 (Play) menu allows you to specify the image to display in Playback mode (* Default setting). If you select [Last seen],
the last image viewed will display (Resume Playback).
zThe following actions will display the most recent image regardless of the [Resume] settings.
Shooting an image, changing the memory card, or editing an image on the memory card using a computer.

Erasing 17
Erasing
 a
a
Mode Dial
 b
b


 c
c  Button
b Button
/ Buttons
a Set the mode dial to  (Playback).
bUse the W or X button to select an image to erase and press the 
 button.
cConfirm that [Erase] is selected and press the FUNC./ SET button.
•To exit instead of erasing, select [Cancel].
Started Getting
Please note that erased images cannot be recovered. Exercise adequate caution before erasing an image.

Getting Started
18 Printing
Printing
c
ON/OFF
c Button 
a
Mode Dial
 d
d
 /
/  Buttons
d Button
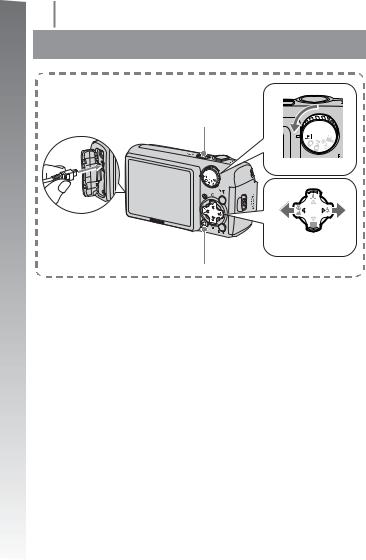
aConnect the camera to a direct print compatible printer.
•Open the camera’s terminal cover and insert the interface cable all the way into the connector.
•See the printer’s user guide for connection instructions.
•Since this camera uses a standard protocol (PictBridge), you can use it with other PictBridge-compliant printers in addition to Canon-brand printers. Please see the Direct Print User Guide for more information.
bTurn on the printer.
cSet the camera’s mode dial to  (Playback) and press the ON/OFF button.
• The  button will light blue.
dUse the W or X button to select an image to print and press the  button.
• The  button will blink blue and printing will start.

Printing 19
Printing From a Print List
You can add images directly to a print list by merely pressing the

 button immediately after shooting or playing back an image. You can then print the images from the print list easily, when
connecting the camera to a printer.
Adding to a Print List
aPress the 
 button (still images only).
bAdd to the print list.
1.Use the S or T button to set the number of copies to print.
2.Use the W or X button to select
[Add].
3. Press the FUNC./SET button.
•To remove an image from the print 
list, press the 
 button again, use the W or X button to select [Remove] and press the FUNC./SET button.
Printing Images in a Print List
This explanation is based on the use of a Canon SELPHY ES series or SELPHY CP series printer.
a Connect the camera to a printer. Number of copies to print
bPrint.
1.Use the S or T button to select 
[Print now]. 
•You can use the W or X button to
confirm the images added to the  print list.
2.Press the FUNC./SET button.
•Printing will start.
•If printing is halted and resumed, printing will start from the next image in the queue.
Started Getting
