


125
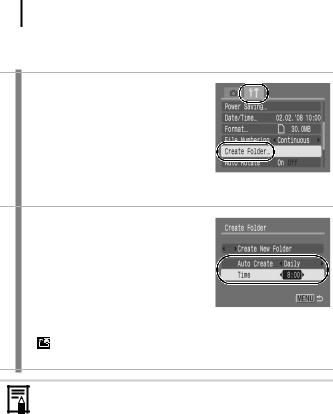
Creating an Image Destination (Folder)
You can create a new folder at any time and the recorded images will be automatically saved to that folder.
Create New |
Creates a new folder the next time you shoot images. To |
Folder |
create an additional folder, insert the check mark again. |
Auto Create |
You can also specify a date and time if you wish to create a |
new folder using a shooting time after the specified date |
|
|
and time. |
Creating a Folder the Next Time You Shoot.
1 Select [Create Folder].
1. Press the MENU button.
2.Use the W or X button to select the
 menu.
menu.
3. Use the S or T button to select [Create Folder].
4. Press the FUNC./SET button.
2 Accept the setting.
1. Use the W or X button to check mark [Create New Folder].
2. Press the MENU button.
• will be displayed on the LCD monitor when shooting. The icon will cease to display after the new folder is created.
Camera the Configuring
126
Setting the Day or Time for Automatic Folder Creation.
1 Select [Create Folder].
1. Press the MENU button. 2. Use the W or X button to select 
menu.
3. Use the S or T button to select [Create Folder].
4. Press the FUNC./SET button.
2 Accept the setting.
127
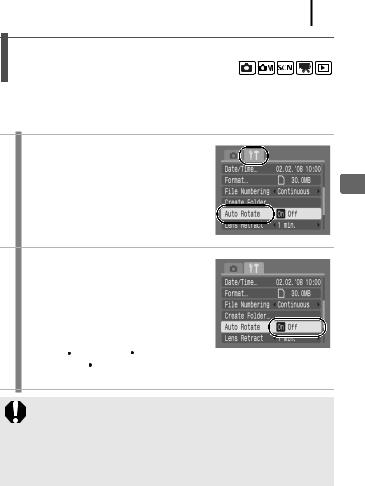
Setting the Auto Rotate Function
Your camera is equipped with an Intelligent Orientation sensor that detects the orientation of an image shot with the camera held vertically and automatically rotates it to the correct orientation when viewing it in the LCD monitor.
1 Select [Auto Rotate].
1. Press the MENU button.
2.Use the W or X button to select the
 menu.
menu.
3. Use the S or T button to select [Auto Rotate].
2 Accept the setting.
1.Use the W or X button to select [On] or [Off].
2.Press the MENU button.
• When the Auto Rotate function is set to [On] and [Shooting Info] is set to
[On], |
|
(normal), |
|
(right end is |
||
down), |
or |
|
(left end |
is down) will display on the LCD monitor |
||
while shooting. |
|
|
||||
zThis function may not operate correctly when the camera is
pointed straight up or down. Check that the arrow  is pointing in the right direction and if it is not, then set the Auto Rotate function to [Off].
zEven if the Auto Rotate function is set to [On], the orientation of images downloaded to a computer will depend upon the software used to download the images.
Camera the Configuring

128
When the camera is held vertically to shoot, the Intelligent Orientation sensor judges the upper end to be “up” and the lower end to be “down”. It then regulates the optimal white balance, exposure and focus for vertical photography. This function operates regardless of the on/off status of the Auto Rotate function.
Resetting Settings to Their Default Values
1 Select [Reset All].
1. Press the MENU button.
2.Use the W or X button to select the
 menu.
menu.
3.Use the S or T button to select
[Reset All].
4. Press the FUNC./SET button.
2 Accept the setting.
1.Use the W or X button to select [OK]
2.Press the FUNC./SET button.
z Settings cannot be reset when the camera is connected to a computer or to a printer.
zThe following cannot be reset.
-Shooting mode
-The [Date/Time], [Language] and [Video System] options in the  menu (pp. 49, 50)
-White balance data recorded with the custom white balance function