

100
2 Use the S or T button to select a search key and press the W or X button.
•Some search keys only display when there is a corresponding image in the folder.
Date Jump Example
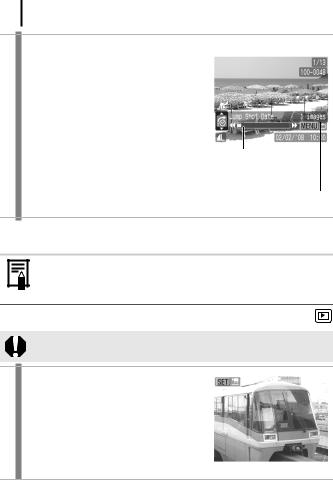
Location of image currently being displayed
Number of images matching search key
To Cancel the Jump Search Mode
Press the MENU button.
In Single Playback mode, you can also display the [Jump to] menu by holding down the MENU button.
 Viewing Movies
Movies cannot be played in the Index Playback mode.
1 Display the movie file.
1.Use the W or X button to select a movie.
2.Press the FUNC./SET button.
•The movie control panel will display.
•Images with a 
 icon are movies.

101
2 Play the movie.
1.Use the W or X button to select  .
.
2.Press the FUNC./SET button.
•The movie will pause if you press the FUNC./SET button during playback. It will resume when you press the button again.
•When playback ends, the movie stops at the last frame displayed.
•If playback was halted partway through in the prior viewing session, playback will resume from the last frame displayed.
Movie Control Panel
Playback Progress Bar Time movie was shot
Volume Level
(Adjust it with the S or T button)
Operating the Movie Control Panel
|
|
|
Exit |
Ends playback and returns to single image playback |
|
|
|
|
|
|
|
|
|
|
An icon will display when a printer is connected. See |
||
|
|
|
|||
|
|
|
the Direct Print User Guide for details. |
||
|
|
|
|
||
|
|
|
|
|
|
|
|
|
Play |
Play |
|
|
|
|
|
|
|
|
|
|
Slow Motion |
You can use the |
button to slow down or the |
|
|
|
|||
|
|
|
button to speed up playback. |
||
|
|
|
|
||
|
|
|
|
|
|
|
|
|
First Frame |
Displays the first frame |
|
|
|
|
|
|
|
|
|
|
Previous Frame |
Rewinds if the FUNC./SET button is held down. |
|
|
|
|
|
|
|
|
|
|
Next Frame |
Fast Forwards if the FUNC./SET button is held |
|
|
|
|
|||
|
|
|
down. |
|
|
|
|
|
|
|
|
|
|
|
Last Frame |
Displays the last frame |
|
|
|
|
|
|
|
|
|
|
|
|
|
zUse the television’s controls to adjust the volume when playing a movie on a TV set (p. 129).
zThe sound cannot be played in slow motion playback.
Playback/Erasing
102
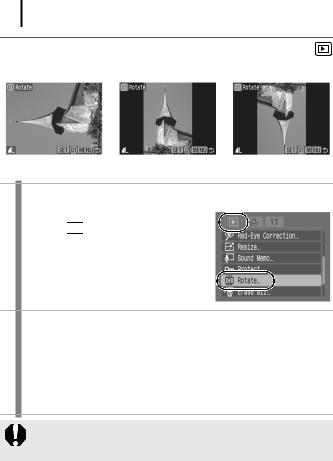
 Rotating Images in the Display
Images can be rotated clockwise 90° or 270° in the display.
Original |
90° |
270° |
1 Select [Rotate].
1. Press the MENU button.
2. In the 

 menu, use the S or T button to select
  .
.
3. Press the FUNC./SET button.
2 Rotate the image.
1.Use the W or X button to select an image to rotate.
2.Press the FUNC./SET button.
•Cycle through the 90°/270°/original orientations with each press of the FUNC./SET button.
•This also can be set in the Index Playback mode.
When images are downloaded to a computer, the orientation of images rotated by the camera will depend upon the software used to download the images.

103
 Playback with Transition Effects
You can select the transition effect displayed when switching between images.
No transition effect.
The displayed image darkens and the next image gradually brightens until it is displayed.
Press the  button to have the previous image display from the left and the
  button to have the next image display from the right.
1 Select [Transition].
1. Press the MENU button.
2.In the 

 menu, use the S or T button to select
  .
.
2 Accept the setting.
1.Use the W or X button to select  ,
,
 or
or  .
.
2.Press the MENU button.
Playback/Erasing