

96
Playback/Erasing

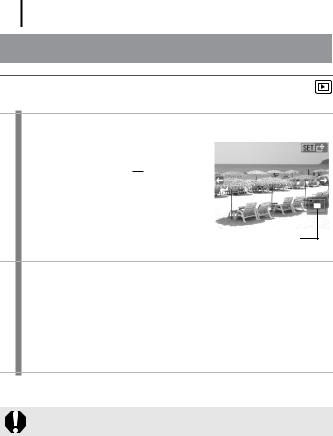
 Viewing Magnified Images
1 Press the  button.
•
 will display and allow you to magnify the view up to a factor of 10
times. Pressing the  button zooms the display out.
•Pressing the W or X button allows you to display the previous or next image at the magnified level.
Approximate Location
of the Displayed Area
2 Press the FUNC./SET button and change the position of the displayed area with the S, T, W or X button.
•
 will display and the camera switches to the Image Advance mode.
•Press the FUNC./SET button again to cancel the Image Advance mode.
To Cancel the Magnified Display
Press the MENU button.
Movie frames and index playback images cannot be magnified.

97
Viewing Images in Sets of Nine
(Index Playback)
1 Select [Image Disp.].
1. Press the MENU button.
2. In the 

 menu, use the S or T button to select
  .
.
2 Accept the setting.
1. Use the W or X button to select [Index].
2. Press the MENU button.
•Up to nine images can be viewed at once in index playback.
•Use the S, T, W or X button to change the image selection.
|
|
|
|
Movie |
Selected Image |
||
Playback/Erasing
You can also switch between single image playback and index playback by holding down the FUNC./SET button.
98
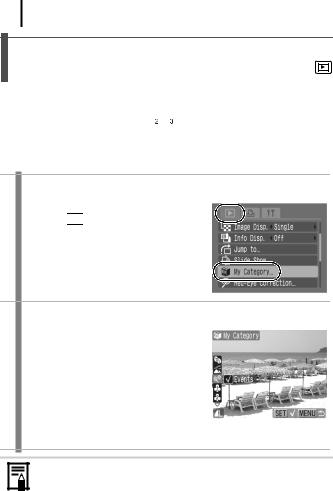
Organizing Images by Category (My Category)
Images can be sorted into previously prepared categories and organized by category.
|
|
|
People |
|
|
|
|
|
|
|
|
My Category 1–3 |
|
|
|
|
|
||||||||
|
|
|
|
|
|
|
|
|
|
|
|
|
|
|
|
Scenery |
|
|
To Do |
||||||
|
|
|
||||||||||
|
|
|
|
|
|
|
|
|
|
|
|
|
|
|
|
Events |
|
||||||||
|
|
|
||||||||||
|
|
|
|
|
|
|
|
|
|
|
|
|
1 Select [My Category].
1. Press the MENU button.
2. In the 

 menu, use the S or T button to select
  .
.
3. Press the FUNC./SET button.
2 Categorize the images.
1.Use the W or X button to select images to categorize.
2.Use the S or T button to select a category.
3.Press the FUNC./SET button.
•Pressing the FUNC./SET button again cancels the setting.
•Press the MENU button to complete the setting.
This also can be set in the Index Playback mode.
99

 Jumping to Images
When you have many images recorded onto a memory card, it is handy to use the search keys below to jump over images to find the object of your search.
|
|
|
|
|
Jump Shot Date |
Jumps to the first image of each shooting |
|
|
|
|
|
date. |
|
|
|
|
|
|
|
|
|
|
|
|
|
|
|
|
|
|
|
|
People |
Jumps to images from the [People] |
|
|
|
|
|
category. |
|
|
|
|
|
|
|
|
|
|
|
|
|
|
|
|
|
|
|
|
Scenery |
Jumps to images from the [Scenery] |
|
|
|
|
|
category. |
|
|
|
|
|
|
|
|
|
|
|
|
|
|
|
|
|
|
|
|
Events |
Jumps to images from the [Events] category. |
|
|
|
|
|
||
|
|
|
|
|
|
|
|
|
– |
|
|
Category 1–3 |
Jumps to the images from each category. |
|
|
|
||||
|
|
|
|
|
|
|
|
|
|
|
|
To Do |
Jumps to images from the [To Do] category. |
|
|
|
|
|
||
|
|
|
|
|
|
|
|
|
|
|
|
Jump to Folder |
Jumps to the first image of each folder. |
|
|
|
|
|
||
|
|
|
|
|
|
|
|
|
|
|
|
Jump to Movie |
Jumps to a movie. |
|
|
|
|
|
||
|
|
|
|
|
|
|
|
|
|
|
|
Jump 10 Images |
Jumps to the image 10 images ahead. |
|
|
|
|
|
||
|
|
|
|
|
|
|
|
|
|
|
|
Jump 100 Images |
Jumps to the image 100 images ahead. |
|
|
|
|
|
||
|
|
|
|
|
|
|
1 Select [Jump to].
1. Press the MENU button.
2. In the 

 menu, use the S or T button to select
  .
.
3. Press the FUNC./SET button.
•The camera will switch to Jump Search mode.
Playback/Erasing