

59

 Using the Flash
Available Shooting Modes  p. 176
1 Press the  button.
1.Use the W or X button to change the flash mode.
 : [Auto]
 : [On]
 : [Off]
•You can configure detailed settings for the flash when you press the MENU button while this screen is displayed (p. 70).
-Slow Synchro, Red-Eye Corr., Red-Eye Lamp
•The LCD monitor turns off while the flash charges.
You are recommended to shoot with the camera attached to a
tripod or other device if the camera shake warning icon  appears.
Functions Shooting Used Commonly
60

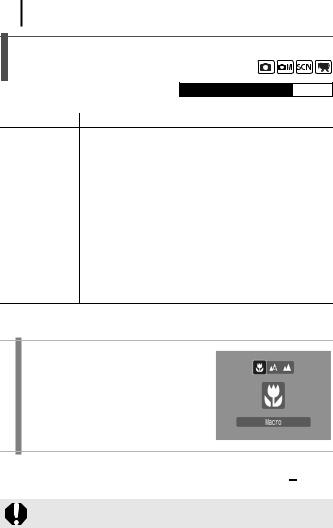
 Shooting Close-ups/Infinity Shots
(Macro/Infinity/Super Macro)
Available Shooting Modes  p. 176
You can shoot close-ups or infinity shots.
Shooting Mode |
Features |
Use this mode to shoot close-ups of flowers or small items.
|
Image Area at Minimum Focusing Distance from End |
|
Macro |
of Lens to Subject |
|
• Maximum wide angle setting: 53 x 40 mm (2.1 x 1.6 in.) |
||
|
Minimum focusing distance: 5 cm (2.0 in.) |
|
|
• Maximum telephoto setting: 76 x 57 mm (3.0 x 2.2 in.) |
|
|
Minimum focusing distance: 25 cm (9.8 in.) |
|
Infinity |
Use this mode when the distance from the end of the |
|
lens to the subject is 3 m (9.8 ft.) or greater. |
||
|
||
|
You can shoot an area of 17 x 13 mm (0.67 x 0.51 in.) at |
|
|
a focusing distance as close as 1 cm (0.39 in.) from the |
|
Super Macro |
end of the lens to the subject (minimum focusing |
|
distance) at maximum wide angle. With the digital zoom |
||
|
||
|
set at its maximum zoom factor (approx. 4.0x), you can |
|
|
shoot an area of 4.2 x 3.2 mm (0.17 x 0.13 in.). |
Shooting in Macro/Infinity Mode 1 Press the  /
/ button.
1.Use the W or X button to select  or
or  .
.
To Cancel the Macro/Infinity Mode
Press the  /
/ button and use the W or X button to select
  (Normal).
Using the flash in Macro mode may cause image edges to darken.
61
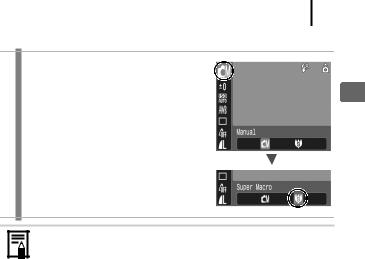
Shooting in Super Macro Mode
1 Select  .
.
1. Set the mode dial to  .
.
2.Press the FUNC./SET button.
3.Use the S or T button to select  and choose
  with the W or X button.
4.Press the FUNC./SET button.
In Super Macro mode, the zoom level is fixed at maximum wide angle.
Functions Shooting Used Commonly
62
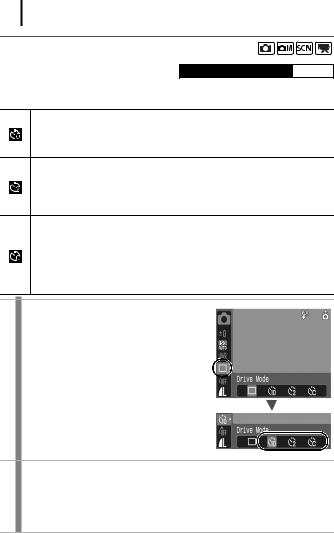
 Using the Self-Timer
Available Shooting Modes  p. 176
You can set the time delay and the numbers of shots you wish to take in advance.
10 sec. Self-Timer: shoots 10 seconds after you press the shutter button.
• 2 seconds before the shutter releases, the self-timer lamp and sound speed up.
2 sec. Self-Timer: shoots 2 seconds after you press the shutter button.
• When you press the shutter button, the self-timer sound will beep rapidly, the self-timer lamp will blink and the shutter will release 2 seconds later.
Custom Timer: you can change the delay time (0–10, 15, 20, 30 sec.) and number of shots (1–10).
• When [Delay] is set to 2 or more seconds, the self-timer sound beeps quickly 2 seconds before the shutter releases. When [Shots] is set to more than 2, the self-timer sound only beeps before the first shot.
•This function cannot be used in Movie mode.
1Configure the self-timer mode.
1.Press the FUNC./SET button.
2. Use the S or T button to select 
 and the W or X button to change the
  option.
3. Press the FUNC./SET button.
2 Shoot.
•When you press the shutter button fully, the self-timer lamp will blink.*
*When [Red-Eye Lamp] in [Flash Settings] is set to [On], the self-timer lamp will light 2 seconds before the flash fires (p. 70).

63
To Cancel the Self-Timer
Follow Step 1 to display  .
.
Changing the Delay Time and Number of Shots ( )
)
1 Select  .
.
1.Press the FUNC./SET button.
2.Use the S or T button to select 
and choose  with the W or X button.
2 Accept the setting.
1.Press the MENU button.
2.Use the S or T button to select [Delay] or [Shots] and change the settings with the W or X button.
3.Press the MENU button.
4.Press the FUNC./SET button.
If the [Shots] option is set to 2 or more shots, the following occurs.
-The exposure and white balance are locked at the settings selected for the first shot.
-If the flash is used, the interval between shots lengthens because the flash must charge.
-The interval between shots may lengthen when the built-in memory of the camera fills.
-Shooting will automatically cease if the memory card becomes full.
Functions Shooting Used Commonly
64
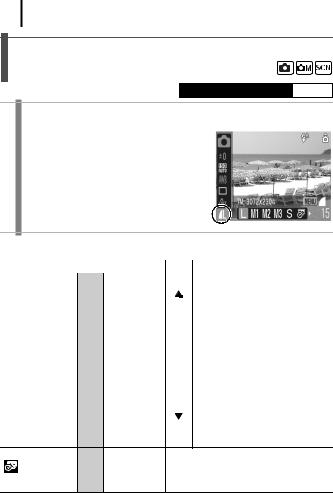
Changing the Recording Pixels
(Still Images)
Available Shooting Modes  p. 176
1 Select the number of recording pixels.
1.Press the FUNC./SET button.
2.Use the S or T button to select  and the W or X button to change the option.
3.Press the FUNC./SET button.
Approximate Values for Recording Pixels
|
|
Recording Pixels |
|
|
Purpose* |
||
|
|
(Large) |
7M |
3072 x 2304 |
High Printing to about A3-size |
||
|
|
||||||
|
|
|
|
pixels |
|
|
297 x 420 mm (11.7 x 16.5 in.) |
|
|
|
|
2592 x 1944 |
|
|
Printing to about A4-size |
|
|
(Medium 1) |
5M |
|
|
210 x 297 mm (8.3 x 11.7 in.) |
|
|
|
pixels |
|
|
Printing to about Letter-size |
||
|
|
|
|
|
|
|
216 x 279 mm (8.5 x 11 in.) |
|
|
(Medium 2) |
3M |
2048 x 1536 |
|
|
Printing to about A5-size |
|
|
|
|
||||
|
|
|
|
pixels |
|
|
148 x 210 mm (6 x 8.3 in.) |
|
|
|
|
|
|
|
Print postcard-size prints |
|
|
(Medium 3) |
2M |
1600 x 1200 |
|
|
148 x 100 mm (6 x 4 in.) |
|
|
pixels |
|
|
Print L-size prints |
||
|
|
|
|
|
|||
|
|
|
|
|
|
|
119 x 89 mm (4.7 x 3.5 in.) |
|
|
|
|
640 x 480 |
|
|
Send images as e-mail |
|
|
(Small) |
0.3M |
Low attachments or shoot more |
|||
|
|
pixels |
|||||
|
|
|
|
|
|
images |
|
|
|
|
|
|
|
|
|
|
|
|
Printing date-stamped images (p. 20) |
|
2M |
1600 x 1200 |
in L-size or postcard-size (you can |
(Date Stamp) |
|
pixels |
check the print area at a 3:2 aspect |
|
|
|
ratio as you shoot). |
65
Printing on wide size paper
(you can check the composition at a
3072 x 1728 pixels 16:9 aspect ratio as you shoot. Areas (Widescreen) that will not be recorded appear on
the LCD monitor as a black border.)
• 
 : Approximate number of recording pixels. (M is short for megapixels.) * Paper sizes vary according to region.
z See Memory Cards and Estimated Capacities (p. 167). z See Image Data Sizes (Estimated) (p. 169).
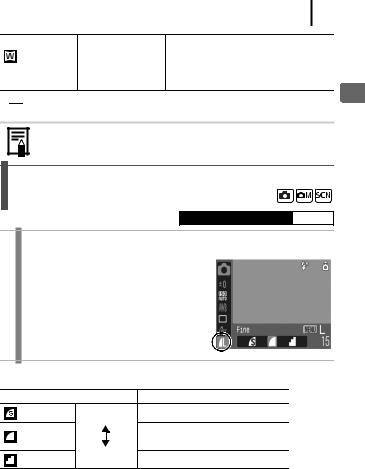
Changing the Compression
(Still Images)
Available Shooting Modes  p. 176
1 Select a compression setting.
1.Press the FUNC./SET button.
2.Use the S or T button to select  and press the MENU button.
3.Use the W or X button to change the option.
4. Press the FUNC./SET button.
Functions Shooting Used Commonly
Approximate Values for Compression Settings
Compression |
Purpose |
|
Superfine |
High Quality |
Shoot higher quality images |
Fine |
|
Shoot normal quality images |
Normal |
Normal |
Shoot more images |