


Working with Results / 93
Figure 8-9: Defining your own units. Top half: Defining new units for a worksheet. Bottom half: Results from the redefined units.
Note Fahrenheit and Celsius temperature units, as well as decibels and other scalings, are not multiplicative. These scaling functions are defined in Mathcad and can be used in the units placeholder or in the Postfix Operator on the left-hand side of an expression to create conventional unit notation. The functions have defined inverses so can also be used in the unit placeholder. See the QuickSheet “Custom Operators” within Mathcad Techniques and “Temperature Units and User-Defined Default Units” within the New Features section of the Mathcad Tutorials for samples of temperature scale calculations.
Working with Results
Formatting Results
The way that Mathcad displays answers is called the result format. You can set the result format for a single calculated result or for an entire worksheet.
Setting the Format of a Single Result
Numerically calculated results are formatted in a worksheet according to the worksheet default result format. To modify the format for a single result:
1. Click anywhere in the equation.
2.Choose Result from the Format menu or double-click the result to open the Result Format dialog box.
3.Change the desired settings. See online Help for more details on the various settings in the dialog box. To display a result with six decimal places, increase “Number of decimal places” from 3 to 6.

94 / Chapter 8 Calculating in Mathcad
To redisplay a result using the worksheet default result format settings, delete the equal sign and press [=] again.
Note When the format of a result is changed, only the appearance of the result changes in the worksheet. Mathcad continues to maintain full precision up to 17 decimal places internally for that result. Use the round function if you wish Mathcad to calculate with fewer decimal places. If you copy a result, Mathcad copies the number only to displayed precision.
Setting Worksheet Default Format
To change the default display of numerical results:
1.Click in a blank part of your worksheet.
2.Choose Result from the Format menu.
3.Change the desired settings in the Result Format dialog box.
Mathcad changes the display of all results whose formats have not been explicitly specified.
You can also change the worksheet default by clicking on a particular result, choosing Result from the Format menu, changing the settings in the Result Format dialog box, and clicking “Set as Default.”
Tip Changing the worksheet default result format affects only the current worksheet. To use your default result formats in new worksheets, save your worksheet as a template as described in Chapter 7, “Mathcad Worksheets.”
The Result Format Dialog Box
Online Help Complete descriptions of options available under the Result Format dialog box can be found in “Formatting Numerical Results” and the pages for each tab in Help.
The Number Format page lets you control the number of decimal places, trailing zeros, exponential threshold, scientific or engineering notation, or display of your results as fractions or mixed numbers.
The Display Options page lets you control whether arrays are displayed as tables or matrices, whether nested arrays are expanded, and whether i or j is used to indicate imaginary numbers. You can also specify another radix such as Binary or Octal.
The Unit Display page gives you options to format units (as fractions) or simplify the units to derived units.
The Tolerance page allows you to specify when to hide a real or imaginary part of a result and how small a number has to be for it to display as zero.
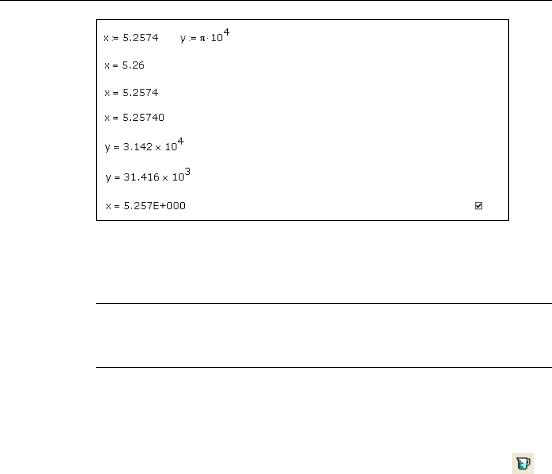
Figure 8-10 shows some examples of formatting options.
Working with Results / 95
Definitions
General format, Exponential threshold = 15,
Number of decimal places = 2
Decimal format, Number of decimal places = 4
Decimal format, Number of decimal places = 5
Show trailing zeros 
Scientific format
Engineering format
Engineering format, Show exponents as E ±000
Figure 8-10: Several ways to format the same number.
Displaying Units of Results
By default, Mathcad displays results in the fundamental units of the current unit system.
Tip Check “Simplify units when possible” in the Result Format dialog box to see units in a result expressed in terms of derived units rather than in base units. Check “Format units” to see units in a result displayed as a built-up fraction containing terms with positive exponents only, rather than as a product of units with positive and negative exponents.
You can have Mathcad redisplay a particular result in terms of any of Mathcad’s builtin units. To do so:
1.Click in the result. You’ll see an empty placeholder to its right. This is the units placeholder.
2. Click the units placeholder then choose Unit from the Insert menu or click |
|
on |
the Standard toolbar to open the Insert Unit dialog box. |
|
|
|
|
3. Double-click the unit in which you want to display the result. You can also type a unit’s name directly into the units placeholder.
Unit Systems
Mathcad uses SI as the default unit system. When you use the equal sign to display a result having units, Mathcad automatically displays the units in the result in terms of base or derived SI units.
You can display results in units of any of the other built-in unit systems in Mathcad (CGS, U.S., or MKS) or not use a unit system at all. To do so, choose Worksheet Options from the Tools menu and click the Unit System tab.
Select the default unit system for display of results. The SI and US base electrical unit (ampere) differs from the base electrical unit in MKS (coulomb), and in CGS (statcoulomb).

96 / Chapter 8 Calculating in Mathcad
The following table summarizes the base units available in Mathcad:
Unit System |
Base Units |
SI |
m, kg, s, A, K, cd, and mole |
MKS |
m, kg, sec, coul, K, cd, and mole |
CGS |
cm, gm, sec, statcoul, K, cd, and mole |
U.S. |
ft, lb, sec, A, K, cd, and mole |
None |
Displays results in terms of fundamental dimensions of |
|
length, mass, time, charge, and absolute temperature. |
|
All built-in units are disabled. |
The standard SI unit names — such as A for ampere, L for liter, s for second, and S for siemens — are generally available in all unit systems, except where there are conflicts with system definitions (CGS). The Insert Unit dialog provides a complete listing of units available for the unit system you have chosen. Mathcad includes most units common to scientific and engineering practice. When conventional unit prefixes such as m- for milli-, n- for nano-, and so on, are not understood by Mathcad, you can easily define custom units such as ns as described in “Defining Your Own Units” on page 92.
Tip For examples of units with prefixes not already built into Mathcad, see the Units section of the Tutorials under the Help menu.
If you click “None” in the Unit System tab of the Worksheet Options dialog box, Mathcad doesn’t understand any built-in units and displays answers in terms of the fundamental dimensions of length, mass, time, charge, and temperature. However, even if you are working in one of Mathcad’s built-in unit systems, you can always choose to see results displayed in fundamental dimension names rather than the base units of the unit system. To do so:
1.Choose Worksheet Options from the Tools menu.
2.Click the Dimensions tab.
3.Check “Display dimensions” and click “OK.”
Unit Conversions
There are two ways to convert from one set of units to another:
•Use the Insert Unit dialog box, or
•Type units directly into the units placeholder. To convert units using the Insert Unit dialog box: 1. Click the unit you want to replace.
2.Choose Unit from the Insert menu or click on the Standard toolbar.
3.Double-click the unit you want displayed.
Figure 8-11 shows F displayed both in terms of fundamental SI units and in terms of several combinations of units.