


Appendices
This page intentionally left blank

APPENDIX A
Hearing Aid Batteries
Today, nearly all hearing aid batteries are the zinc air type. Each zinc air battery comes from the factory with a sticker on it. Removing the sticker turns the battery on. Once the battery has been activated, it continues to discharge even if the sticker is replaced.
As long as they’re stored properly and the stickers have not been removed, zinc air batteries have a shelf life of one or more years, depending on the manufacturer. Nonetheless, you should buy high-quality batteries where you know they’ll be fresh.
It’s necessary to use the battery size that’s correct for your hearing aid. Batteries come in standard sizes, although a given size may be labeled differently by different manufacturers. Fortunately, manufacturers use a standardized color code on their sticky tabs and packaging that makes it easy to find the correct size.
Generally speaking, a battery costs about $1.00 (or less if purchased in quantity) and will last anywhere from a few days (CIC) to a few weeks (BTE). This may sound like a short life compared to something like a watch battery; however, a hearing aid performs far more work than a watch and therefore requires more power. Battery life depends on the power of the hearing aid, the size of the battery, the type of circuitry in the hearing aid, the volume setting at which the aid is worn, the number of hours the aid is worn each day, and environmental conditions such as temperature and humidity.
Batteries should be stored at room temperature. Heat and cold shorten battery life.
Batteries should be stored in a dry place—not in the refrigerator. Cold, moist air from the refrigerator can cause condensation to form under the sticker, and that can cause the battery to discharge before you’re ready to use it.
Don’t carry batteries in a purse or pocket where they might contact metal objects like keys, coins, or other batteries. This could cause a battery to discharge,

268 |
Appendix A: Hearing Aid Batteries |
leak, or even rupture. Keep new batteries in their original packaging until needed.
Because hearing aid batteries are small, they can be difficult to see and handle. Look for packages that dispense one battery at a time, or batteries with longer sticky tabs that make them easier to use.
Batteries are harmful if swallowed, so they must be kept away from infants, children, pets, and people with poor eyesight who might mistake them for pills. If a battery is swallowed, consult the National Button Battery Hotline at 202- 625-3333 (collect calls accepted). Your physician or emergency room staff may also wish to call this number.
Batteries that have been fully discharged can be disposed of in your regular trash, but be sure to discard them where they can’t be found by infants, children, or pets.

APPENDIX B
Hearing Aid Drying Kits (Dehumidifiers)
Moisture of any type is harmful to hearing aids and can result in expensive repairs (or worse). Sources of moisture include perspiration and humidity, as well as accidental dips in the pool and unexpected downpours. Storing your hearing aids in a dehumidifier when they’re not in use improves their performance and prolongs their life. Simple, inexpensive dehumidifiers typically consist of silica crystals (or another desiccant) in an airtight container. Hearing aids are placed in the container, and the crystals absorb the moisture that has accumulated in them. After many uses, the crystals become saturated with moisture, and this is signaled by a change in their color. The crystals can usually be reactivated by heating them in an oven.
You may want to consider investing in an electronic dehumidifier. These offer features like a desiccant that absorbs moisture and dries earwax, germicidal lights that disinfect and sanitize, and fans that circulate warm air to dry the hearing aid’s components. Batteries should also go into the dehumidifier, because removing moisture from a battery can extend its life a bit. Of course, electronic dehumidifiers cost more than the simple, nonelectronic versions.

APPENDIX C
The International Symbol of Access
for Hearing Loss
Figure AC.1. The International Symbol of Access for Hearing Loss.
This symbol identifies locations where communication access for people with hearing loss is provided. For example, it’s used to identify public TTYs or telephones that have amplification, and meeting rooms, theatres, and churches that have assistive listening systems.

APPENDIX D
Care and Maintenance of Hearing Aids
CARE AND MAINTENANCE OF BEHIND-THE-EAR (BTE) HEARING AIDS
A BTE hearing aid attaches to a custom earmold that holds the aid on the ear and directs amplified sound into the ear canal (see Chapter 7). The earmold should fit snugly but comfortably.
Your BTE hearing aid should be wiped off each day with a soft, dry cloth (never use anything damp).
Check for earwax in the earmold’s sound bore (the hole where the sound comes out) each morning. Waiting until morning allows the wax to harden a bit, making it easier to remove. If the wax is close to the surface, gently lift or brush it out using the wax removal tool from your audiologist. Be careful not to push the wax farther into the earmold (to prevent wax from going in rather than coming out, try holding the earmold upside down over a soft surface while cleaning it).
The earmold itself should be cleaned each day using a disinfectant recommended by your audiologist (for example, a disinfectant towelette made especially for hearing aids). Do not use alcohol, because it can ruin the earmold’s surface. If you do not use a disinfectant, you should regularly remove the earmold from the hearing aid and wash it (but discuss this with your audiologist first). To remove the earmold, grasp the earhook of the hearing aid (rather than the hearing aid itself ) with one hand and gently twist the earmold tubing off the earhook with the other. Do not separate the tubing from the earmold or the earhook from the hearing aid. Once the earmold has been disconnected from the hearing aid, wash the earmold (but not the hearing aid!) with soap and warm (not hot) water. Be sure the tubing and earmold are completely dry before reattaching them to the earhook of the hearing aid. To be sure, blow through the tubing or, better yet, use a rubber bulb to squeeze air through it (a tool like this can be obtained by
272 |
Appendix D: Care and Maintenance of Hearing Aids |
your audiologist). When you reattach the earmold, be sure to orient it in the correct direction relative to the hearing aid. (Holding it in your hand, assume that you’re looking at your head and the earmold from the rear. Envision the long [canal] portion of the earmold pointing toward your ear canal, and the hearing aid going behind your ear.) If you wear two hearing aids, it’s a good idea to wash, dry, and reattach the earmolds one at a time so you don’t confuse them.
When your earmold tubing becomes hard, cracked, or stretched, it must be replaced by your audiologist; check daily to be sure it’s in good condition and doesn’t contain droplets of moisture.
Some of the new BTEs used with open canal fittings have a slim tube attached to a tiny eartip that delivers sound into the ear canal. Both the tube and eartip need to be cleaned daily. The tube (and the eartip attached to it) should be removed from the hearing aid and wiped with a damp cloth. A cleaning rod or reamer should be used to push wax and debris all the way through the tube. Be cautious about using water, because it may become trapped inside the tube.
CARE AND MAINTENANCE OF CUSTOM HEARING AIDS
There are no separate earmolds with “custom” hearing aids: in-the-ear (ITE), in-the-canal (ITC), and completely-in-the-canal (CIC) hearing aids (see Chapter 7). With these styles, the hearing aid itself fits into the ear. Like earmolds, custom hearing aids should fit snugly but should not be uncomfortable.
Each day, you should clean your hearing aids with a disinfectant recommended by your audiologist. Do not use alcohol, and never get them wet.
Check for earwax in the microphone and sound bore (the hole where the sound comes out) each morning. Earwax is a constant problem with custom hearing aids and the major reason for repairs. Waiting until morning allows the wax to harden a bit, making it easier to remove. If the wax is close to the surface, gently lift or brush it out using the wax removal tool from your audiologist. Be careful not to push the wax farther into the hearing aid (to prevent wax from going in rather than coming out, try holding the aid upside down over a soft surface while cleaning it).
Ask your audiologist about the advisability of using a guard to protect your hearing aid from wax.

APPENDIX E
Troubleshooting Hearing Aid Problems
If your hearing aid isn’t working properly, try these things before calling your audiologist (it could save you time and money):
Read the information that came with your hearing aid; there might be a simple solution to the problem.
If your hearing aid or battery is very cold or very hot, allow it to return to room temperature.
Try a fresh battery. Be sure the battery is the right size for your hearing aid and that you have inserted it correctly (usually, the + side goes up). If you’re uncertain about the status of your batteries, invest in an inexpensive battery tester (see your audiologist). Properly dispose of old batteries so they don’t get mixed up with new ones.
Be sure the battery compartment door is completely closed (but don’t force it).
If your hearing aid has an on/off switch, be sure it’s turned on. Some hearing aids have an M/T/O switch. In this case, M means microphone, T means telephone, and O means off. Unless you’re using the telephone, the switch should be in the M position.
If your hearing aid has a volume control, be sure it’s set properly. Generally, the volume should not be set at full-on.
If your hearing aid has a button that allows you to switch programs, be sure you have selected the correct program.
Using a magnifying glass and a bright light, look for wax in the sound bore (the hole where the sound comes out) of the hearing aid or earmold. If you see wax, carefully remove it with your wax removal tool.
Similarly, check for wax in the microphone opening.
Remove excess wax from your ear canals. Too much wax can cause hearing aids to whistle, amplification to seem weak, or your voice to sound hollow. You can

274 |
Appendix E: Troubleshooting Hearing Aid Problems |
remove wax with an over-the-counter product designed to soften it, but consult your physician first.
Check the earmold tubing (if you have a BTE) for moisture. When warm air from inside your ear reaches the outside where it’s cooler, water vapor condenses and can collect in the tubing. Remove the earmold from the hearing aid and blow the moisture out.
If the tubing has become hard or cracked, have it replaced (see Appendix C).
Check to be sure the tubing isn’t being twisted when you position the hearing aid behind your hear.
Check to be sure the hearing aid or earmold is sitting in your ear properly. An improperly inserted hearing aid/earmold will reduce the amplification that reaches your ear.
Check to be sure that you aren’t trying to put the right hearing aid (or earmold) into the left ear or vice versa.
Use a dehumidifying kit to remove any moisture from the hearing aid (see Appendix B).
Check the battery contacts for corrosion; if the contacts look dirty or corroded, gently clean them with a cotton swab and a tiny bit of alcohol (but not enough to get the hearing aid wet).
If feedback is the problem, try to determine its cause. Hearing aids whistle temporarily when something (like your hand) covers them, trapping amplified sound and causing it to be reamplified. Persistent feedback, however, can suggest that the hearing aid (or earmold) no longer fits or isn’t inserted properly. Remove the hearing aid (or earmold) from your ear and place your finger tightly over the sound bore. If the feedback stops, fit or insertion is the likely problem. If the feedback continues, the hearing aid itself might need repair. Feedback can also mean the hearing aid’s volume is set too high, the ear canal is plugged with wax, or there’s a problem with the earmold tubing (it’s cracked, blocked by earwax, or contains moisture).
If you try these things and the hearing aid still isn’t working, call your audiologist. Do not attempt to make repairs yourself; that could violate the hearing aid’s warranty.

APPENDIX F
Speechreading
TIPS FOR IMPROVING SPEECHREADING WHEN YOU ARE THE LISTENER
Face the speaker and get as close as possible (3–6 feet is usually ideal).
Look directly at the speaker; watch her lips, facial expressions, gestures, and body language.
Be sure the light is on the speaker’s face rather than behind him.
Tell the speaker what she can do to help you speechread, and be specific.
Ask for the topic, and ask the speaker to let you know when the topic changes.
When conversing with several people, ask each of them to signal (by nodding or raising a finger, for example) when they begin to speak. This will help you to locate the person who is speaking more quickly.
Don’t try to get every word; instead, try to relax and get the gist of the message (words or phrases that come later may help to clarify things you missed earlier).
When you miss something, ask the speaker to rephrase rather than repeat.
Stay abreast of current events; this improves your ability to benefit from context.
Wear your hearing aids; it will improve your ability to speechread. There’s a synergistic relationship between hearing ability and speechreading ability; the ability to hear improves the ability to speechread and vice versa. Interestingly, many of the sounds that are hardest to hear (for example, weak, high-frequency consonants like /s/, /f/, and /th/) are easiest to see, whereas many of the sounds that are hardest to see (for example, more powerful, low-frequency vowels) are easiest to hear. This is one of the ways in which hearing and speechreading complement one another.
Take breaks as needed (this is hard work!).

276 |
Appendix F: Speechreading |
ADDITIONAL TIPS FOR IMPROVING SPEECHREADING WHEN YOU ARE THE SPEAKER
Look directly at the listener.
Don’t begin speaking until the listener is looking at you.
Don’t obscure your face with your hands, the newspaper, or other objects.
Don’t eat, chew, or smoke while talking.
Don’t turn away while talking.
Don’t exaggerate lip movements, talk too fast, or shout.

APPENDIX G
The Listening and Communication
Enhancement (LACE) Program
To communicate effectively, you must have good listening skills, be able to process speech rapidly, and have the ability to remember what you hear (auditory memory). These abilities can be degraded by hearing loss and the natural aging process. LACE is a computer training program designed to strengthen those abilities through auditory training. Just as physical therapy can strengthen muscles to compensate for physical weakness or injury, LACE can strengthen skills and strategies to compensate for hearing loss. The program requires 30 minutes of training each day, 5 days a week, for 4 weeks. It’s home based, self-paced, and interactive. It’s intended to supplement rather than replace the counseling you receive from your audiologist.
The auditory training exercises are designed to improve your auditory memory, the speed at which you process information, your understanding of speech when several people are talking, and your ability to use contextual cues. In addition, LACE provides information about hearing loss and offers communication tips for you and the people with whom you interact. It helps train the brain to fill in the gaps that occur even with hearing aids and demonstrates that it’s possible to comprehend a message without understanding every word. The program is designed to help you feel more confident about what you think you heard.
LACE training is adaptive, meaning that it’s never too difficult on too easy (when a response is correct, the next item will be slightly more difficult; when a response is incorrect, the next item will be slightly less difficult). In other words, training intensifies as skills improve. The user receives feedback after each response and at the end of each session; the information is transmitted confidentially to the audiologist.

278 Appendix G: The Listening and Communication Enhancement Program
In a 2007 study that tracked 625 people who bought new hearing aids during a 6-month period, users who used LACE were four times more likely to be satisfied with their hearing aids than those who did not. Statistical analysis indicated that there were no significant differences between the two groups other than LACE participation.1
LACE runs on almost any version of Microsoft Windows and can also be used on an Apple Macintosh (Mac) computer. It’s designed for computer novices.

APPENDIX H
Communicating When You Are Not
at Home
IMPROVING YOUR ABILITY TO FUNCTION IN THE WORKPLACE
Wear hearing aids that are up to date and in good working order; wear two hearing aids if that’s what your audiologist recommends and you can afford it.
Be assertive about your needs; ask your employer for appropriate accommodations. For example
Move your work to a quieter area, or make your work area more quiet (avoid photocopiers, heating/cooling systems, busy areas where people congregate to talk, and other sources of noise).
Use a telephone with an amplifier or a text telephone.
Use flashing lights or vibration to signal fire, the telephone ringing, or the end of machine cycles.
Use an assistive listening device at meetings; ask for important information to be conveyed in writing.
Explain your hearing loss to supervisors and coworkers. Give them specific suggestions about how they can help you (for example, by getting your attention before they speak, speaking clearly, moving closer and facing you, speaking one at a time, minimizing background noise, and using email instead of the phone to convey information).
Help your coworkers to understand that hearing aids help, but they don’t make hearing normal; explain that speechreading also has limitations, and that hearing is more difficult in some situations than others.
Because functioning with a hearing loss can be hard work
Schedule less demanding tasks between more demanding ones
Keep difficult situations and difficult people in perspective; give people the benefit of the doubt
Keep your self-confidence and your sense of humor!

280 Appendix H: Communicating When You Are Not at Home
IMPROVING HEARING IN THE CAR
Turn off the radio or CD player.
Close the windows to minimize traffic and wind noise.
If you have a better ear, sit with it facing the center of the car.
If you wear two hearing aids, reduce the volume on the one closest to the window.
Invest in an assistive listening device.
IMPROVING HEARING IN RESTAURANTS
Restaurants pose special problems for people with hearing loss (and sometimes for people with normal hearing). Noise is a common complaint, ranking close to poor service. A noise rating system would be helpful, but until that happens, here are a few tips for making dining out more pleasurable:
Whenever possible, choose restaurants with less noise and good acoustics.
Restaurants with low ceilings, carpeting, tablecloths, fabric-covered furniture, and window treatments made of soft materials are likely to be less noisy.
Smaller restaurants with fewer tables, or restaurants with tables arranged in several small rooms rather than one large one, are likely to be quieter. In general, more upscale restaurants tend to be less noisy.
Look for places that do not play recorded background music, and definitely avoid those with live entertainment if you want to have conversation. If recorded music is playing, explain your problem to the manager and ask her to turn it off while you’re dining (be assertive!). Be aware that you are not alone; the disturbance caused by recorded music is a common complaint among diners.
Choose to dine before or after the crowd; restaurants are quieter when they are not busy.
Call ahead and request a “quiet” table in a well-lit area (away from the restaurant’s entrance, bar, kitchen, fountain, heating/cooling system, and sound system speakers).
Ask for a booth or a table in a corner, rather than in the middle of the room.
If you have directional microphones on your hearing aids, sit with the background noise behind you. If you do not have directional microphones, it’s usually best to sit with your back to the wall (to minimize noise coming from behind).
At the table, position yourself where you can hear and see best (for example, sit with your better ear directed toward the conversation, do not look into light coming from a window, and so forth).
Dining with a group is challenging; if possible, choose a round table rather than a rectangular one so you can see the faces of your companions. Ask your companions to speak one at a time.
Look for a restaurant with adequate lighting to facilitate speechreading.
Move tall objects (flowers, candles, menus) that obscure your view of others.
Read the specials as you come in, rather than relying on your ability to hear the waiter when he describes them (or ask for them in writing at your table).

Appendix H |
281 |
Read the menu carefully so that you can anticipate the choices you will be asked to make (for example, if you must choose a salad dressing, read the list of alternatives ahead of time).
Consider investing in an assistive listening device (for example, a personal FM system).
Let your dining companions know what they need to do to help you understand them (be assertive!).
IMPROVING HEARING IN AUDITORIUMS, THEATERS, OR MEETING ROOMS
Contact the facility ahead of time to ask if it has an assistive listening system for its patrons who are hard of hearing. Most public facilities are required by law to provide such a system at no charge.
If the facility does not have a system, ask why. If you believe the law requires a system, let them know. To find out, read the Public Accommodations section of the “ADA Questions and Answers” brochure available at www.ADA.gov/publicat.htm, or call the ADA Information Line at 1-800-514- 0301. Make suggestions about what you find most helpful at other facilities. Volunteer to help as a “consumer consultant.”
If an assistive listening system is available, become familiar with it. Make arrangements to meet with someone knowledgeable, preferably the person responsible for the system. Other employees may have little or no experience with it (in some cases, even the person who has been assigned responsibility for it has limited experience).
When it’s not possible to visit the facility ahead of time, arrive early. Inquire at the ticket window or look for the “International Symbol of Access for Hearing Loss,” which will direct you to the facility’s assistive listening system (see Appendix C).
If you are not using the assistive listening system, arriving early gives you time to find a seat where you can see and hear best, for example, away from background noise, as close to the speaker(s) as possible, with your better ear directed toward the speaker(s), with your back to the light source, etc.
Learn as much as possible about the program that you are attending ahead of time.
IMPROVING HEARING IN PLACES OF WORSHIP
If your place of worship does not have an assistive listening system, ask for one (consider volunteering to do the research); the system should work in all rooms where people communicate.
If there’s already a system in place, volunteer to help maintain it, make others aware of it, and teach others how to use it.
Ask all speakers to use the system at all times.
If it’s not possible to get an assistive listening system that everyone can use, consider buying an assistive listening device for your own use.
Sit as close to the front as possible.
282 Appendix H: Communicating When You Are Not at Home
Sit with a friend who can tell you about announcements or changes that are not printed in the bulletin or program.
Ask for a copy of the sermon/homily/message ahead of time.
IMPROVING HEARING DURING TRAVEL
When making hotel reservations, request accommodations for your hearing loss. In the United States, hotels with more than five rooms are legally obligated to provide minimal accommodations in at least some of their rooms. Accommodations may include an amplified telephone, a TTY, alerting devices, and so forth.
Use closed captions on your television to avoid disturbing other guests.
Invest in an assistive listening device (for example, a personal FM system or a personal communicator) for car travel.
When traveling by airplane, ask someone working at the gate to let you know about changes announced over the PA system. Ask someone sitting near you to do the same. On the plane, tell the flight attendant and your seatmate that you may be unable to hear announcements.
Invest in an assistive listening device for guided tours and activities; sit or stand as close to the guide as possible; ask for information in writing ahead of time.
In case of emergency, carry a card (available from the Hearing Loss Association of America) explaining your hearing problem.
IMPROVING HEARING DURING HOSPITAL STAYS
A hospital stay can be especially difficult for a patient with hearing loss. Some of the reasons include
At best, you’re not feeling well (and at worst, you could be gravely ill).
You may not be wearing your hearing aids (you may not feel well enough to put them on or they may whistle when you lie down).
To make matters worse, you may not be wearing your eyeglasses either.
Hospital rooms are filled with hard surfaces, making the acoustics poor.
People tend to speak in low voices so that they don’t disturb other patients.
Hospitals have become very noisy places. According to researchers at Johns Hopkins University, between 1960 and 2006, average noise levels rose from 57 dB to 72 dB during the day and from 42 dB to 60 dB in the evening.1
You may be awakened at all hours by well-meaning nurses and aides who sometimes talk in the dark, with their faces turned away, or while wearing masks.
Nurses may use the intercom to respond to the call button, making it difficult for you to understand.
You may be unable to hear the telephone or television (at least without disturbing others).
If you are unable to hear a knock on a closed door, your privacy may be invaded.
You may feel anxious about missing instructions or announcements.
You may have difficulty understanding your doctor, whose visit may be very brief and who might use terms that are unfamiliar to you.

Appendix H |
283 |
Here are a few things that can help:
Whenever possible, inform hospital staff about your hearing problem ahead of time; of course, you will need to remind them when you arrive.
Let hospital staff know that you may have trouble understanding when you’re not wearing your hearing aids, if personnel are wearing masks, or when messages come over the intercom. Tell them how they should communicate with you. For example, ask to have important information provided in writing.
By law, hospitals must provide accommodations (at no charge) that enable people with hearing loss to communicate with doctors, nurses, and other personnel (private practitioners are obligated to do the same). Explain the type of accommodations that will be helpful (for example, a personal communication device, an amplified telephone with visual alert, or a personal FM device).
Ask that the International Symbol of Access for Hearing Loss be posted on your door and in your medical records to indicate that you have a hearing loss (see Appendix C).
Store your hearing aids safely to guard against loss or damage.

Appendix I
Sound Levels of Recreational,
Occupational, and Military Noise
Sources
Figure AI.1. Means and Ranges for Sound Levels of Recreational and Natural Noise Sources. (From the Noise Navigator Database; with permission from Elliott Berger, Senior Scientist, Auditory Research, E-A-R/Aearo Technologies.)
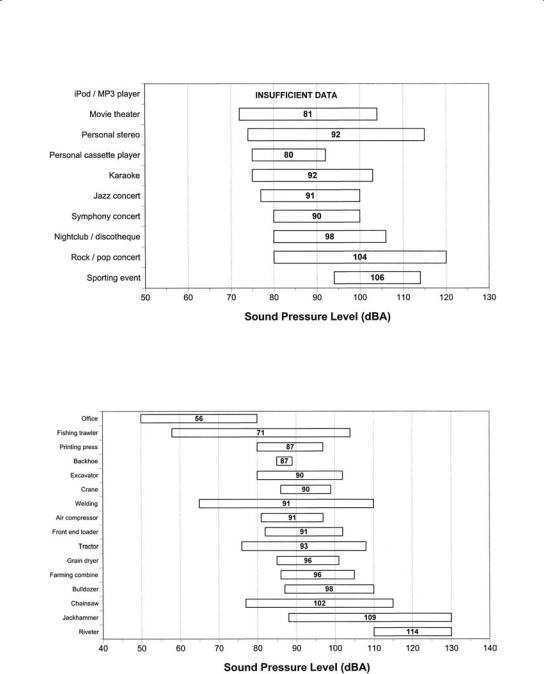
Figure AI.2. Means and Ranges for Sound Levels of Entertainment Noise Sources. (From the Noise Navigator Database; with permission from Elliott Berger, Senior Scientist, Auditory Research, E-A-R/Aearo Technologies.)
Figure AI.3. Means and Ranges for Sound Levels of Occupational Noise Sources. (From the Noise Navigator Database; with permission from Elliott Berger, Senior Scientist, Auditory Research, E-A-R/Aearo Technologies.)

Figure AI.4. Means and Ranges for Sound Levels of Common Weapons and Explosive Devices. (From the Noise Navigator Database; with permission from Elliott Berger, Senior Scientist, Auditory Research, E-A-R/Aearo Technologies.)
Figure AI.5. Means and Ranges for Sound Levels of Military Equipment and Aircraft. (From the Noise Navigator Database; with permission from Elliott Berger, Senior Scientist, Auditory Research, E-A-R/Aearo Technologies.)