

Учебники / Middle Ear Surgery
.pdf16 4 Postoperative Treatment
There is no objection to the patient diving if the ear is dry, the outer ear canal is normal and the pressure equilibration is sufficient. Patients with infected ears and radical cavities should refrain from diving.
Chapter 5 |
17 |
|
|
5 Local Anaesthesia
Holger Sudhoff, Henning Hildmann
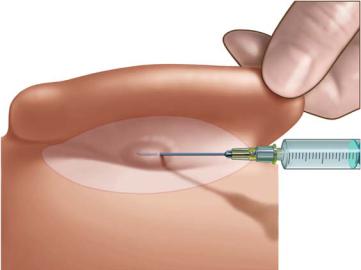
Local and general anaesthesia can be used for middle ear surgery. However, both forms require the use of local injection to reduce intraoperative bleeding and intraand postoperative pain. Local anaesthesia is achieved by the subcutaneous injection of 1 % or 2 % local anaesthetic with 1:100,000 adrenaline using a 2-ml syringe. It can be applied in combination with sedation in local or in general anaesthesia. For this the auricle is pulled forward and a depot is placed in the postauricular fold (Fig. 5.1). The needle is then advanced further under permanent application of local anaesthetic towards the posterior canal skin, then pulled back and advanced superiorly and inferiorly to the prior injection site (Fig. 5.2). Subsequently the ear canal is opened with a nasal speculum, allowing subperiostal injection at the 3, 6, 9 and 12 o’clock positions (Fig. 5.3). The bevelling of the needle is placed against the bone and the anaesthetic is injected until the ear canal skin turns white and becomes prominent. The ear canal is sealed with a cotton ball prior to disinfection to avoid the penetration of potentially ototoxic substances into the middle ear cavity if a perforation is present. In some cases the local anaesthesia is insufficient for the promontorial region innervated by the tympanic nerve. This can be overcome by the topical application of lidocaine solution.
Fig. 5.1

18 5 Local Anaesthesia
Fig. 5.2
Fig. 5.3
General Anaesthesia
General anaesthesia is used for extended and long-lasting procedures, generally in children and non-cooperative patients (handicapped or language-defi- cient). Routine preoperative examinations are performed.
Chapter 6 |
19 |
|
|
6 Approaches to the Middle Ear
Andre Gurr, Holger Sudhoff, Henning Hildmann
The decision as to perform transcanal, endaural or a retroauricular approach should be based on the preoperative evaluation. The expected extent of surgery, the necessity of opening the mastoid, the given anatomical findings, e.g. a narrow or angled external ear canal and a bulging anterior external ear canal wall, all have to be considered. The position of the sigmoid sinus and the depth of the dura are further aspects to be taken into account. Smaller central perforations and fresh traumatic perforations can be closed through a transcanal approach using a speculum.
The transcanal approach is the least traumatic approach and can be used for office procedures and small perforations. The endaural approach is generally used for surgery within the middle ear. It mainly comprises the region which can be seen by examining the patient preoperatively with the speculum, i.e. before stapes surgery and tympanoplasties without work in the mastoid.
Transcanal Approach
This approach can be used for small central and small residual central perforations, but a good overall view is essential. The use of self-retaining specula allows bimanual manipulations. Local anaesthesia should be restricted to avoid bulging and to ensure good access to the tympanic membrane. Essentially the transcanal approach is considered as an office procedure. We do not use this approach for stapes surgery.
Endaural Approach
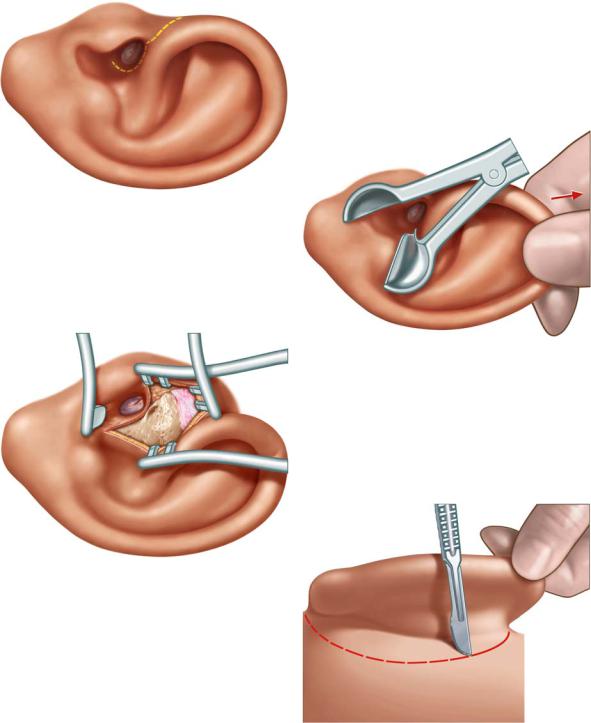
Most central perforations in chronic otitis media can be treated using an endaural approach. Enlargement of the ear canal and the partial reduction of a prominent anterior canal wall to expose the anterior part of the drum may be necessary. Additionally, tragal cartilage or perichondrium can easily be harvested by extending the incision to the anterior portion of the external meatus. However, the amount of perichondrium accessible from that approach may not be sufficient for the closure of subtotal perforations. The endaural approach – as shown by the dashed yellow line – is faster and less traumatic compared to the retroauricular approach (Fig. 6.1). It is facilitated by the assistance of the nurse retracting the auricle posterior-superiorly without bending the helix cartilage (Fig. 6.2). The lateral portion of the ear canal is expanded by an ear speculum using the left hand. The surgeon now has a good view over the

20 6 Approaches to the Middle Ear
superior entrance of the external ear canal between the helical and the tragal cartilage.
The intercartilaginous incision starts with a No. 10 scalpel with permanent contact to the bony external ear canal. The incision is extended parallel to the anterior portion of the helix upwards in a smoothly curved line with reduced pressure. This procedure reduces the risk to the superficial temporal vein and avoids bleeding (Fig. 6.1).
A second skin medial circumferential incision is placed 4 – 5 mm medial to the introitus of the external ear between the 6 and 12 o’clock positions and is extended to the intercartilaginous incision. The underlying soft tissue and periosteum are pushed laterally using a raspatory, exposing the suprameatal spine and tympanomastoid fissure. A small portion of the mastoid cortex will be exposed as well. A self-retaining retractor with sharp edges elevates the laterally based skin flap. A second self-retaining retractor is placed at a 90° angle to the first retractor with its blunt edge against the anterior portion of the external ear canal and the tragus (Fig. 6.3). The view may be obstructed by a prominent suprameatal spine or by a bulging bony anterior external meatus, which have to be drilled away. In the case of a perforation the middle ear should be protected against bone dust by gelatine balls. Irrigation may dislocate the elevated tympanomeatal flap by winding or tearing it. Therefore the use of diamond burrs is preferable adjacent to the tympanomeatal flap.
Retroauricular Approach
Even though mastoid surgery can be done from an endaural incision, e.g. with an extended Heermann’s incision, we prefer a retroauricular approach for most situations when surgery in the mastoid is expected. We feel the overview is easier especially for cavity reduction techniques, such as removal of the tip of the mastoid or harvesting flaps for obliteration.
The retroauricular approach is preferable for assessment of the sinus-dura angle, air cells behind the sigmoid sinus and the potentially pneumatized posterior portion of the zygomatic arch. The exposure of the internal tabula of the middle and posterior cranial fossa is easily achieved by the retroauricular approach. A meatoplasty to enlarge the entrance of the external ear canal requires sufficient resection of conchal cartilage in selected cases. Large fascia and cartilage-perichondrium transplants are collectable from the concha. If soft tissue flaps are needed, the postauricular skin incision has to be 1.5 cm distant to the retroauricular fold.
The skin incision is performed by pulling the auricle anteriorly as illustrated by the red dashed line in Fig. 6.4. If a muscle-soft tissue flap is not necessary, the auricle is pulled forward and the skin and subcutis are incised from upwards down. Afterwards the scalpel should be used with permanent contact to the bony mastoid. Putting the left middle finger into the entrance of the external ear canal and bending the auricle forwards with the thumb and index
6 Approaches to the Middle Ear |
21 |
|
|
Fig. 6.1
Fig. 6.2
Fig. 6.3
Fig. 6.4

22 6 Approaches to the Middle Ear
finger, an incision is made to open the access to the external ear canal. The mastoid plane is exposed with a subcutaneous unloading incision angled at 90° as marked by the dashed red line in Fig. 6.5.
If fascia is needed, retractors are placed into the superior part of the incision, the covering soft tissue is pushed away and the necessary amount is removed.
The ear canal is opened from its posterior portion (Fig. 6.6). The retroauricular skin, the suprameatal spine and the entrance of the bony external ear canal are exposed. The meatal skin is incised from 12 to 6 o’clock 4 – 5 mm medial to the entrance of the ear canal to avoid injuring the anterior ear canal skin (red line).
By a second incision the canal is opened and the retractors are placed according to Fig. 6.6.
Tympanomeatal Flap
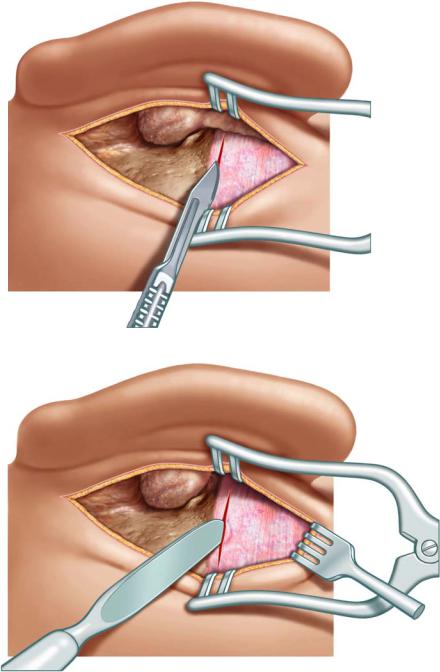
The tympanomeatal flap must be shaped according to the specific pathological findings of the tympanic membrane. Generally a No. 15 scalpel is used to incise the posterior skin of the external meatus between a 6 and a 12 o’clock position. The incision will be reinforced with the Plester’s knife (Fig. 6.7).
The elevation of the tympanomeatal flap is created using the Plester’s knife until the ligamental portion of the annulus tympanicus can be posteriorly and circumferentially seen close to the annulus; the angled knife is used, the blade drops into the sulcus and lifts it out of its position in its posterior portion (Fig. 6.8). The not-transected skin adjacent to the annulus can be cut with the Bellucci scissors to avoid disruptions of the tympanomeatal flap. Separating the soft tissue from the bone, the surgeon must work immediately on the bone, especially separating the fibres along the tympanomastoidal fissure line, which avoids tearing the flap. The suction is applied behind the knife. Otherwise the tissue is constantly pulled into the suction and slows down the procedure considerably.

6 Approaches to the Middle Ear |
23 |
|
|
Fig. 6.5 |
Fig. 6.6 |
Fig. 6.7 |
Fig. 6.8 |

24 Chapter 7
7 Harvesting and Processing
of Soft Tissues
Holger Sudhoff, Henning Hildmann
The temporalis fascia can be harvested using an endaural, retroauricular approach or by an additional superior laterally based skin incision. After having inserted the self-retaining retractors during the endaural approach, it is preferable to harvest the temporalis fascia to avoid readjustment of the retractors. The retractor is placed into the upper part of the incision. The overlying soft tissue is pushed aside by a raspatory (Fig. 7.1). The soft tissue overlying the solid fascia should not be used for tympanic membrane closure. The density of fibres is too low. Atrophic scars result after healing.
The fascia is exposed. The temporalis fascia is incised parallel to the linea temporalis, taking care not to injure the muscle (Fig. 7.2). A hook is inserted into the upper edge of the incision. The undersurface of the temporalis fascia is separated from the underlying muscle with a raspatory and the fascia is removed with dissecting scissors (Fig. 7.3). Attention should be paid not to injure the adjacent vessels. If the preparation is restricted to the fascia, no bleeding will occur as marked by the red dashed line in Fig. 7.4. Bleeders from the muscle or the margins of the fascia need to be coagulated or even ligated at this stage.
Fig. 7.1
7 Harvesting and Processing of Soft Tissues |
25 |
|
|
Fig. 7.2
Fig. 7.3