

ID Technical Book, англ. яз
.pdfPRODUCT SPECIFICATIONS 3.0
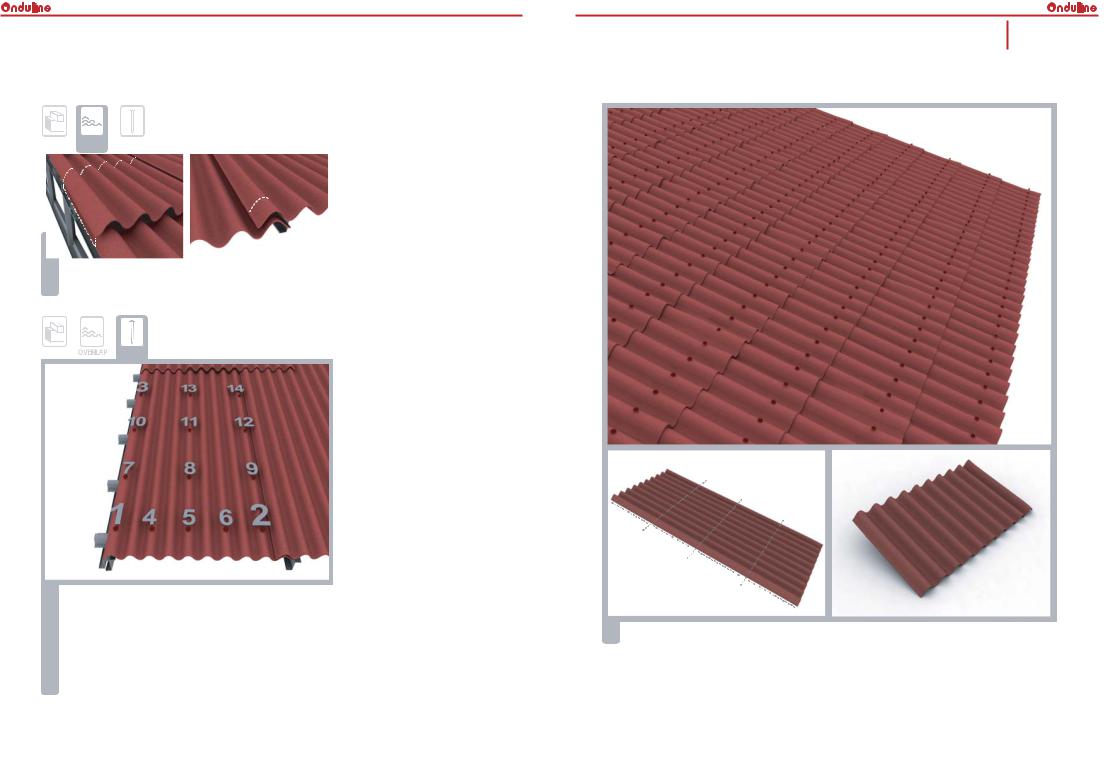
3.1 Onduline classic sheet
FRAME OVERLAP FIXING
The original bitumen-saturated corrugated roofing sheet with characteristics, versatility and benefits that are suitable and applicable for most types of building and others use such as undersheeting, oversheeting and wall-cladding.

 1
1  2
2
Available in Black, Brown, Red and Green.
1.For the end overlap, use minimum 30 cm.
2.For the side overlap, use minimum 2 corrugations.
3.2 Onduline ridge
|
Manufactured from the same material and quality as |
|||
FRAME OVERLAP FIXING |
Onduline |
Classic. Flexible |
double |
wings |
|
accommodate a wide range of roof angles. |
|
||
Available in same 4 colors as the Onduline Classic.
3.3 Onduline verge
Designed to provide a weatherproof seal at the verge, this unit is made from the same quality material as Onduline Classic.
1. 16 nails should be hammered per sheet
Available in same 4 colors as the Onduline Classic.
- 8 nails at each corrugation at the end overlap or eaves - 2 intermediate rows of 4 nails
2. Nails should be hammered at each corrugation at the end overlap and side overlap
3. As Onduline is a flexible material, it is important to follow the nailing order and pattern
8 |
29 |
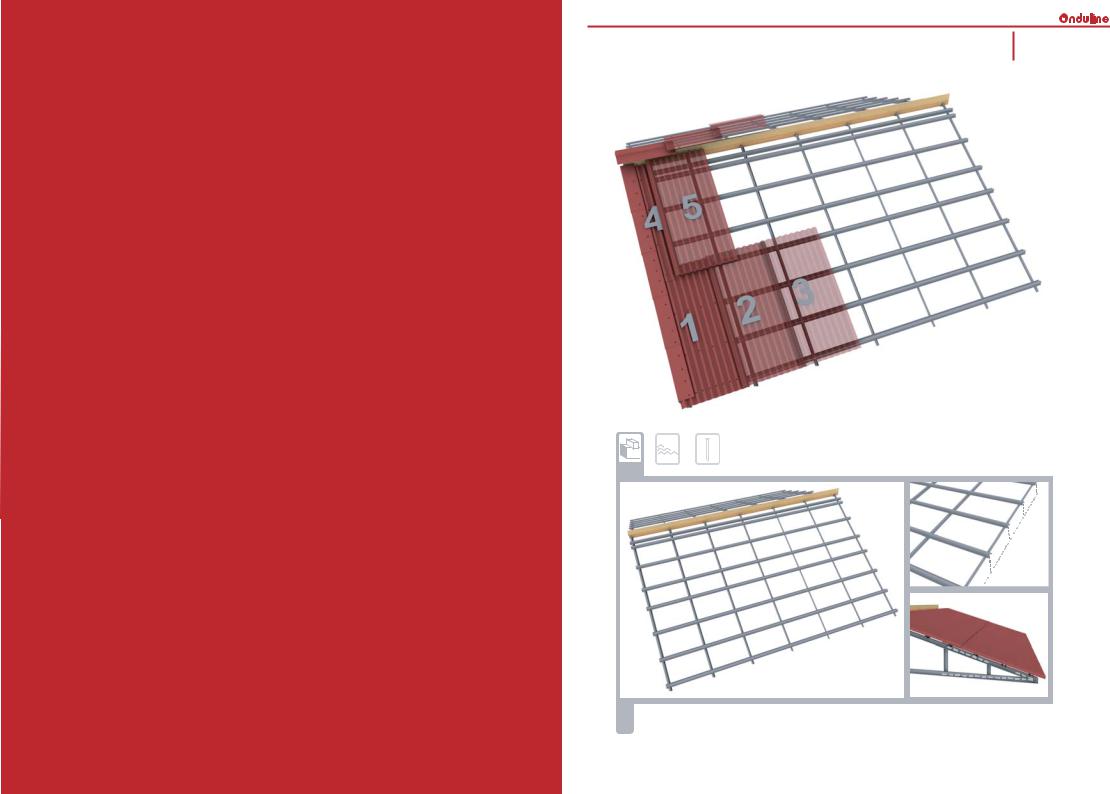
SUMMARY / GENERAL 1.4.1
Metal frame with roof pitches over 15o ( >27% )
FRAME OVERLAP FIXING
61 |
|
m |
c |
max |
|
|
|
61 |
cm |
max |
|
61 |
cm |
max |
|
>15


1.For roof pitches over 15 degrees, Onduline sheet shall be supported by purlins with maximum width
distance of 61 cm. In particularly high conditions of temperature and humidity please ask our technical service.
9

FRAME OVERLAP FIXING
17
CM

 1
1
1.For the end overlap, use minimum 17 cm.
2.For the side overlap, use minimum 1 corrugation.
FRAME |
|
FIXING |
|
|
|||
|
|
|
|
|
|
|
|
1.11 screws should be drilled per sheet
-5 screws at each corrugation at the end overlap or eaves
-3 screws at first intermediate purlin of the sheet
-3 screws at second intermediate purlin of the sheet
2.Screws should be drilled at each corrugation at the end overlap and side overlap
3.As Onduline is a flexible material, it is important to follow the fixing order and pattern
product specifications
10

SUMMARY / GENERAL 1.4.2
Metal frame with roof pitches 10o - 15o ( 17% - 27% )
20
 c m
c m
1. Fix 20 cm overlap to create a pleasant tile effect shadow line.
FRAME OVERLAP FIXING
cm |
max |
45 |
|
45 |
cm |
|
max |
|
45 |
cm |
|
max |
|
10-15


1. For roof pitches 10 to 15 degrees, Onduline sheet shall be supported by purlins with maximum width distance of 45 cm.
28 |
11 |
FRAME OVERLAP FIXING
20 |
1 |
|
CM |
|
|
|
|
|
|
|
|
1.For the end overlap, use minimum 20 cm.
2.For the side overlap, use minimum 1 corrugation.
FRAME FIXING
1. 14 screws should be drilled per sheet
- 5 screws at each corrugation at the end overlap or eaves - 3 screws at first intermediate purlin of the sheet
- 3 screws at second intermediate purlin of the sheet - 3 screws at third intermediate purlin of the sheet
2. Screws should be drilled at each corrugation at the end overlap and side overlap.
3. As Onduline is a flexible material, it is important to follow the fixing order and pattern.
INSTALLATION DETAILS 2.16
Tile effects
50 |
cm |
|
50 |
cm |
|
50 |
cm |
|
50 |
cm |
|
1. Cut Onduline sheets into 50 cm with saw. Make sure the blade accurately greased before cutting.
12 |
27 |

|
|
|
|
|
|
|
|
|
|
|
|
|
|
|
|
|
|
|
|
|
|
|
|
|
|
|
2.15 |
|
INSTALLATION DETAILS |
|
SUMMARY / GENERAL |
|
1.4.3 |
||
|
|
|
||||||
|
|
|
|
|
|
|
||
|
|
|
Curved roofs / Domes |
|
Detail fixing steps |
|
|
|


 50cm
50cm
 17cm
17cm
 45cm
45cm
 45cm
45cm
 61cm
61cm
 36cm
36cm
 36cm
36cm
 45cm
45cm
When the frame design is established, continuously setup the lines courses to get the right positions of purlins :
-Top dome : ( pitch <17% ) - maximum span is 36 cm
-17% < pitch<27% - maximum span is 45 cm
-Pitch > 27% - maximum span is 61 cm
At rooftop ( slope = 0% )
-Avoid sheet overlap ( lay the top sheet centered in its middle )
-No sheet overhang more than 7 cm
-Side lap : 2 corrugations
1. As Onduline is a flexible material, it is important to follow the fixing order and pattern
2. Use only Onduline recommended fasteners
3. Fix every corrugation at eaves, sheets overlaps and either side of vertical joints
4. Fix every corrugation on intermediate purlins
5. Fastening must always be carried out at the top of corrugation
500cm |
min |
|
26 |
13 |
|
|
|
|
|
|
|
|
|
|
|
|
|
|
|
|
|
|
|
|
|
|
|
|
INSTALLATION DETAILS |
|
2.14 |
|
|
|
|
|
|||
|
|
|
|
|
|
|
|
|
|
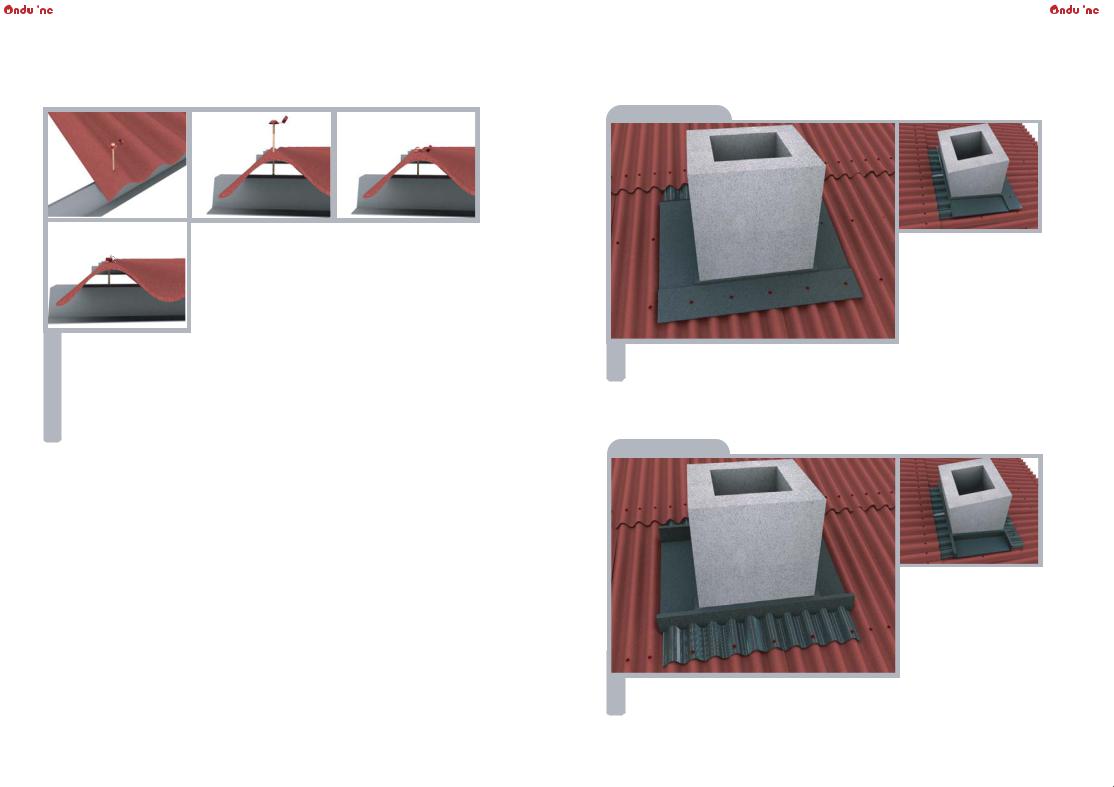
Chimneys |
|
|
|
Zinc chimney flashing
1.Select the correct type of drill screw to suit purlin type. Place the head of the drill screw in the socket of the drive tool. Align the top side of the corrugation with the centre of the purlin.
2.Drive the drill screw through the top of the corrugation and the purlin until the corrugation is correctly stressed.
3.The use of the drill with an adjustable torque setting is recommended to avoid over compressing the
4.corrugation
If you have been using an Onduline Safe Top cap, close the cap tightly
1.Fixing must be done to make it totally waterproof and ensure no water accumulation at its back.
2.A specific roofing document for Chimney installation is available on request.
GRP chimney flashing
1.Fixing must be done to make it totally waterproof and ensure no water accumulation at its back.
2.A specific roofing document for Chimney installation is available on request.
14 |
25 |

2.10 INSTALLATION DETAILS
Valley
Using a plate of metal
1.Fix valley board / trim purlin and line with metal pre-formed unit
2.The vertical valley depth should be 7.5 cm
3.The sheets are cut across (parallel to the valley line). The overhang is 4 cm
Using Onduline valley
1.Fix valley board / trim purlin and line with Onduline valley
2.The vertical valley depth should be 7.5 cm
3.The sheets are cut across (parallel to the valley line). The overhang is 4 cm
75mm min
75mm min
min
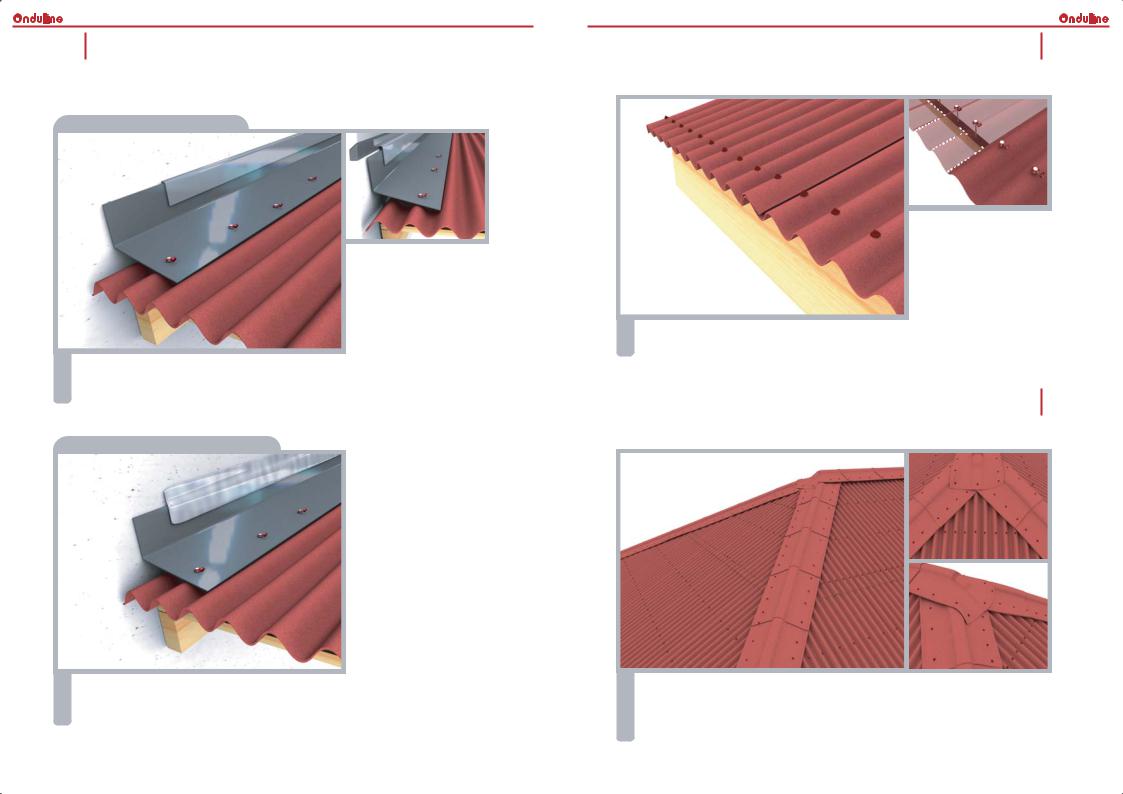
INSTALLATION DETAILS 2.1
Ridges
1.Use a rafter to support the ridge
2.The ridge should be fastened at each corrugation of the overlapped sheet
3.Add an extra purlin when necessary if the distance between the last purlin and the ridge is too wide
cm  12min
12min
 12.5cm min
4.Start fixing the ridge at opposite end of the roof from prevailing winds
5.Maintain 12 cm minimum overlap between ridge and Onduline sheet
6.Maintain 12.5 cm minimum overlapping between ridges
1. A ridge cap can be cut from exterior quality plywood to finish the ridge unit at the verge
22 |
15 |

2.2 INSTALLATION DETAILS
Edges / Verges
Covering with an Onduline Sheet Corrugation
1.Fasten bargeboard level with the underside of Onduline corrugation and overhang corrugation.
2.Fold down and nail into position.
Covering with an Onduline Ridge Unit
1.Fasten bargeboard level with top of Onduline sheet.
2.The Onduline ridge is then overlaid and nailed into position
Covering with an Onduline Verge Unit
1.Fasten bargeboard level with top of Onduline sheet.
2.The Onduline verge is then overlaid and nailed into position.
Covering with the universal multipurpose eaves tray
1.Fasten bargeboard level with top of finished Onduline roof.
2.covering with the universal multipurpose eaves tray is then overlaid and nailed into position.
INSTALLATION DETAILS 2.9
End roof
Using Onduline ridge unit
1.Fit ridge board and purlin.The Onduline ridge is then overlaid and nailed or screwed into position
Using a piece of metal
1.Fit metal ridge and purlin.The metal ridge is then overlaid and nailed or screwed into position
16 |
21 |
2.8 INSTALLATION DETAILS
Side wall abutments
Hard cover flashing to wall
1.Use a pre-formed plate of metal flashing to seal side wall abutment. Take into consideration the possible dilation while drilling.
2.Use separate cover flashing to the wall to allow for movement.
Onduline flashing tape to wall
1.Use a pre-formed plate of metal flashing to seal side wall abutment. Take into consideration the possible dilation while drilling.
2.Use Onduline flashing tape (Reparo) as cover flashing to the wall.
INSTALLATION DETAILS 2.3
Eaves
7cm 
 7cm
7cm

7cm
1.The sheets overhang at the eaves is 7 cm. Please set this distance while elaborating the roof project.
INSTALLATION DETAILS 2.4
Hip detail
1.Fix the hip before the ridge
2.Lay the support board and trim purlins accordingly
3.Fasten the ridge to the purlins
4.Overlay and clean the ridges if necessary
20 |
17 |