

Lab 6.4.3: Troubleshooting Inter-VLAN Routing
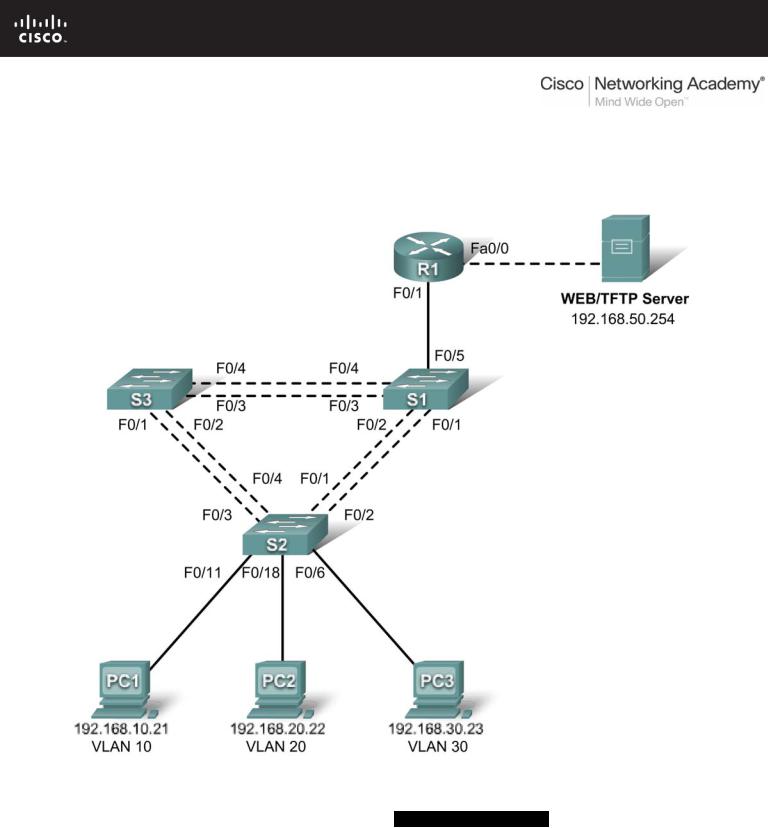
Topology Diagram
Addressing Table
|
Device |
|
|
Interface |
|
|
IP Address |
|
Subnet Mask |
|
Default Gateway |
|
|
|
|
|
|
|
|
|
|||||
|
(Hostname) |
|
|
|
|
|
|
|
||||
|
|
|
|
|
|
|
|
|
|
|
|
|
|
|
|
|
|
|
|
|
|
|
|
|
|
|
S1 |
|
VLAN 99 |
192.168.99.11 |
|
255.255.255.0 |
192.168.99.1 |
|
||||
|
|
|
|
|
|
|
|
|
||||
|
S2 |
|
VLAN 99 |
192.168.99.12 |
|
255.255.255.0 |
192.168.99.1 |
|
||||
|
|
|
|
|
|
|
|
|
||||
|
S3 |
|
VLAN 99 |
192.168.99.13 |
|
255.255.255.0 |
192.168.99.1 |
|
||||
|
|
|
|
|
|
|
|
|
||||
|
R1 |
|
Fa 0/0 |
192.168.50.1 |
|
255.255.255.0 |
|
N/A |
||||
|
|
|
|
|
|
|
|
|
|
|
|
|
All contents are Copyright © 1992–2007 Cisco Systems, Inc. All rights reserved. This document is Cisco Public Information. Page 1 of 7

CCNA Exploration |
|
LAN Switching and Wireless: Inter-VLAN Routing |
Lab 6.4.3: Troubleshooting Inter-VLAN Routing |
R1 |
Fa 0/1 |
See Subinterface Configuration Table |
N/A |
|
|
|
|
|
|
PC1 |
NIC |
192.168.10.21 |
255.255.255.0 |
192.168.10.1 |
|
|
|
|
|
PC2 |
NIC |
192.168.20.22 |
255.255.255.0 |
192.168.20.1 |
|
|
|
|
|
PC3 |
NIC |
192.168.30.23 |
255.255.255.0 |
192.168.30.1 |
|
|
|
|
|
Server |
NIC |
192.168.50.254 |
255.255.255.0 |
192.168.50.1 |
|
|
|
|
|
Port Assignments – Switch 2
Ports |
|
Assignment |
Network |
Fa0/1 – 0/5 |
802.1q Trunks (Native VLAN 99) |
192.168.99.0 /24 |
|
Fa0/6 – 0/10 |
VLAN 30 |
– Sales |
192.168.30.0 /24 |
Fa0/11 – 0/17 |
VLAN 10 |
– R&D |
192.168.10.0 /24 |
Fa0/18 – 0/24 |
VLAN 20 |
– Engineering |
192.168.20.0 /24 |
Subinterface Configuration Table – Router 1
Router Interface |
Assignment |
IP Address |
Fa0/1.1 |
VLAN1 |
192.168.1.1 |
Fa0/1.10 |
VLAN 10 |
192.168.10.1 |
Fa0/1.20 |
VLAN 20 |
192.168.20.1 |
Fa0/1.30 |
VLAN 30 |
192.168.30.1 |
Fa0/1.99 |
VLAN 99 |
192.168.99.1 |
Learning Objectives
To complete this lab:
•Cable a network according to the topology diagram
•Erase any existing configurations and reload switches and the router to the default state
•Load the switches and the router with supplied scripts
•Find and correct all configuration errors
•Document the corrected network
Scenario
The network has been designed and configured to support five VLANs and a separate server network. Inter-VLAN routing is being provided by an external router in a router-on-a-stick configuration, and the server network is routed across a separate Fast Ethernet interface. However, it is not working as designed, and complaints from your users have not given much insight into the source of the problems. You must first define what is not working as expected, and then analyze the existing configurations to determine and correct the source of the problems.
This lab is complete when you can demonstrate IP connectivity between each of the user VLANs and the external server network, and between the switch management VLAN and the server network.
Task 1: Prepare the Network
Step 1: Cable a network that is similar to the one in the topology diagram.
The output shown in this lab is based on 2960 switches and an 1841 router. You can use any current switches or routers in your lab as long as they have the required interfaces shown in the topology
All contents are Copyright © 1992–2007 Cisco Systems, Inc. All rights reserved. This document is Cisco Public Information. |
Page 2 of 7 |

CCNA Exploration |
|
LAN Switching and Wireless: Inter-VLAN Routing |
Lab 6.4.3: Troubleshooting Inter-VLAN Routing |
diagram. Other device types may produce different output. Note that Ethernet (10Mb) LAN interfaces on routers do not support trunking, and Cisco IOS software earlier than version 12.3 may not support trunking on Fast Ethernet router interfaces.
Set up console connections to all three switches and to the router.
Step 2: Clear any existing configurations on the switches.
Clear switch configurations on all three switches, and reload to restore the default state. Use the show vlan command to confirm that only default VLANs exist and that all ports are assigned to VLAN 1.
Step 3: Configure the Ethernet interfaces on the host PCs and the server.
Configure the Ethernet interfaces of PC1, PC2, PC3 and the server with the IP addresses and default gateways listed in the addressing table.
Task 2: Load the Router and Switches with Supplied Scripts
Router 1 Configuration
hostname R1
!
no ip domain lookup
!
interface FastEthernet0/0
ip address 192.168.50.1 255.255.255.192
!
interface FastEthernet0/1 no ip address
!
interface FastEthernet0/1.1 encapsulation dot1Q 1
ip address 192.168.1.1 255.255.255.0
!
interface FastEthernet0/1.10 encapsulation dot1Q 11
ip address 192.168.10.1 255.255.255.0
!
interface FastEthernet0/1.20 encapsulation dot1Q 20
ip address 192.168.20.1 255.255.255.0
!
interface FastEthernet0/1.30
ip address 192.168.30.1 255.255.255.0
!
interface FastEthernet0/1.99 encapsulation dot1Q 99 native
ip address 192.168.99.1 255.255.255.0
!
line con 0
logging synchronous password cisco login
!
line vty 0 4 password cisco login
!
All contents are Copyright © 1992–2007 Cisco Systems, Inc. All rights reserved. This document is Cisco Public Information. |
Page 3 of 7 |

CCNA Exploration |
|
LAN Switching and Wireless: Inter-VLAN Routing |
Lab 6.4.3: Troubleshooting Inter-VLAN Routing |
end
Switch 1 Configuration hostname S1
!
vtp mode server vtp domain lab6_3 vtp password cisco
!
vlan 99
name Management exit
!
vlan 10 name R&D exit
!
vlan 30 name Sales exit
!
interface FastEthernet0/1 switchport trunk native vlan 99 switchport mode trunk
no shutdown
!
interface FastEthernet0/2 switchport trunk native vlan 99 switchport mode trunk
no shutdown
!
interface FastEthernet0/3 switchport trunk native vlan 99 switchport mode trunk
no shutdown
!
interface FastEthernet0/4 switchport trunk native vlan 99 switchport mode trunk
shutdown
!
interface FastEthernet0/5 switchport trunk native vlan 99 switchport mode trunk
!
interface range FastEthernet0/6 - 24 shutdown
!
interface Vlan99
ip address 192.168.99.11 255.255.255.0 no shutdown
!
exit
!
ip default-gateway 192.168.99.1
All contents are Copyright © 1992–2007 Cisco Systems, Inc. All rights reserved. This document is Cisco Public Information. |
Page 4 of 7 |

CCNA Exploration |
|
LAN Switching and Wireless: Inter-VLAN Routing |
Lab 6.4.3: Troubleshooting Inter-VLAN Routing |
!
line con 0
logging synchronous password cisco login
!
line vty 0 4 password cisco login
!
line vty 5 15 password cisco login
!
end
Switch 2 Configuration
!
hostname S2
no ip domain-lookup enable secret class
!
vtp mode client vtp domain lab6_3 vtp password cisco
!
interface FastEthernet0/1 switchport trunk native vlan 99 switchport mode trunk
!
interface FastEthernet0/2 switchport trunk native vlan 99 switchport mode trunk
!
interface FastEthernet0/3 switchport trunk native vlan 99 switchport mode trunk
!
interface FastEthernet0/4 switchport trunk native vlan 99 switchport mode trunk
!
interface FastEthernet0/5 switchport trunk native vlan 99 switchport mode trunk
!
interface range FastEthernet0/6 - 11 switchport access vlan 30 switchport mode access
!
interface range FastEthernet0/12 - 17 switchport access vlan 10
!
interface range FastEthernet0/18 -24 switchport mode access
switchport access vlan 20
All contents are Copyright © 1992–2007 Cisco Systems, Inc. All rights reserved. This document is Cisco Public Information. |
Page 5 of 7 |

CCNA Exploration |
|
LAN Switching and Wireless: Inter-VLAN Routing |
Lab 6.4.3: Troubleshooting Inter-VLAN Routing |
!
interface Vlan99
ip address 192.168.99.12 255.255.255.0 no shutdown
exit
!
ip default-gateway 192.168.99.1 ip http server
!
line con 0 password cisco
logging synchronous login
line vty 0 4 password cisco login
line vty 5 15 password cisco login
!
end
Switch 3 Configuration
!
hostname S3
!
enable secret class
!
vtp mode client vtp domain lab6_3 vtp password cisco
!
interface FastEthernet0/1 switchport trunk native vlan 99 switchport mode trunk
no shutdown
!
interface FastEthernet0/2 switchport trunk native vlan 99 switchport mode trunk
no shutdown
!
interface FastEthernet0/3 switchport trunk native vlan 99 switchport mode trunk
no shutdown
!
interface FastEthernet0/4 switchport trunk native vlan 99 switchport mode trunk
no shutdown
!
interface FastEthernet0/5 switchport trunk native vlan 99 switchport mode trunk
All contents are Copyright © 1992–2007 Cisco Systems, Inc. All rights reserved. This document is Cisco Public Information. |
Page 6 of 7 |

CCNA Exploration |
|
LAN Switching and Wireless: Inter-VLAN Routing |
Lab 6.4.3: Troubleshooting Inter-VLAN Routing |
!
interface range FastEthernet0/6 - 24 shutdown
exit
!
ip default-gateway 192.168.99.1
!
line con 0
logging synchronous password cisco login
!
line vty 0 4 password cisco login
!
line vty 5 15 password cisco login
!
end
Task 3: Troubleshoot and Correct the Inter-VLAN Issues and Configuration Errors
Begin by identifying what is working and what is not. What is the state of the interfaces? What hosts can ping other hosts? Which hosts can ping the server? What routes should be in the R1 routing table? What could prevent a configured network from being installed in the routing table?
When all errors are corrected, you should be able to ping the remote server from any PC or any switch. In addition, you should be able to ping between the three PCs and ping the management interfaces on switches from any PC.
Task 4: Document the Network Configuration
When you have successfully completed your troubleshooting, capture the output of the router and all three switches with the show run command and save it to a text file.
Task 5: Clean Up
Erase the configurations and reload the switches and router. Disconnect and store the cabling. For PC hosts that are normally connected to other networks (such as the school LAN or to the Internet), reconnect the appropriate cabling and restore the TCP/IP settings.
All contents are Copyright © 1992–2007 Cisco Systems, Inc. All rights reserved. This document is Cisco Public Information. |
Page 7 of 7 |