


Selecting All Columns
SELECT *
FROM departments;
|
Copyright © 2009, Oracle. All rights reserved. |
Academy |
Selecting All Columns |
|
|
You can display all columns of data in a table by following the SELECT keyword with an asterisk |
||
(*). In the example in the slide, the department table contains four columns: DEPARTMENT_ID, |
||
DEPARTMENT_NAME, MANAGER_ID, and LOCATION ID. The table contains eight rows, one for
Note: In SQL Developer, you can enter your SQL statement in a SQL Worksheet and click the “Execute Statement” icon or press [F9] to execute the statement. The output displayed in the Results
each department. |
|
Oracle |
|
|
|
|
|
You can also display all columns in the table by listing all the columns after the SELECT keyword. |
|||
For example, the following SQL statement&(like the example in the slide) displays all columns and all |
|||
rows of the DEPARTMENTS table: |
|
Only |
|
SELECT |
|
|
|
department id, department name, manager_id, location_id |
|||
FROM |
departments; |
Use |
|
|
|
||
|
Internal |
|
|
Oracletabbed page app ars as shown in the slide.
Oracle Database 11g: SQL Fundamentals I 1 - 6
Selecting Specific Columns
SELECT department_id, location_id
FROM departments;
|
Copyright © 2009, Oracle. All rights reserved. |
Academy |
Selecting Specific Columns |
|
You can use the SELECT statement to display specific columns of the table by specifying the column |
|||
names, separated by commas. The example in the slide displays all the department numbers and |
|||
location numbers from the DEPARTMENTS table. |
|
||
In the SELECT clause, specify the columns that you want in the order in which you want them to |
|||
|
|
Oracle |
|
appear in the output. For example, to display location before department number (from left to right), |
|||
you use the following statement: |
& |
Only |
|
SELECT |
|
|
|
location id, departm nt id |
|||
FROM |
departme ts; |
|
|
|
|
Use |
|
Internal |
|
||
Oracle… |
|
|
|
Oracle Database 11g: SQL Fundamentals I 1 - 7

Writing SQL Statements
•SQL statements are not case-sensitive.
•SQL statements can be entered on one or more lines.
•Keywords cannot be abbreviated or split across lines.
•Clauses are usually placed on separate lines.
•Indents are used to enhance readability.
•In SQL Developer, SQL statements can optionally be terminated by a semicolon (;). Semicolons are required when you execute multiple SQL statements.
•In SQL*Plus, you are required to end each SQL statement with a semicolon (;).
|
Copyright © 2009, Oracle. All rights reserved. |
Academy |
Writing SQL Statements |
|
By using the following simple rules and guidelines, you can construct valid statements that are both easy to read and edit:
• SQL statements are not case-sensitive (unless indic ted). |
|
• SQL statements can be entered on one or many lines. |
|
|
Only |
• Keywords cannot be split across lines or abbreviated.Oracle |
|
& |
|
• Clauses are usually placed on separate lines for readability and ease of editing. |
|
In SQL Developer,Internalclick the Run Script icon or press [F5] to run the command or commands in the |
|
• Indents should be used to make code more readable. |
|
• Keywords typically are entered in uppercas ; all other words, such as table names and columns |
|
names are entered in lowe case. |
Use |
Executing SQL Statemen s |
|
Oraclepage while the Run Script icon emulates the SQL*Plus display and shows the output on the Script |
|
SQL Worksh t. You can also click the Execute Statement icon or press [F9] to run a SQL statement in the SQL Worksheet. The Execute Statement icon executes the statement at the mouse pointer in the Enter SQL Statement box while the Run Script icon executes all the statements in the Enter SQL Statement box. The Execute Statement icon displays the output of the query on the Results tabbed
Output tabbed page.
In SQL*Plus, terminate the SQL statement with a semicolon, and then press [Enter] to run the command.
Oracle Database 11g: SQL Fundamentals I 1 - 8
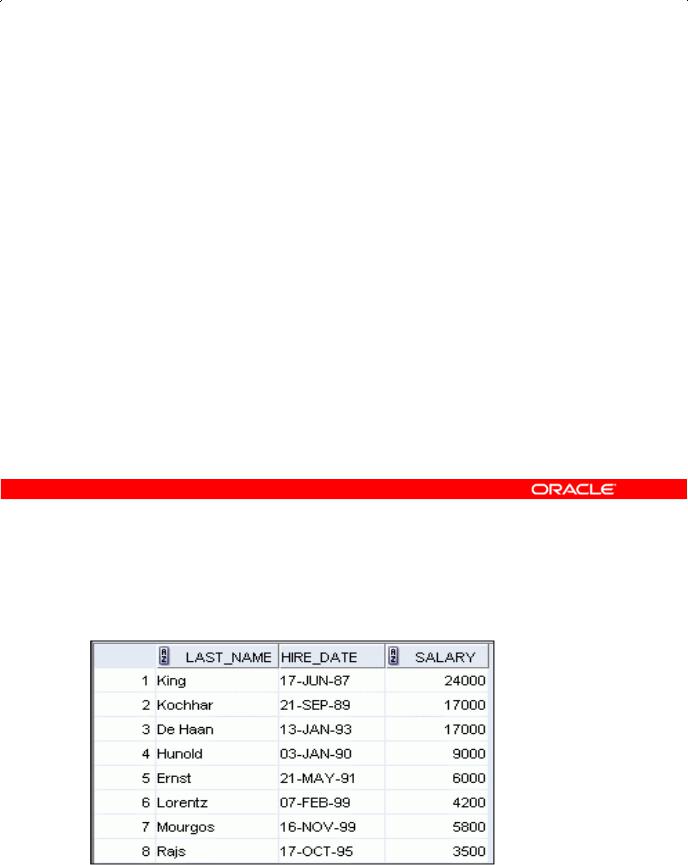
Column Heading Defaults
•SQL Developer:
–Default heading alignment: Left-aligned
–Default heading display: Uppercase
•SQL*Plus:
–Character and Date column headings are left-aligned.
–Number column headings are right-aligned.
–Default heading display: Uppercase
Column Heading Defaults |
|
|
Academy |
|
|
Copyright © 2009, Oracle. All rights reserved. |
|
||
|
|
Oracle |
||
|
In SQL Developer, column headings are displayed in uppercase and are left-aligned. |
|||
|
SELECT last_name, hire_date, sal ry |
|
||
|
FROM employees; |
|
Only |
|
|
|
& |
|
|
|
Internal |
|
|
|
Oracle |
Use |
|
|
|
|
… |
|
|
|
You can override the column heading display with an alias. Column aliases are covered later in this lesson.
Oracle Database 11g: SQL Fundamentals I 1 - 9