

Entering and Displaying Access 2003 Data
You're now ready to enter and edit Access database data. Once you enter the data, you need to print the data to proofread for accuracy and to keep a hard copy as a backup. Although Access provides advanced and fancy reporting tools, you don't have to master those tools to print your Access data, as you will learn in this hour. When you gather a large amount of data, being able to print the data in a meaningful format is important and Access gives you the tools to do just that.
Finally, this lesson explains how to use the Form Wizard to generate forms that match your data. Forms offer a different perspective from datasheets. The Access forms you create resemble printed forms onscreen.
The highlights of this hour include the following:
How to enter data into tables
Which table-editing commands Access supports
How to print tables
When to use the Form Wizard to generate forms from tables
How to use forms for data entry and editing
How to print forms
Entering Table Data
Access gives you two primary means for adding data to tables that you create:
Datasheet view
Forms
The Datasheet view that you saw in Hour 17, "Access 2003 Basics," enables you to enter and view several records at one time as well as edit any record that you view. When you use a form, on the other hand, you typically work with only one record at a time. The record takes on the format of a printed form, giving you a better focus on individual records. You learn more about forms in a later section, "Using Forms to Enter and Edit Data." The next section focuses on the Datasheet view.
Using the Datasheet View
In the previous hour, you learned how to display the Datasheet view. The Datasheet view offers one of the simplest ways to enter and edit data in an Access database. The rest of this section shows you how Access makes entering data easy.
Entering Data
To enter data in the Datasheet view after you display the Datasheet view, just click the Datasheet view's first field and enter the field information. When you enter data into the first field, Access opens an additional blank record below the one you are entering. Access always leaves room for additional records. As you enter data, press Tab, Shift+Tab, or the arrow keys to move from field to field. You can also click any field into which you want to enter data. As you enter data, watch the status bar at the bottom of your screen. When you designed your table, if you enter a description for a field, Access displays that description in the status bar as you enter data in that field.
Note
If, while entering data, you see a number automatically appear in a field, don't panic. Access is automatically entering an AutoNumber into a field defined as an AutoNumber field (such as the key).
Figure 18.1 shows a Datasheet view that contains several records. The record selector always moves as you enter and edit data to show the current record. When you edit one row and then move to another, Access automatically saves that row to the table. As you make an edit, the Editing icon appears to the left of the row to indicate the row being edited. A second kind of record selector, an asterisk, always appears to the left of the next empty record and indicates a new record into which you can enter data.
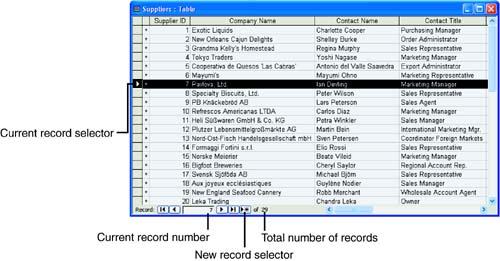
Figure 18.1 A Datasheet view can show several records of data.
Note
Often, multiple records contain the same data in certain fields (as is the case with city and state names in a table). When you are about to enter data in a cell and the previous record contains the same data, press Ctrl+' to copy the previous record's field value into the current field's cell.
As you enter data, take advantage of the Office AutoCorrect feature. Just as Word and Excel support AutoCorrect entries, so does Access. All the Office products share the same AutoCorrect abbreviations you have defined.
When you enter AutoCorrect abbreviations and shortcuts, Access substitutes the shortcut for the AutoCorrect correction. Access does not automatically enable automatic spell-checking as you enter data because much of your table data contains data such as formal names and product codes that would appear to the spell-checker as misspellings. You can check your table's spelling by selecting Tools, Spelling.
To change a mistake, such as a transposed number, click the mistake to display the insertion point inside the Datasheet view's field and correct the entry. You can also press the arrow keys to move to any field and press F2 to edit the field's text.