

Computer Science АС (ГСФ) / CS Work at lab classes / 11 Visual Basic - start
.docHow to use the VB standard controls
Sunday, November 03, 2013
For this lesson we will need a new Project, call it Lesson4.vbp, which will only be used to create and try out various controls. To refresh your memory, since the previous two lessons have been rather theoretical, you select the New tab, and Standard EXE for the type. As soon as The Form opens, you Save the new Project, give the Form a name, let's say it's Lesson4.frm and then you give the Project a name: Lesson4.vbp. Note that you do not have to specify the extensions, .frm and .vbp, because they will be assigned automatically. The Form
We covered it too briefly in Lesson 01 so we'll go over it again. The Form is the first object you see when you Open the application. It's the window into which all the controls will appear, where you will input data and see results.

There's not too much you can do with the form at this time. Basically, you adjust the BackColor and the StartUpPosition (where it will open on the screen when you Run it) and then you start putting controls on it.
The Label
This is probably the first control you will master. It is used to display static text, titles and screen output from operations. The important properties to remember:
-
Caption - the text that is displayed in the label
-
BackColor and ForeColor - colors of the background and the text
-
BackStyle - Opaque or Transparent - whether the background is visible or not
-
Font - font and size of text
-
Alignment - text centered, left or right
-
Multiline- True or False - if True, you can have several lines of text, delimited by <CR> in the label - by default, it is set to False

Frame & PictureBox
When you want to group several controls together - name and address, for example - you use a Frame. The frame backcolor can be the same as the form's and only the frame borders will be obvious, or it can be a different color and stand out. You create the frame before the controls. When you create controls in a frame, they are tied to the frame and move with it. The frame caption is the text that appears at the top of the frame - you use it to define the group. The PictureBox is like a Label with a picture in it instead of text. The Picture property determines the name of the file, .BMP or .GIF, that will be displayed. It can be used for a company logo, etc.

TextBox & CommandButton
The TextBox is like a Label but, it is used to input data into the program. The data typed in is in the Text property of the control. When the program is Run, only the controls that can be manipulated will be activated. For example, if the form contains 3 Labels, 3 TextBoxes and 3 Buttons, when it is Run, the cursor will not stop at the labels. When the user hits the Tab key, the cursor will go to the first TextBox or Button - not necessarily the first one on the form but, the first one that was created. That is called the Tab order and you have to specify it. On the form there is only one control at any given time that has the cursor on it - it is said to have Focus. If you type data, the control with Focus will receive it. You change the Focus with Tab or by clicking on a different control.
|
Up until now we haven't bothered with the names of controls (the Name property). Once we start to code, however, it does become important. There are all kinds of occasions in code where you have to call upon a certain control. It can get very confusing when your 12 buttons are called Command1...Command12. What did Command7 do, again? Give each control a name (except for titles, etc. that you never refer to) so that you will be able to identify it easily. It is recommended that you use a prefix when assigning a name; cmd for a CommandButton, lbl for a Label, txt for a TextBox. Thus, txtNumber where you input the value can be distinguished from lblNumber where you display the result. |
The CommandButton is used to initiate actions, usually by clicking on it. The Caption property determines the text to display on the face of the button. The Default property, if set to true, means that the button will be activated (same as Clicked) if the <Enter> key is hit anywhere in the form. If Cancel is set to True, the button will be activated from anywhere in the form by the <Esc> key.

Hopefully, you have now run this program several times, each time you added a new control, in fact. Admittedly, nothing much happened except to confirm that the controls were appearing in the right place on the form. Here now is an example of the code we could write to perform simple tasks: input name and city and display the information in a label when the Continue button is clicked. The Exit button will end execution of the program and the Cancel button (or the Esc key) will clear the fields.

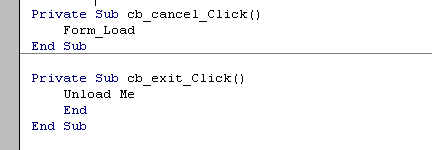
A few explanations: the Form_Load event occurs when the form first opens. This is where we initialize things - we want the TextBoxes and the result Label to be empty when we start off so, we set them to a blank space. The actual processing is done after the data have been entered and we hit the Continue button. The processing logic is put in the Continue_button_clicked event. When you hit the <Esc> key or you click on the Cancel button, you want to annul the entry you're doing and start over again. That's the same as opening the form so, we just tell the program to execute the Form_Load procedure which we already have. The Exit button uses the pronoun Me to Unload. Me means the form currently active without having to name it.
|
Multiple forms For the next series of examples we will use a new Form. It is not necessary to create a new Project; any Project can have several Forms in it. With the Project open on the current Form, go to: Menu --> Project --> Add form. Select New form in the creation window and, voila! Next time you save the Project, it will ask you to name this new Form. You can name it Lesson4B.frm for example. One more detail: when you Run the Project, you want to tell it which Form to open. Go to the Project Manager window, right click on the Project name and select Project properties. In the Project properties window, the ListBox on the right says "Startup object". Select the Form you want to open when you Run. You can change the Startup object at any time to run the different forms that you created. |
Check boxes & Option buttons
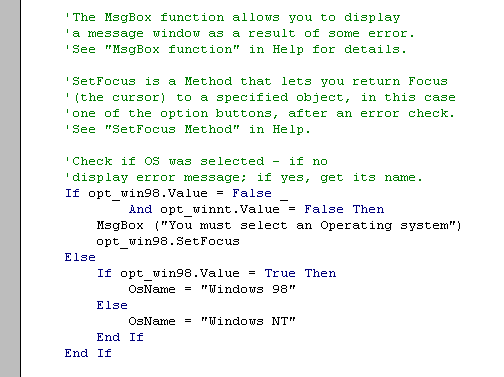
These two controls are used when the user must choose from a list of options. The difference between the two is that with Check boxes he can select several at one time but, with Option buttons, he must select only one among several. The example below illustrates the use of Check boxes and Option buttons. To capture the information entered by means of these controls, you must test the property: Value. In a Check box, Value = 1 if box is checked and = 0 if not. In an Option button, Value = True if selected and = False if not.

The code, although somewhat long, is not very complicated. Most of the time, processing consists of checking the content of .Value. It is fairly standard procedure, especially with Option buttons, to ensure that at least one button has been selected and to display an error message if it has not.


Assignment 3
Create the Payroll form shown below. Number of hours must be entered as well as the appropriate rate. Gross salary = rate * hours. Net salary = gross salary - deductions.
