

Computer Science АС (ГСФ) / CS Work at lab classes / 12 Visual Basic - continue
.docMore standard controls
Working with arrays
Before we get to today's lesson on common controls, we will cover a bit of programming theory on Arrays. In VB, arrays work in much the same way as they do in all other languages you have studied. By definition an array is an indexed variable, meaning it is one variable with many parts, each part being referenced by an index number. The index number being numeric, it can be manipulated by loop statements, incremented, decremented, etc. An array can contain any valid data type and, if it is of the Variant type, can even contain elements of different types.
An array is declared like any other variable, with the addition of an index:
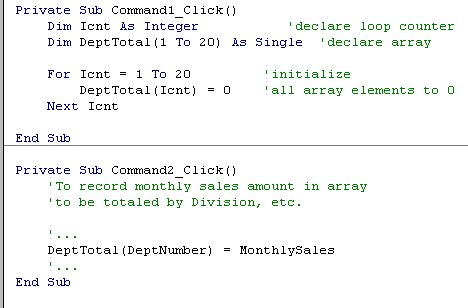
Dim Department(6) As String
will declare an array of 7 elements of the String type (we assume that it will be 7 Department names). The only problem with this declaration is that the index goes from 0 to 6. So, if you want the name of the sixth Department you have to specify Department(5), which can be confusing at times. To work around this problem you can specify the starting index in the declaration:
Dim Months(1 To 12) As String
Thus, Months(1) is January and Months(12) is December. You don't even have to start at 1. If your Sections are numbered 101 - 120 you can define an array:
Dim Sections(101 To 120) As Integer
One common method of manipulating arrays is to use For...Next loops:
An array can also be assigned to a variable in code. Look at the following example and understand that that is not an implicit declaration. The variable "Week" is declared as Variant. It is assigned anarray value in code.

Now, when we get to the next set of controls, different kinds of Lists, these notions may prove useful.
ListBox
With the ListBox control the user can select items from a list of choices. Although the list of choices can be entered in the List property of the control, as in the example below, this is not a very good habit to get into. It is essentially "hardcoding" data into the program and it can cause maintenance headaches.

The common technique for loading a ListBox is to do it in code, with the Form_Load event. This way, if items have to be added it is a simple matter to add a line of code.

|
It is sometimes difficult to distinguish an object's Properties and its Methods. In the example above we used lst_team.AddItem. What is AddItem? It is a Method. How do I know? Well, to tell them apart, think of grammar. A property is a characteristic, something that the object is, a color, a size - it is like an adjective. A Method is an action, something that it does, in fact, a verb. When you see object.something_descriptive, it is a Property. When you see object.some_action, it is a Method. |
In the example shown, AddItem is a Method because it is the action of adding items to the ListBox. If you wanted to remove an item from the list in code, there is a RemoveItem Method for the ListBox. lst_team.RemoveItem 2 would remove the 3rd team - remember that it starts at 0. When the Form opens, it will load the list in Form_load before the ListBox is displayed. If there are too many items for the space allocated to the ListBox, it will create a vertical scroll bar. When the user selects one of the teams from the list, we have to have a way of capturing that information in a variable. That is done with the Text property of the ListBox:
TeamName = lst_team.Text
ComboBox
The ComboBox is called that because it's a combination of a ListBox and a TextBox. It has the advantage over the ListBox of not taking up space until it is actually used which means that it makes it easier to position on the Form. But the combo has the disadvantage, sort of, that the user can enter his own information, in addition to what is in the list. This may make data validation harder because the choices are not limited. When you want to force the user to make a choice only among the specified items, use a ListBox, even if it is a bit more awkward. If the user is allowed to override the choices, uses a ComboBox. As in the ListBox, use the Text property to get the information input.
Label3.Caption = cbo_position.Text


As you can see, it is fairly simple to load the ListBox and the ComboBox during the From_Load event. The only other detail to note is that the order in which the items appear in the Combo is not the same as the order in which the items were added. That is intentional - it is done with the Sorted property for the ComboBox. It can also be done for the ListBox.
DriveListBox, DirListBox, FileListBox
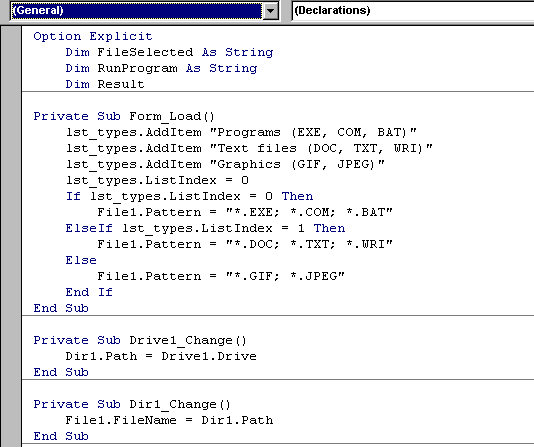
For this next example we need to create a new form, Form2, in the current Project. Specifications: While in Form1, the Registration form, we need to be able to hit a button which will call-up a new form, the DirList form, which will look like the example below. This form will allow us to select a type of file that we want to see and then to select a file, in a directory, in a drive that will be specified. If the file selected is an executable, we will run the file. If it is a text file we will call-up Notepad to edit it, and if it is a graphics file we will call-up the image editor. In fact, this allows us to call an external program from inside a form. If, for example, we wish to edit the player's picture before storing it, we can open the picture file with the image editor, change it, and continue with the rest of the form.

There are 3 new controls on this form, plus the buttons and the ListBox. Since you almost always have only one of each of those controls on the form, we won't bother to change the names of the controls in this example - we keep them as: Drive1, Dir1, and File1. The control that shows the current drive is called a DriveListBox. The name of the active drive is in the control's Drive property. The selected drive can be changed, in code, by writing: Drive1.Drive = "D:", for example.
|
Don't bother looking for the .Drive property in the Properties window for Drive1 - you won't find it. Same with Dir1.Path and List1.FileName. That's because Drive is a runtime property. That is, one that is only available when the program runs. Makes sense when you think about it. You can design the DriveListBox to have the size, the color and the font you want but you can't tell it which drive will be active at runtime. That will have to come from the system. VB is full of these details. Every control has properties that are only accessible at runtime, through code. The only way to find them is to look in the documentation. A big Reference Manual is handy and the Help function helps a lot with this, too. |
The current directory is in the DirectoryListBox. The name is in the Dir1.Path property. The default event associated with Drive1 and Dir1 is called a Change event. That's because nothing has to be done with those controls until they are actually changed. Remember, when the program runs they are automatically loaded with the current drive and the current directory active. The current file selected is in the FileListBox, in the File1.FileName property. This one is not automatically loaded because there is no current active file. You select a file by clicking on it, generating aClick event. Study the code and then look at the explanations below. To keep the code section from getting too long, explanations have not been included as comments.

Program notes:
-
First task in Form_Load is to load the list of file types. We only want to display files that are Executable, Text or Graphics. The .EXE is selected by default - ListIndex =0.
-
The FileListBox Pattern property creates the filter for the selection.
-
Whenever we change the Drive selection or the Directory selection, a Change event is generated. When the Drive changes, the Directory's path changes and when the Directory changes, the list of files changes.
-
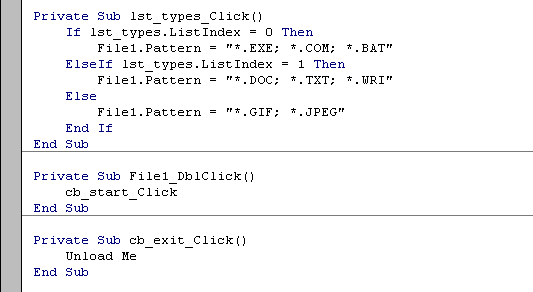
When you click on the Start button you first have to check if a file is selected. If not, issue a message.
-
The Right() function, which we will look at in Lesson7, checks to see if the rightmost character of the filename is a \. If it is it means that the file is in the root directory. If it isn't, we have to add a \ between the path and the filename.
-
Based on the type of file selected, we execute the Shell function which runs an executable program. vbNormalFocus is the window style argument that tells the program to run in a normal window.
-
When we click on a file type, the Pattern property for the FieList must change.
-
A double-click on a filename does the same as hitting the Start button.
-
Remember, we called this Form from the Registration form. When we're done with this, we want to close it and go back to the calling form. The Exit button does an Unload of the current form but, it does not execute an End statement because that would cause the Project to end.
This final section of code is in the Registration form. It is the code for the Viewer button which calls the DirList form. The only thing to do is to Load the form using its FormName (from the Name property) and then to execute its Show method. The argument vbModeless means that the form does not get exclusive focus. The opposite of vbModeless is vbModal. A modal form is one which requires action from the user before it can be closed. Usually, error messages are modal - you have to respond, usually by hitting the OK or Cancel button, and you can't click on another form to send this one to the background, and you can't close it with the close box. A modeless form can be sent to the background and it can be closed at any time.
