

Computer Science АС (ГСФ) / CS Work at lab classes / 15 Change the Firewall settings
.docChange the Firewall settings (For Windows 7)
Description:
If a Firewall on your computer is active, it may be rejecting the necessary network connection needed for the network operations such as network printing, network scanning or network PC-Faxing. In this case, Brother recommends you either disable the Firewall on your computer whenever you use a network feature, or leave the Firewall enabled and adjust the settings.
Step 1: Disable the Firewall settings For personal Firewall Software users: (For example, Blackice™, Norton Internet Security™, Tiny Personal Firewall, Zone Alarm®, Sygate and McAfee®.) For instructions on how to disable this type of program, please refer to the user's guide for your software or contact the software manufacturer.
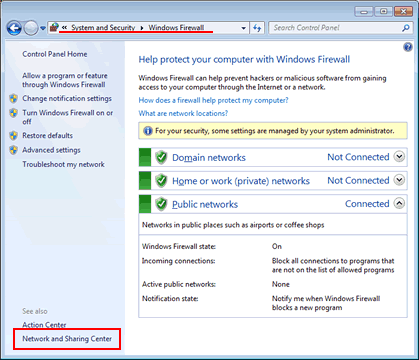
For Windows® 7 Firewall users: NOTE: If the User Account Control screen appears, type an administrator username and password and click Yes. First check your network location.
-
Click the Start button => Control Panel => System and Security => Windows Firewall => Network and Sharing Center.
-
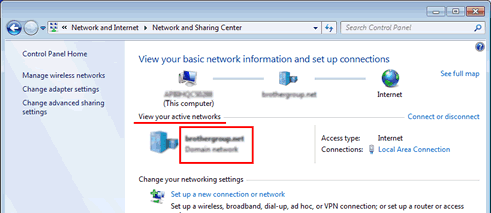
Check your network location which is shown in the View your active networks section.
Then disable the Firewall settings.
-
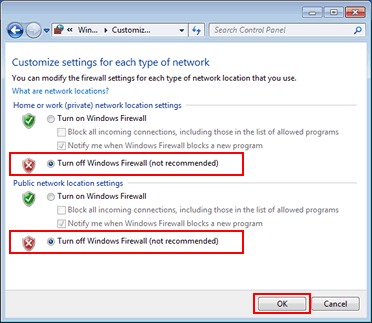
Click the Start button => Control Panel => System and Security => Windows Firewall => Turn Windows Firewall on or off.

-
Choose Turn off Windows Firewall (not recommended) for your network location, and click OK.
Note
If you disabled your Firewall, you will need to re-enable it after a network operation. For instructions on how to re-enable a Software Manufacturer Firewall, refer to your user's guide or contact the software manufacturer. For Windows® 7 Firewall users, follow the instructions in Step 1 and select Turn On Windows Firewall (recommended) (Step iv) to re-enable the Firewall.
Step 2: Leave the Firewall enabled and adjust the settings For personal Firewall Software users: (For example, Blackice™, Norton Internet Security™, Tiny Personal Firewall, Zone Alarm®, Sygate and McAfee®.) For instructions on how to configure the settings properly for this type of program, please refer to the user's guide for your software or contact the software manufacturer. For Windows® 7 Firewall users: NOTE: If the User Account Control screen appears, type an administrator username and password and click Yes. First check your network location.
-
Click the Start button => Control Panel => System and Security => Windows Firewall => Network and Sharing Center.

-
Check your network location which is shown in the View your active networks section.

Add the port 54925 for Network Scanning.
-
Click the Start button => Control Panel => System and Security => Windows Firewall => Advanced Settings.

-
Click Inbound Rules.

-
Click New Rule....

-
Choose Port and click Next.

-
Choose UDP, Specific local ports and enter 54925 in the box. Then click Next.

-
Choose Allow the connection and click Next.

-
Check the profile for your network location and click Next.

-
Enter any description in the Name box, for example "Brother NetScan", and click Finish.

-
Make sure that the new setting is added.
Add the port 54926 for Network PC-FAX.
-
Repeat Step v - xi with attention to the following points. In Step vii, enter 54926 for Specific local ports. In Step x, enter any description in the Name box, for example "Brother PC-FAX".
-
Close the Windows Firewall with Advanced Security screen.
If you still have trouble with your network connection such as network scanning or printing,
-
Click the Start button => Control Panel => System and Security => Windows Firewall => Allow a program or feature through Windows Firewall.

-
Click Change settings if the button is clickable.

-
Check File and Printer Sharing for your network location and click OK.
