

Practical Plastic Surgery
.pdf52 |
Practical Plastic Surgery |
Techniques of Flap Transfer
The final way to categorize flaps is by the technique of flap transfer. Broadly speaking, flaps can either be pedicled flaps or free flaps. Pedicled flaps remain attached to the underlying blood supply, while the tissue connected to it is transferred to another site. Free flaps are temporarily disconnected from their blood supply, and then the feeding vessels are surgically anastomosed to the blood supply at the recipient site. Flaps can be further categorized by the distance between the donor site and recipient site. Local flaps are used to close defects adjacent to the donor site. Distant flaps imply that the donor site and the recipient site are not in close proximity so that closure cannot be facilitated by a local method.
There are several different types of local flaps. An advancement flap moves along an axis in the same direction as the base to close the defect simply by stretching the skin. Examples of an advancement flap are the V-Y flap, Y-V flap, and the bipedicled flap (Fig. 11.2). A rotation flap has a curvilinear design and rotates about a pivot
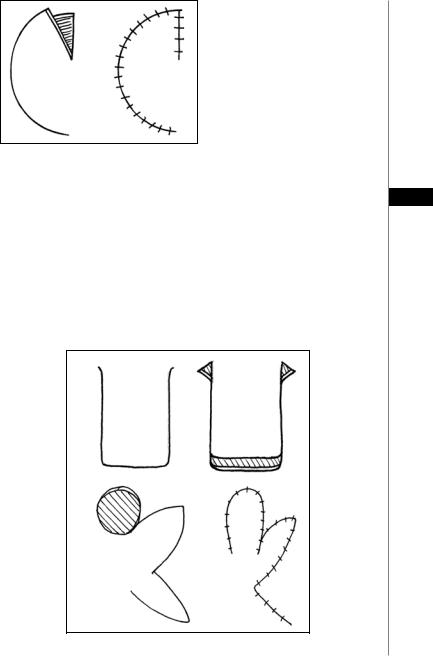
11point to close a wound defect. The donor site is closed primarily by reapproximating the skin edges or with a skin graft. A back cut in the direction of the pivot point can be made to facilitate closure, but this can also compromise the blood supply to the flap by decreasing the base width. A Burow’s triangle can also be made external to the incision to decrease tension and facilitate primary closure of the donor site (Fig. 11.3). Finally, a transposition flap is a rectangular flap that is rotated laterally about a pivot point into an adjacent defect to be closed. The farther the flap rotates, the shorter the effective length of the flap, so that the flap must be designed longer than the defect in
A
B
Figure 11.2. A) The rectangular transposition flap. B) The V-Y advancement flap.
Principles of Surgical Flaps |
53 |
Figure 11.3. The rotation flap.
order to close the donor site. Otherwise, the donor site may be closed primarily with a skin graft or with an additional transposition flap, as in a bilobed flap (Fig. 11.4).
There are several important types of transposition flaps. The first is the Z-plasty, 11 in which adjacent triangular flaps are interchanged to exchange the width and length between them. The three limbs of the Z must be equal in length, and the amount of length obtained depends upon the intervening angles, with 60˚ being the classic angle to obtain optimal increase in length while preserving blood supply to the triangular flaps (Fig. 11.5). The rhomboid or Limberg flap is another type of transposition flap that can be used to close a skin defect. Four different flaps can be designed at angles of 60˚, with the longitudinal axis paralleling the line of minimal
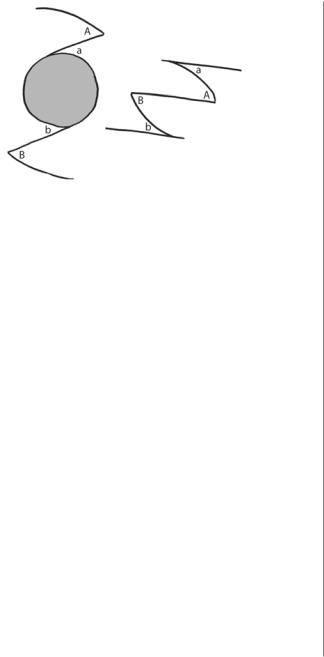
skin tension (Fig. 11.6). The Dufourmentel flap is like the rhomboid flap, except the angles are at 90˚. Finally, the double opposing semicircular flap can be used to close circular skin defects (Fig. 11.7).
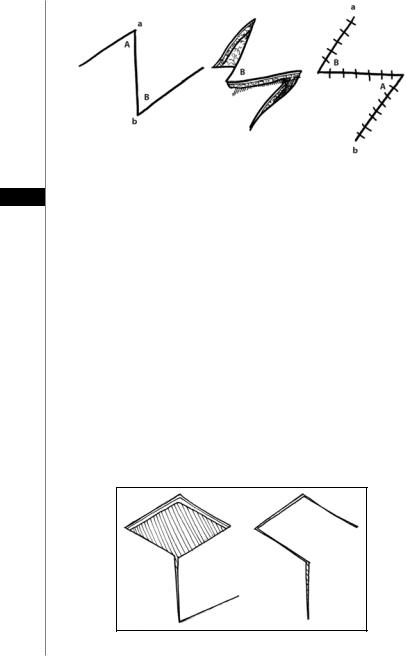
A
B
Figure 11.4. A) The rectangular advancement flap. B) The bilobed flap.
54 |
Practical Plastic Surgery |
|
|
|
|
|
|
|
Figure 11.5. The Z-plasty technique.
11
Interpolation flaps also rotate about a pivot point, but they are either tunneled under or passed over intervening tissue to close a defect that is not immediately adjacent to the donor site. Examples include the Littler neurovascular island flap and the pedicled TRAM flap.
Distant flaps involve tissue transfer from one part of the body to another in which the donor site and the recipient site are not in close proximity to each other. There are three types of distant flaps: direct flaps, tubed flaps and free flaps. The direct flap involves the direct transfer of tissue from a donor site to a distant recipient site. Examples of direct flaps include the thenar flap, cross-leg flap and groin flap. Tubed flaps are used when tissue cannot be directly approximated, so that tissue from the donor site is tubed to recipient site. Once the vascular supply has been established, the tube is divided and tissue from the tube is returned to donor site. Examples of this are the forehead flap and the clavicular tubed flap. Finally, free flaps involve complete disconnection of the underlying blood supply, so that the blood vessels from transferred tissue must be surgically reanastomosed to reestablish vascular circulation.
Summary
In sum, the underlying principle of all surgical flaps is the meticulous preservation of blood supply. Unlike grafts, a flap carries its own vascular circulation with it.
Figure 11.6. The rhomboid (Limberg) flap.
Principles of Surgical Flaps |
55 |
|
|
|
|
|
|
|
Figure 11.7. The double opposing semicircular flap. |
11 |
|
The amount and type of tissue that a flap can contain is wholly dependent on the maintenance of adequate blood supply. Knowledge of vascular anatomy is crucial to flap design. Techniques of flap transfer must take care to safeguard the vascular circulation of the flap. With the careful protection of blood supply, it is possible to successfully plan and implement any surgical flap.
Pearls and Pitfalls
The success or failure of a flap is dependent upon blood supply. The ingrowth of new blood vessels from the surrounding tissue occurs over several weeks. As a general rule, the tissue that is most distant from the arterial inflow is at the highest risk of necrosis. Efforts to reduce this risk include the following: (1) preferentially discarding excess tissue from the distant tip; (2) for skin flaps, designing a flap with as broad a base as possible, away from any previous incisions sites; (3) minimizing tension; (4) maximizing inflow.
When designing a flap for covering or filling a defect, it is prudent to follow the carpenter’s rule of “measure twice, cut once.” Defects must be examined and measured three-dimensionally, since the width, depth and length will not always conform to a two-dimensional plane. The final desired contour should also be considered (e.g., if a convex contour is desired, the length of the flap should be greater than the direct length of the defect). Furthermore, it should be determined whether or not moving adjacent structures (such as the arms or legs) will change the dimensions of the defect. For instance, a supraclavicular skin defect will significantly increase in size when the patient’s head is turned away from the defect.
Suggested Reading
1.Jackson IT. Local Flaps in Head and Neck Reconstruction. St Louis, Mosby: 1985.
2.Kayser MR. Surgical flaps. Selected Readings in Plastic Surgery 1999.
3.Mathes SJ, Nahai F. Clinical atlas of muscle and musculocutaneous flaps. St Louis, Mosby: 1982.
4.McGregor AD, McGregor IA. Fundamental techniques of plastic surgery. London: Churchill Livingston, 2000.
5.Taylor GI, Palmer JH. The Vascular territories (Angiosomes) of the body: Experimental study and clinical applications. Br J Plast Surg 1987; 40:113.

Chapter 12
Microvascular Surgical Technique
and Methods of Flap Monitoring
Sean Boutros and Robert D. Galiano
Introduction
The hand is capable of coordinated activity finer than the eye can direct. With the aid of magnification, the true capability of the hand can be exploited. As a tool for the plastic surgeon, microsurgery has allowed reconstructions that were simply not possible before. However, microvascular free tissue transfer is not a technique for the occasional microsurgeon. The catastrophic complication of flap failure looms over every microsurgical case; therefore, expertise in the execution of a free flap as well as its postoperative surveillance is key to a successful outcome.
Experience has shown that flap loss is a preventable complication and that elective microsurgery should have a failure rate of less than 2%. Most cases of flap loss are technical in nature. The fault may lie in the choice of flap, the harvest of the flap, preparation of donor vessels, insetting of pedicle or microsurgical technique. In general, it is best to think of all possible errors as additive in the process of thrombosis. Failure will occur if the procoagulatory factors outweigh the intrinsic ability of the vessels, in particular intact and uninjured intima, to prevent clot formation.
Flap Choice
The first step for success in microsurgery is flap choice. The specifics of different flaps are discussed in subsequent chapters. The most important determining factors for flap choice should be the surgeon’s experience and the goals of reconstruction.
In general, each surgeon should identify at least four flaps they feel comfortable with. These flaps should include a bulky muscle flap, a bulky fasciocutaneous flap, a thin fasciocutaneous flap, and a bone flap. With this armamentarium, the reconstructive surgeon will have tools that can be applied to most situations. By limiting himself to a small number of flaps, more experience can be obtained with each one. This increased experience translates to increased success. It is not advantageous to explore every novel flap that is reported, as this dilutes the experience and increases the chance of failure. With increasing experience with each flap comes increasing success and a lower failure rate.
This does not imply that specific flaps may not be beneficial over others in certain situations. There is no doubt that the donor properties of a latissimus dorsi flap differ from those of the gracilis flap and that each may be a better choice for a specific patient. However, the patient is best served with successful reconstruction. If there is significant benefit in a flap where the surgeon has no experience, the surgeon should consider referral or should seek additional training in order to add that flap to his or her armamentarium. This may include time in a cadaver lab or observing a surgeon with a particular skill.
Practical Plastic Surgery, edited by Zol B. Kryger and Mark Sisco. ©2007 Landes Bioscience.

Microvascular Surgical Technique and Methods of Flap Monitoring |
57 |
Having mastered the tools of reconstruction, the surgeon should judiciously consider the requirements for reconstruction. Bulky muscle flaps are best for contaminated defects and bony injuries with high risk for infection. Thick fasciocutaneous flaps are useful for contour and shape reconstruction. Thin fasciocutaneous flaps provide stable, noncontracting coverage. Bone flaps provide structural integrity.
Flap Harvest
Specific aspects of each flap harvest are discussed elsewhere in this book. Certain principles, however, hold true despite the flap chosen. While harvesting a flap, the pedicle should be carefully dissected with as much length as possible. It is important not to limit the pedicle length to the anticipated need, but to harvest the maximum that can safely be obtained. It is much more advantageous to discard unneeded length than to find oneself requiring more pedicle length. Vein grafts should be avoided unless absolutely necessary.
While harvesting the flap and dissecting the pedicle, the most common mistake is damaging the vessels. Forceps should only touch the adventia and never purchase the vessel as the intimal layer is extremely fragile and easily fractured or crushed by manipu- 12 lation. Any grasping of the vessels will cause damage to the intima which increases the likelihood of clot formation. This intimal injury leads to platelet deposition and throm-
bosis as the injured endothelial cell layer loses its natural thrombolytic properties. Division of the pedicle should be reserved until the last possible moment. Prior
to division, the donor vessels should be dissected, isolated, prepared and positioned for the anastomosis. It is helpful to mark the vessels in their natural state to assure that they are not twisted when transferred to the recipient site. Prior to division, the artery should be occluded first, followed by the vein. This will avoid excess blood pooling in the flap. Immediately after the flap is removed, one can consider cooling the flap with chilled saline as this decreases the metabolic activity of the tissue and allows the luxury of a longer ischemic time.
There is seldom a need to separate the artery and vein within the pedicle for anything more than a minimal distance. The only exception is the case where the recipient vessels are not paired. The vessels should not be skeletonized until they are brought to the recipient site and carefully prepared under the microscope. Any branches within 2 mm of the anastomosis are best sutured closed with microtechnique to avoid blood pooling near the anastomosis.
Preparation of Recipient Site
Preparing the recipient site mirrors the harvest of the flap. Vessels should be chosen that are simple to use and of the largest caliber available. They should be expendable when possible and have sufficient length. Again, care should be taken in the preparation of the vessels. They should not be extensively manipulated or injured. They should only be skeletonized for 2-3 mm around the anastomotic site, and this should be done under the microscope.
Microsurgical Technique
The anastomosis can be done in several fashions. These include end-to-end or end-to-side. They can be performed by multiple suture techniques or with coupling devices. The general philosophy is to gain experience with two or three techniques and apply those techniques to different situations. With careful planning, preparation, and mobilization of both the pedicle and recipient vessels, this is generally possible.

58 |
Practical Plastic Surgery |
General principles of proper microsurgical technique are:
1.Pass sutures perpendicularly through the adventitia into the intima.
2.Avoid grasping or manipulating the intima.
3.Avoid multiple suture passes.
4.Avoid torquing the needle in the vessel; grasp and regrasp the needle in order to pass it through the vessel following the curve of the needle perfectly.
5.Dilate and visualize the inside of the vessels with heparinized saline irrigation on an ocular anterior chamber needle.
6.Use polished vessel dilating forceps to gently open spasmodic vessels or for vessel expansion.
7.Leave long tails on the sutures for manipulation and visualization.
8.Perform both anastomoses prior to reperfusion.
9.Release clamps on the vein first.
10.Inspect the anastomosis using the long suture tails as handles.
11.Place additional sutures in gaps with pulsatile or pressurized bleeding.
12.Avoid the temptation to place excess sutures in cases of mild oozing of blood
12from the anastomosis.
13.Apply warm saline to the flap and papaverine to the anastomosis after reperfusion to dilate the vessels and relax spasm.
Anastomotic Techniques
End-to-End
The end-to-end anastomosis is the simplest and the most reliable method. There are several techniques of suture placement including the 180˚-180˚ and triangulation methods. The easiest is probably the 180˚-180˚ technique. This can be applied to any situation and is probably the best technique for size-mismatched vessels. Important points to remember are:
1.The vessels must not be twisted prior to placement in the double clamp holder. This can be ensured by inking one surface of the pedicle and recipient vessels prior to their division or dissection.
2.The first two sutures are placed at opposite poles of the vessels.
3.The third suture is placed midway between the poles.
4.In most cases, the next sutures bisect the gap though on occasion, two sutures will be needed in the gap.
5.Once the anterior wall is complete, twist the entire double clamp to show the backwall.
6.Visually inspect every suture of the anterior wall from the posterior view to assure that they are evenly spaced and have not purchased the back wall of the vessel.
7.Place another bisecting suture midway between the poles on the back wall.
8.All remaining sutures can be placed and left long (not tied).
9.Dilate the vessel with saline when tying the back wall to assure that there is no purchase of the anterior wall.
End-to-Side
The end-to-side technique is occasionally necessary. For example, it is used in the leg when there is only one vessel available or for an anastomosis in the head and neck (for example, to the internal jugular vein). Principles are:
1.The pedicle vessels should enter the recipient vessel at a gentle angle.
2.Perform a limited arterioectomy, removing a small window of vessel.
3.Place heel and toe sutures first.

Microvascular Surgical Technique and Methods of Flap Monitoring |
59 |
4.Initially close the heel.
5.Follow with closure of the toe.
Coupling Devices
Coupling devices are useful for veins or thin-walled arteries. They save some time in the anastomosis. They, however, are not a panacea. The major time consumption in a microsurgical case is not the anastomosis, but the set up and preparation. If coupling devices are used, the set up and preparation time remain the same. Principles of gentle handling of vessels are still required as is avoidance of damage to the intima. Overall, the devices appear to have a place in the venous anastomosis, where they can also act as a stent, or in cases with significant size mismatch. Points to consider are:
1.Use the largest size coupler that will comfortably fit (range 2-3.5 mm).
2.Draping of the vessel over the spikes is performed by one surgeon while the other maintains the engagement of the spike as the vessel is seated.
3.Seat the vessel 180˚ apart to assure even spacing on the coupler.
4.Avoid grasping the intima of the vessel as it is draped over the spikes.
5.Assure that the coupling device is closed and guide it off of the coupling applier. 12
Draping of the Pedicle
After the anastomosis is complete and the flap is successfully revascularized, it is not uncommon for significant problems to arise. Kinking or unnatural curvature of the pedicle will certainly cause thrombosis. In fact, any turbulent, nonlaminar flow increases the likelihood of thrombosis and flap loss. The pedicle should be carefully draped. Gelfoam sponge or Alloderm can be used to help maintain the proper position of the pedicle.
Closure
A sound closure technique is again crucial for success. Both the flap and pedicle can be compressed by a tight closure. Anticipation of this is critical, as well planned incisions will allow closure after the edema of these long cases has set in. If there is any question, the liberal use of skin grafts to allow tensionless closure is recommended. The anastomosis should never be situated immediately under a suture line.
Monitoring
There is no “perfect” monitoring technique. Despite numerous ingenious techniques and improvements in technology, the ideal monitoring technique should be the one that surgeons and ancillary staff at a particular hospital are most familiar with and meet the restraints (budgetary or manpower) of the institution. What is ideal at one institution may not be practical at another. What is clear over many years of clinical experience, although this remains to be formally proven, is that the presence of dedicated staff in a dedicated unit stands the best chance of picking up problems earlier. The impetus to closely monitor a flap comes from the enormous investment undertaken on the part of the patient as well as the surgeon regarding microvascular free tissue transfer. The utility of postoperative flap surveillance has been proven, with an increase in the salvage rate of the failing flap from 33% to about 70% in some series.
The clinical exam is useful when performed by the experienced clinician. The transition of a healthy, plump flap or vibrant replanted digit to cold, flat, lifeless tissue can proceed via either arterial occlusion or venous congestion. These characteristics are useful in deciding whether to explore a flap or perhaps treat with leech therapy. Although it is the least technologically-based, much information can be gleaned from a thorough physical exam. Turgor can indicate the state of arterial in-

60 |
Practical Plastic Surgery |
flow or venous outflow. Like a balloon, the flap or digit will inevitably declare itself if it has arterial insufficiency or venous congestion. Bleeding can be useful, as the qualitative and quantitative flow in response to pinpricks or rubbing of wound edges can declare the state of circulatory flow to the flap. In particular, a congested flap may bleed briskly, but the blood will appear dark and unoxygenated. The blood flow of a flap with compromised arterial inflow will be weak or absent. A caution regarding the pinprick test is that it is useful for evaluating a flap, but will occasionally cause trauma leading to vasospasm or hematoma in the confined space of a finger.
It is possible to monitor free flaps with a temperature probe. This method consists of placing surface temperature probes on the skin of the free flap and comparing them to probes placed on neighboring native skin. The probes are attached to a temperature monitor that will give off an alarm if there is a difference in temperature between the two sites greater than the specified amount (typically, 2-3˚C). Although appealing, there are limitations to the use of temperature probes, as the readings may be affected by regional changes in blood flow that are not secondary to flap flow disturbances.
Doppler ultrasonography is perhaps the most widely used monitoring tool. Two
12permutations exist. The first is the external Doppler. A recent innovation is the implantable internal Doppler. This tool permits monitoring of the segment of artery and vein a short distance downstream of the anastomosis. Its use has obviated the need for an external sentinel skin segment, and is ideally suited for buried anastomosis (e.g., jejunal free flaps in the head and neck, or vascularized bone transfers). These techniques are extremely useful; however, complications such as probe dislodgement and the occasional monitoring of an adjacent vessel that is not the pedicle can result.
In replants, the pulse oximeter is extremely useful. Some centers have reported success with fluorescein infusion and fluorescent lamp observation. This technique is not as useful in pigmented skin. Other techniques that at this time must be considered experimental include pH monitoring, duplex ultrasound, photoplethysmography, reflection photometry and radioisotope studies. None of these are currently widely used.
Pearls and Pitfalls
Although the microsurgical trainee may be eager to execute a large variety of occasionally exotic flaps, it is much more important to master a limited number of flaps and apply these flaps to different defects throughout the body. The principles outlined in this chapter serve as the basis to successfully execute any type of microsurgical transfer the plastic surgeon will encounter, even unusual flaps. In summary, it is essential to:
1.Sharpen microsurgical skills in the lab.
2.Handle the vessels gently.
3.Place significant attention on closure and pedicle position.
4.Familiarize oneself with one or two monitoring techniques. This will maximize salvage of the inevitable free flap failure.
The most important indicator of a problem with the free-flap is a change in the
clinical exam. This necessitates that the flap be seen as soon as possible by a surgeon who has been actively managing the patient.
Suggested Reading
1.Hidalgo DA, Disa JJ, Cordeiro PG et al. A review of 716 consecutive free flaps for oncologic surgical defects: Refinement in donor-site selection and technique. Plast Reconstr Surg 1998; 102(3):722.
2.Disa JJ, Cordeiro PG, Hidalgo DA. Efficacy of conventional monitoring techniques in free tissue transfer: An 11-year experience in 750 consecutive cases. Plast Reconstr Surg 1999; 104(1):97.
3.Khouri RK. Avoiding free flap failure. Clin Plast Surg 1992; 19(4):773.

Chapter 13
Tissue Expansion
Zol B. Kryger and Bruce S. Bauer
Introduction
Tissue expansion relies on the ability of skin and soft tissues to generate in response to tension. In plastic surgery, tension is generated by implanting a subcutaneous balloon (expander) that is inflated over a period of weeks; new tissue is generated in response to the constant stretch caused by the progressive inflation of this expander. This tissue can be used to reconstruct extirpative or traumatic defects such as those encountered after mastectomy, burn excision, or removal of giant nevi.
Biological Basis of Tissue Expansion
A number of studies support the concept that the increase in skin surface area after expansion is due to the generation of new tissue rather than the stretching of existing skin. In culture, mechanical stress induces fibroblast and epidermal hyperplasia. These cells preserve their phenotype without malignant degeneration. This observation is supported by the fact that there has never been a reported case of skin malignancy secondary to tissue expansion.
From a histological standpoint, adult and pediatric skin responds to expansion in the same manner. Within 1 week of expansion, the epidermis begins to thicken and the dermis thins. The skin appendages do not change. The subcutaneous fat and muscle atrophy. Cellular proliferation reduces the resting tension of the skin over time, enabling another round of expansion to take place. Once the process is complete, the expanded skin eventually returns to its baseline thickness. The vessels of the skin and subcutaneous tissue also resume their pre-expanded size and number; however anecdotally, some flaps demonstrate increased vascularity.
Indications
In general terms, expansion of tissue is used to improve rotation, transposition or advancement of local or regional flaps, or to increase the harvest of full-thickness skin grafts. Recently, tissue expansion has been successfully applied to myocutaneous and free flaps. In adults, aside from their use in breast reconstruction, tissue expanders are used primarily for secondary burn and trauma reconstruction in the head and neck region. In the pediatric population, expanders have been used in a multitude of reconstructive procedures. The most common indication in children is to reconstruct defects left by excision of giant congenital nevi. Tissue expansion is contraindicated in infected skin. Although expansion is possible in radiated or scarred tissue, it is associated with a much higher complication rate and should be avoided whenever possible.
Technique
Expanders come in a variety of shapes and sizes, and there is no absolute ideal expander for a given site or condition. Expanders can have either internal or external
Practical Plastic Surgery, edited by Zol B. Kryger and Mark Sisco. ©2007 Landes Bioscience.