

- •Contents at a Glance
- •Contents
- •About the Author
- •Acknowledgments
- •Introduction
- •C# and the .NET Framework
- •Before .NET
- •Windows Programming in the Late 1990s
- •Goals for the Next-Generation Platform Services
- •Enter Microsoft .NET
- •Components of the .NET Framework
- •An Improved Programming Environment
- •Object-Oriented Development Environment
- •Automatic Garbage Collection
- •Interoperability
- •No COM Required
- •Simplified Deployment
- •Type Safety
- •The Base Class Library
- •Compiling to the Common Intermediate Language
- •Compiling to Native Code and Execution
- •Overview of Compilation and Execution
- •The Common Language Runtime
- •The Common Language Infrastructure
- •Important Parts of the CLI
- •Common Type System (CTS)
- •Common Language Specification (CLS)
- •Review of the Acronyms
- •Overview of C# Programming
- •A Simple C# Program
- •More About SimpleProgram
- •Identifiers and Keywords
- •Naming Conventions
- •Keywords
- •Main: The Starting Point of a Program
- •Whitespace
- •Statements
- •Simple Statements
- •Blocks
- •Text Output from a Program
- •Write
- •WriteLine
- •The Format String
- •Multiple Markers and Values
- •Comments: Annotating the Code
- •More About Comments
- •Documentation Comments
- •Summary of Comment Types
- •Types, Storage, and Variables
- •A C# Program Is a Set of Type Declarations
- •A Type Is a Template
- •Instantiating a Type
- •Data Members and Function Members
- •Types of Members
- •Predefined Types
- •More About the Predefined Types
- •User-Defined Types
- •The Stack and the Heap
- •The Stack
- •Facts About Stacks
- •The Heap
- •Value Types and Reference Types
- •Storing Members of a Reference Type Object
- •Categorizing the C# Types
- •Variables
- •Variable Declarations
- •Variable Initializers
- •Automatic Initialization
- •Multiple-Variable Declarations
- •Using the Value of a Variable
- •Static Typing and the dynamic Keyword
- •Nullable Types
- •Creating a Nullable Type
- •Assigning to a Nullable Type
- •Classes: The Basics
- •Overview of Classes
- •A Class Is an Active Data Structure
- •Programs and Classes: A Quick Example
- •Declaring a Class
- •Class Members
- •Fields
- •Explicit and Implicit Field Initialization
- •Declarations with Multiple Fields
- •Methods
- •Creating Variables and Instances of a Class
- •Allocating Memory for the Data
- •Combining the Steps
- •Instance Members
- •Access Modifiers
- •Private and Public Access
- •Depicting Public and Private Access
- •Example of Member Access
- •Accessing Members from Inside the Class
- •Accessing Members from Outside the Class
- •Putting It All Together
- •Methods
- •The Structure of a Method
- •Code Execution in the Method Body
- •Local Variables
- •Type Inference and the var Keyword
- •Local Variables Inside Nested Blocks
- •Local Constants
- •Flow of Control
- •Method Invocations
- •Return Values
- •The Return Statement and Void Methods
- •Parameters
- •Formal Parameters
- •Actual Parameters
- •An Example of Methods with Positional Input Parameters
- •Value Parameters
- •Reference Parameters
- •Output Parameters
- •Parameter Arrays
- •Method Invocation
- •Expanded Form
- •Arrays As Actual Parameters
- •Summary of Parameter Types
- •Method Overloading
- •Named Parameters
- •Optional Parameters
- •Stack Frames
- •Recursion
- •More About Classes
- •Class Members
- •Order of Member Modifiers
- •Instance Class Members
- •Static Fields
- •Accessing Static Members from Outside the Class
- •Example of a Static Field
- •Lifetimes of Static Members
- •Static Function Members
- •Other Static Class Member Types
- •Member Constants
- •Constants Are Like Statics
- •Properties
- •Property Declarations and Accessors
- •A Property Example
- •Using a Property
- •Properties and Associated Fields
- •Performing Other Calculations
- •Read-Only and Write-Only Properties
- •An Example of a Computed, Read-Only Property
- •Example of Properties and Databases
- •Properties vs. Public Fields
- •Automatically Implemented Properties
- •Static Properties
- •Instance Constructors
- •Constructors with Parameters
- •Default Constructors
- •Static Constructors
- •Example of a Static Constructor
- •Accessibility of Constructors
- •Object Initializers
- •Destructors
- •Calling the Destructor
- •The Standard Dispose Pattern
- •Comparing Constructors and Destructors
- •The readonly Modifier
- •The this Keyword
- •Indexers
- •What Is an Indexer?
- •Indexers and Properties
- •Declaring an Indexer
- •The Indexer set Accessor
- •The Indexer get Accessor
- •More About Indexers
- •Declaring the Indexer for the Employee Example
- •Another Indexer Example
- •Indexer Overloading
- •Access Modifiers on Accessors
- •Partial Classes and Partial Types
- •Partial Methods
- •Classes and Inheritance
- •Class Inheritance
- •Accessing the Inherited Members
- •All Classes Are Derived from Class object
- •Hiding Members of a Base Class
- •Base Access
- •Using References to a Base Class
- •Virtual and Override Methods
- •Overriding a Method Marked override
- •Case 1: Declaring Print with override
- •Case 2: Declaring Print with new
- •Overriding Other Member Types
- •Constructor Execution
- •Constructor Initializers
- •Class Access Modifiers
- •Inheritance Between Assemblies
- •Member Access Modifiers
- •Regions Accessing a Member
- •Public Member Accessibility
- •Private Member Accessibility
- •Protected Member Accessibility
- •Internal Member Accessibility
- •Protected Internal Member Accessibility
- •Summary of Member Access Modifiers
- •Abstract Members
- •Abstract Classes
- •Example of an Abstract Class and an Abstract Method
- •Another Example of an Abstract Class
- •Sealed Classes
- •Static Classes
- •Extension Methods
- •Expressions and Operators
- •Expressions
- •Literals
- •Integer Literals
- •Real Literals
- •Character Literals
- •String Literals
- •Order of Evaluation
- •Precedence
- •Associativity
- •Simple Arithmetic Operators
- •The Remainder Operator
- •Relational and Equality Comparison Operators
- •Comparison and Equality Operations
- •Increment and Decrement Operators
- •Conditional Logical Operators
- •Logical Operators
- •Shift Operators
- •Assignment Operators
- •Compound Assignment
- •The Conditional Operator
- •Unary Arithmetic Operators
- •User-Defined Type Conversions
- •Explicit Conversion and the Cast Operator
- •Operator Overloading
- •Restrictions on Operator Overloading
- •Example of Operator Overloading
- •The typeof Operator
- •Other Operators
- •Statements
- •What Are Statements?
- •Expression Statements
- •Flow-of-Control Statements
- •The if Statement
- •The if . . . else Statement
- •The switch Statement
- •A Switch Example
- •More on the switch Statement
- •Switch Labels
- •The while Loop
- •The do Loop
- •The for Loop
- •The Scope of Variables in a for Statement
- •Multiple Expressions in the Initializer and Iteration Expression
- •Jump Statements
- •The break Statement
- •The continue Statement
- •Labeled Statements
- •Labels
- •The Scope of Labeled Statements
- •The goto Statement
- •The goto Statement Inside a switch Statement
- •The using Statement
- •Packaging Use of the Resource
- •Example of the using Statement
- •Multiple Resources and Nesting
- •Another Form of the using Statement
- •Other Statements
- •Namespaces and Assemblies
- •Referencing Other Assemblies
- •The mscorlib Library
- •Namespaces
- •Namespace Names
- •More About Namespaces
- •Namespaces Spread Across Files
- •Nesting Namespaces
- •The using Directives
- •The using Namespace Directive
- •The using Alias Directive
- •The Structure of an Assembly
- •The Identity of an Assembly
- •Strongly Named Assemblies
- •Creating a Strongly Named Assembly
- •Private Deployment of an Assembly
- •Shared Assemblies and the GAC
- •Installing Assemblies into the GAC
- •Side-by-Side Execution in the GAC
- •Configuration Files
- •Delayed Signing
- •Exceptions
- •What Are Exceptions?
- •The try Statement
- •Handling the Exception
- •The Exception Classes
- •The catch Clause
- •Examples Using Specific catch Clauses
- •The catch Clauses Section
- •The finally Block
- •Finding a Handler for an Exception
- •Searching Further
- •General Algorithm
- •Example of Searching Down the Call Stack
- •Throwing Exceptions
- •Throwing Without an Exception Object
- •Structs
- •What Are Structs?
- •Structs Are Value Types
- •Assigning to a Struct
- •Constructors and Destructors
- •Instance Constructors
- •Static Constructors
- •Summary of Constructors and Destructors
- •Field Initializers Are Not Allowed
- •Structs Are Sealed
- •Boxing and Unboxing
- •Structs As Return Values and Parameters
- •Additional Information About Structs
- •Enumerations
- •Enumerations
- •Setting the Underlying Type and Explicit Values
- •Implicit Member Numbering
- •Bit Flags
- •The Flags Attribute
- •Example Using Bit Flags
- •More About Enums
- •Arrays
- •Arrays
- •Definitions
- •Important Details
- •Types of Arrays
- •An Array As an Object
- •One-Dimensional and Rectangular Arrays
- •Declaring a One-Dimensional Array or a Rectangular Array
- •Instantiating a One-Dimensional or Rectangular Array
- •Accessing Array Elements
- •Initializing an Array
- •Explicit Initialization of One-Dimensional Arrays
- •Explicit Initialization of Rectangular Arrays
- •Syntax Points for Initializing Rectangular Arrays
- •Shortcut Syntax
- •Implicitly Typed Arrays
- •Putting It All Together
- •Jagged Arrays
- •Declaring a Jagged Array
- •Shortcut Instantiation
- •Instantiating a Jagged Array
- •Subarrays in Jagged Arrays
- •Comparing Rectangular and Jagged Arrays
- •The foreach Statement
- •The Iteration Variable Is Read-Only
- •The foreach Statement with Multidimensional Arrays
- •Example with a Rectangular Array
- •Example with a Jagged Array
- •Array Covariance
- •Useful Inherited Array Members
- •The Clone Method
- •Comparing Array Types
- •Delegates
- •What Is a Delegate?
- •Declaring the Delegate Type
- •Creating the Delegate Object
- •Assigning Delegates
- •Combining Delegates
- •Adding Methods to Delegates
- •Removing Methods from a Delegate
- •Invoking a Delegate
- •Delegate Example
- •Invoking Delegates with Return Values
- •Invoking Delegates with Reference Parameters
- •Anonymous Methods
- •Using Anonymous Methods
- •Syntax of Anonymous Methods
- •Return Type
- •Parameters
- •params Parameters
- •Scope of Variables and Parameters
- •Outer Variables
- •Extension of Captured Variable’s Lifetime
- •Lambda Expressions
- •Events
- •Events Are Like Delegates
- •An Event Has a Private Delegate
- •Overview of Source Code Components
- •Declaring an Event
- •An Event Is a Member
- •The Delegate Type and EventHandler
- •Raising an Event
- •Subscribing to an Event
- •Removing Event Handlers
- •Standard Event Usage
- •Using the EventArgs Class
- •Passing Data by Extending EventArgs
- •Using the Custom Delegate
- •The MyTimerClass Code
- •Event Accessors
- •Interfaces
- •What Is an Interface?
- •Example Using the IComparable Interface
- •Declaring an Interface
- •Implementing an Interface
- •Example with a Simple Interface
- •An Interface Is a Reference Type
- •Using the as Operator with Interfaces
- •Implementing Multiple Interfaces
- •Implementing Interfaces with Duplicate Members
- •References to Multiple Interfaces
- •An Inherited Member As an Implementation
- •Explicit Interface Member Implementations
- •Accessing Explicit Interface Member Implementations
- •Interfaces Can Inherit Interfaces
- •Example of Different Classes Implementing an Interface
- •Conversions
- •What Are Conversions?
- •Implicit Conversions
- •Explicit Conversions and Casting
- •Casting
- •Types of Conversions
- •Numeric Conversions
- •Implicit Numeric Conversions
- •Overflow Checking Context
- •The checked and unchecked Operators
- •The checked and unchecked Statements
- •Explicit Numeric Conversions
- •Integral to Integral
- •float or double to Integral
- •decimal to Integral
- •double to float
- •float or double to decimal
- •decimal to float or double
- •Reference Conversions
- •Implicit Reference Conversions
- •Explicit Reference Conversions
- •Valid Explicit Reference Conversions
- •Boxing Conversions
- •Boxing Creates a Copy
- •The Boxing Conversions
- •Unboxing Conversions
- •The Unboxing Conversions
- •User-Defined Conversions
- •Constraints on User-Defined Conversions
- •Example of a User-Defined Conversion
- •Evaluating User-Defined Conversions
- •Example of a Multistep User-Defined Conversion
- •The is Operator
- •The as Operator
- •Generics
- •What Are Generics?
- •A Stack Example
- •Generics in C#
- •Continuing with the Stack Example
- •Generic Classes
- •Declaring a Generic Class
- •Creating a Constructed Type
- •Creating Variables and Instances
- •The Stack Example Using Generics
- •Comparing the Generic and Nongeneric Stack
- •Constraints on Type Parameters
- •Where Clauses
- •Constraint Types and Order
- •Generic Methods
- •Declaring a Generic Method
- •Invoking a Generic Method
- •Inferring Types
- •Example of a Generic Method
- •Extension Methods with Generic Classes
- •Generic Structs
- •Generic Delegates
- •Another Generic Delegate Example
- •Generic Interfaces
- •An Example Using Generic Interfaces
- •Generic Interface Implementations Must Be Unique
- •Covariance and Contravariance in Generics
- •Covariance and Contravariance in Interfaces
- •More About Variance
- •Enumerators and Iterators
- •Enumerators and Enumerable Types
- •Using the foreach Statement
- •Types of Enumerators
- •Using the IEnumerator Interface
- •Declaring an IEnumerator Enumerator
- •The IEnumerable Interface
- •Example Using IEnumerable and IEnumerator
- •The Noninterface Enumerator
- •The Generic Enumeration Interfaces
- •The IEnumerator<T> Interface
- •The IEnumerable<T> Interface
- •Iterators
- •Iterator Blocks
- •Using an Iterator to Create an Enumerator
- •Using an Iterator to Create an Enumerable
- •Common Iterator Patterns
- •Producing Enumerables and Enumerators
- •Producing Multiple Enumerables
- •Producing Multiple Enumerators
- •Behind the Scenes with Iterators
- •Introduction to LINQ
- •What Is LINQ?
- •LINQ Providers
- •Anonymous Types
- •Query Syntax and Method Syntax
- •Query Variables
- •The Structure of Query Expressions
- •The from Clause
- •The join Clause
- •What Is a Join?
- •The from . . . let . . . where Section in the Query Body
- •The from Clause
- •The let Clause
- •The where Clause
- •The orderby Clause
- •The select . . . group Clause
- •Anonymous Types in Queries
- •The group Clause
- •Query Continuation
- •The Standard Query Operators
- •Signatures of the Standard Query Operators
- •Delegates As Parameters
- •The LINQ Predefined Delegate Types
- •Example Using a Delegate Parameter
- •Example Using a Lambda Expression Parameter
- •LINQ to XML
- •Markup Languages
- •XML Basics
- •The XML Classes
- •Creating, Saving, Loading, and Displaying an XML Document
- •Creating an XML Tree
- •Using Values from the XML Tree
- •Adding Nodes and Manipulating XML
- •Working with XML Attributes
- •Other Types of Nodes
- •XComment
- •XDeclaration
- •XProcessingInstruction
- •Using LINQ Queries with LINQ to XML
- •Introduction to Asynchronous Programming
- •Processes, Threads, and Asynchronous Programming
- •Multithreading Considerations
- •The Complexity of Multithreading
- •Parallel Loops
- •The BackgroundWorker Class
- •Example Code Using the BackgroundWorker Class
- •Example of the BackgroundWorker Class in a WPF Program
- •Asynchronous Programming Patterns
- •BeginInvoke and EndInvoke
- •The Wait-Until-Done Pattern
- •The AsyncResult Class
- •The Polling Pattern
- •The Callback Pattern
- •The Callback Method
- •Calling EndInvoke Inside the Callback Method
- •Timers
- •Preprocessor Directives
- •What Are Preprocessor Directives?
- •General Rules
- •The #define and #undef Directives
- •Conditional Compilation
- •The Conditional Compilation Constructs
- •Diagnostic Directives
- •Line Number Directives
- •Region Directives
- •The #pragma warning Directive
- •Reflection and Attributes
- •Metadata and Reflection
- •The Type Class
- •Getting a Type Object
- •What Is an Attribute?
- •Applying an Attribute
- •Predefined, Reserved Attributes
- •The Obsolete Attribute
- •The Conditional Attribute
- •Example of the Conditional Attribute
- •Predefined Attributes
- •More About Applying Attributes
- •Multiple Attributes
- •Other Types of Targets
- •Global Attributes
- •Custom Attributes
- •Declaring a Custom Attribute
- •Using Attribute Constructors
- •Specifying the Constructor
- •Using the Constructor
- •Positional and Named Parameters in Constructors
- •Restricting the Usage of an Attribute
- •The Constructor for AttributeUsage
- •Suggested Practices for Custom Attributes
- •Accessing an Attribute
- •Using the IsDefined Method
- •Using the GetCustomAttributes Method
- •Other Topics
- •Overview
- •Strings
- •Using Class StringBuilder
- •Formatting Numeric Strings
- •The Alignment Specifier
- •The Format Component
- •Standard Numeric Format Specifiers
- •Parsing Strings to Data Values
- •More About the Nullable Types
- •The Null Coalescing Operator
- •Using Nullable User-Defined Types
- •Nullable<T>
- •Method Main
- •Accessibility of Main
- •Documentation Comments
- •Inserting Documentation Comments
- •Using Other XML Tags
- •Nested Types
- •Example of a Nested Class
- •Visibility and Nested Types
- •Interoperating with COM
- •Index

C H A P T E R 2
Overview of C# Programming
A Simple C# Program
Identifiers and Keywords
Main: The Starting Point of a Program
Whitespace
Statements
Text Output from a Program
Comments: Annotating the Code
15
CHAPTER 2 OVERVIEW OF C# PROGRAMMING
A Simple C# Program
This chapter lays the groundwork for studying C#. Since I’ll use code samples extensively throughout the text, I first need to show you what a C# program looks like and what its various parts mean.
I’ll start by demonstrating a simple program and explaining its components one by one. This will introduce a range of topics, from the structure of a C# program to the method of producing program output to the screen.
With these source code preliminaries out of the way, I can then use code samples freely throughout the rest of the text. So, unlike the following chapters, where one or two topics are covered in detail, this chapter touches on many topics with only a minimum of explanation.
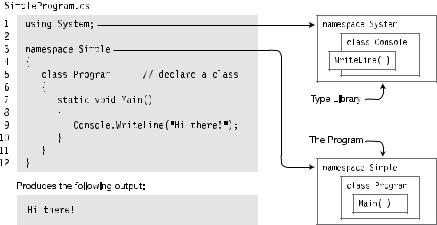
Let’s start by looking at a simple C# program. The complete program source is shown in the top, shaded area in Figure 2-1. As shown, the code is contained in a text file called SimpleProgram.cs. As you read through it, don’t worry about understanding all the details. Table 2-1 gives a line-by-line description of the code.
•When the code is compiled and executed, it displays the string “Hi there!” in a window on the screen.
•Line 5 contains two contiguous slash characters. These characters—and everything following them on the line—are ignored by the compiler. This is called a single-line comment.
Figure 2-1. The SimpleProgram program
16

CHAPTER 2 OVERVIEW OF C# PROGRAMMING
Table 2-1. The SimpleProgram Program, Line by Line
Line Number |
Description |
Line 1 |
Tells the compiler that this program uses types from the System namespace. |
Line 3 |
Declares a new namespace, called Simple. |
|
• The new namespace starts at the open curly brace on line 4 and extends |
|
through the matching curly brace on line 12. |
|
• Any types declared within this section are members of the namespace. |
Line 5 |
Declares a new class type, called Program. |
|
• Any members declared between the matching curly braces on lines 6 and |
|
11 are members that make up this class. |
Line 7 |
Declares a method called Main as a member of class Program. |
|
• In this program, Main is the only member of the Program class. |
|
• Main is a special function used by the compiler as the starting point of the |
|
program |
Line 9 |
Contains only a single, simple statement; this line constitutes the body of Main. |
|
• Simple statements are terminated by a semicolon. |
|
• This statement uses a class called Console, in namespace System, to print |
|
out the message to a window on the screen |
|
• Without the using statement in line 1, the compiler wouldn’t have known |
|
where to look for class Console. |
|
|
More About SimpleProgram
A C# program consists of one or more type declarations. Much of this book is spent explaining the different types that you can create and use in your programs. The types in a program can be declared in any order. In the SimpleProgram example, only a class type is declared.
A namespace is a set of type declarations associated with a name. SimpleProgram uses two namespaces. It creates a new namespace called Simple, in which it declares its type (class Program), and uses the Console class defined in a namespace called System.
To compile the program, you can use Visual Studio or the command-line compiler. To use the command-line compiler, in its simplest form, use the following command in a command window:
csc SimpleProgram.cs
17

CHAPTER 2 OVERVIEW OF C# PROGRAMMING
In this command, csc is the name of the command-line compiler, and SimpleProgram.cs is the name of the source file.
Identifiers and Keywords
Identifiers are character strings used to name things such as variables, methods, parameters, and a host of other programming constructs that will be covered later.
You can create self-documenting identifiers by concatenating meaningful words into a single descriptive name, using uppercase and lowercase letters (e.g., CardDeck, PlayersHand, FirstName, SocialSecurityNum). Certain characters are allowed or disallowed at certain positions in an identifier. Figure 2-2 illustrates these rules.
•The alphabetic and underscore characters (a through z, A through Z, and _) are allowed at any position.
•Digits are not allowed in the first position but are allowed everywhere else.
•The @ character is allowed in the first position of an identifier but not anywhere else. The use of the @ character, although allowed, is discouraged for general use.
Figure 2-2. Characters allowed in identifiers
Identifiers are case-sensitive. For instance, the variable names myVar and MyVar are different identifiers. It’s generally a bad idea, however, to have identifiers that differ only in the case of some of the letters, because they’re easily confused.
As an example, in the following code snippet, the variable declarations are all valid and declare different integer variables. But using such similar names will make coding more error-prone and debugging more difficult. Those debugging your code at some later time will not be pleased.
// Valid syntactically, but don't do this! int totalCycleCount;
int TotalCycleCount; int TotalcycleCount;
18