

Adding a GUI
To create a GUI we will use Tkinter which we introduced briefly in the Event Driven Programming section. This time the GUI will be slightly more sophisticated and use nmore of the graphical controls or widgets that Tkinter provides.
Refactoring the Document Class
Before we get to that stage we need to modify our Document class. The current version prints out the results to stdout as part of the analyze method. However for a GUI we really don't want that. Instead we would like the analyze method to simply store the totals in the counter attributes and we can access them as needed. To do this we simply split or refactor the reportStats() method into two parts: generateStats() which will calculate the values and store them in the counters and printStats() which will print to stdout.
Finally we need to modify Analyze to call generateStats() and the main sequence to specifically call printStats() after Analyze. With these changes in place the existing code will carry on working as before, at least as far as the command line user is concerned. Other programmers will have to make slight changes to their code to printStats() after using Analyze - not too onerous a change.
The revised code segments look like this:
def generateStats(self): self.word_count = len(self.groups) for c in self.stop_tokens:
self.sentence_count = self.sentence_count + self.punctuation_counts[c]
for c in self.punctuation_counts.keys(): self.clause_count = self.clause_count +
self.punctuation_counts[c]
def printStats(self):
print self.format % (self.filename, self.para_count, self.line_count, self.sentence_count, self.clause_count, self.word_count)
print "The following punctuation characters were used:" for i in self.punctuation_counts.keys():
print "\t%s\t:\t%4d" % (i,self.punctuation_counts[i])
and:
if __name__ == "__main__": if len(sys.argv) != 2:
print "Usage: python document.py <filename>" sys.exit()
else:
try:
D = HTMLDocument(sys.argv[1]) D.Analyze()
D.printStats()
except:
print "Error analyzing file: %s" % sys.argv[1]
Now we are ready to create a GUI wrapper around our document classes.
110
Designing a GUI
The first step is to try to visualise how it will look. We need to specify a filename, so it will require an Edit or Entry control. We also need to specify whether we want textual or HTML analysis, this type of 'one from many' choice is usually represented by a set of Radiobutton controls. These controls should be grouped together to show that they are related.
The next requirement is for some kind of display of the results. We could opt for multiple Label controls one per counter. Instead I will use a simple text control into which we can insert strings, this is closer to the spirit of the commandline output, but ultimately the choice is a matter of preference by the designer.
Finally we need a means of initiating the analysis and quitting the application. Since we will be using a text control to display results it might nbe useful to have a means of resetting the display too. These command options can all be represented by Button controls.
Sketching these ideas as a GUI gives us something like:
+------------------------- |
FIILENAME |
|
+----------- |
+ |
| |
|
| O TEXT |
| |
|
| |
|
|
| O HTML |
| |
+------------------------- |
|
|
+----------- |
+ |
| |
|
|
|
| |
| |
|
|
|
| |
| |
|
|
|
| |
| |
|
|
|
| |
| |
|
|
|
| |
+------------------------------------- |
|
|
|
+ |
| |
ANALYZE |
RESET |
QUIT |
| |
| |
| |
|||
| |
|
|
|
| |
+------------------------------------- |
|
|
|
+ |
Now we can write some code, lets take it step by step: from Tkinter import *
import document
################### CLASS DEFINITIONS ######################
class GrammarApp(Frame):
def __init__(self, parent=0): Frame.__init__(self,parent)
self.type = 2 # create variable with default value self.master.title('Grammar counter') self.buildUI()
Here we have imported the Tkinter and document modules. For the former we have made all of the Tkinter names visible within our current module whereas with the latter we will need to prefix the names with 'document.'
We have also defined an __init__ method which calls the Frame.__init__ superclass method to ensure that Tkinter is set up properly internally. We then create an attribute which will store the document type value and finally call the buildUI method which creates all the widgets for us.
def buildUI(self):
# Now the file information: File name and type fFile = Frame(self)
Label(fFile, text="Filename: ").pack(side="left") self.eName = Entry(fFile) self.eName.insert(INSERT,"test.htm") self.eName.pack(side="left", padx=5)
111
#to keep the radio buttons lined up with the
#name we need another frame
fType = Frame(fFile, borderwidth=1, relief=SUNKEN) self.rText = Radiobutton(fType, text="TEXT",
variable = self.type, value=2, command=self.doText)
self.rText.pack(side=TOP)
self.rHTML = Radiobutton(fType, text="HTML", variable=self.type, value=1, command=self.doHTML)
self.rHTML.pack(side=TOP)
#make TEXT the default selection self.rText.select() fType.pack(side="right", padx=3) fFile.pack(side="top", fill=X)
#the text box holds the output, pad it to give a border self.txtBox = Text(fApp, width=60, height=10) self.txtBox.pack(side=TOP, padx=3, pady=3)
#finally put some command buttons on to do the real work fButts = Frame(self)
self.bAnal = Button(fButts, text="Analyze",
command=self.AnalyzeEvent) self.bAnal.pack(side=LEFT, anchor=W, padx=50, pady=2) self.bReset = Button(fButts, text="Reset",
command=self.doReset) self.bReset.pack(side=LEFT, padx=10) self.bQuit = Button(fButts, text="Quit",
command=self.doQuitEvent) self.bQuit.pack(side=RIGHT, anchor=E, padx=50, pady=2)
fButts.pack(side=BOTTOM, fill=X) self.pack()
I'm not going to explain all of that, instead I recommend you take a look at the Tkinter tutorial found on the Python web site. This is an excellent introduction and reference to Tkinter. The general principle is that you create widgets from their corresponding classes, providing options as named parameters, then the widget is packed into its containing frame.
The other key points to note are the use of subsidiary Frame widgets to hold the Radiobuttons and Command buttons. The Radiobuttons also take a pair of options called variable & value, the former links the Radiobuttons together by specifying the same external variable (self.type) and the latter gives a unique value for each Radiobutton. Also notice the command=xxx options passed to the button controls. These are the methods that will be called by Tkinter when the button is pressed. The code for these comes next:
################# EVENT HANDLING METHODS ####################
# time to die...
def doQuitEvent(self): import sys sys.exit()
112
#restore default settings def doReset(self):
self.txtBox.delete(1.0, END) self.rText.select()
# set radio values def doText(self): self.type = 2
def doHTML(self): self.type = 1
These methods are all fairly trivial and hopefully by now are self explanatory. The final event handler is the one which does the analysis:
#Create appropriate document type and analyze it.
#then display the results in the form
def AnalyzeEvent(self): filename = self.eName.get() if filename == "":
self.txtBox.insert(END,"\nNo filename provided!\n") return
if self.type == 2:
doc = document.TextDocument(filename) else:
doc = document.HTMLDocument(filename) self.txtBox.insert(END, "\nAnalyzing...\n") doc.Analyze()
str = doc.format % (filename,
doc.c_paragraph, doc.c_line, doc.c_sentence, doc.c_clause, doc.c_words)
self.txtBox.insert(END, str)
Again you should be able to read this and see what it does. The key points are that:
•it checks for a valid filename before creating the Document object.
•It uses the self.type value set by the Radiobuttons to determine which type of Document to create.
•It appends (the END argument to insert) the results to the Text box which means we can analyze several times and compare results - one advantage of the text box versus the multiple label output approach.
All that's needed now is to create an instance of the Application object and set the event loop running, we do this here:
myApp = GrammarApp() myApp.mainloop()
Lets take a look at the final result as seen under MS Windows, displaying the results of analyzing a test HTML file, first in Text mode then in HTML mode:
113
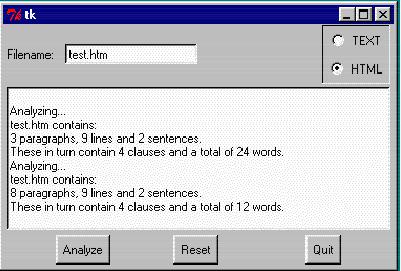
That's it. You can go on to make the HTML processing more sophisticated if you want to. You can create new modules for new document types. You can try swapping the text box for multiple labels packed into a frame. But for our purposes we're done. The next section offers some ideas of where to go next depending on your programming aspirations. The main thing is to enjoy it and allways remember: the computer is dumb!
114